Ikarus StellarMate Plus - Instructions
Preface | Introduction | Overview | Instructions | Preliminary Conclusions | Links | Appendix: Screenshots
Archive
On this page, I present simple instructions for using my new astrophotography computer Ikarus StellarMate Plus (ordered on October 21, from Astroshop, arrived on October 26, 2021). However, it should be noted that the StellarMate software is very much "in flux" and that the procedures described here may already be "obsolete".
Note: For simplicity reasons, I will often call the device just "StellarMate"...
See also:
- Ikarus StellarMate Plus - Information Archive
- Ikarus StellarMate Plus - First Experiences (Part 1: with Wi-Fi only) Archive
- Ikarus StellarMate Plus - First Experiences (Part 2: with USB Dongle) Archive
- Ikarus StellarMate Plus - Further Experiences Archive
- Ikarus StellarMate Plus - Web Discussions Archive
- Ikarus StellarMate Plus - Instructions Archive
- Ikarus StellarMate Plus - Tips and Tricks Archive
Note: At the beginning of June 2024, I gave my astrophotography computer Ikarus StellarMate Plus away. I therefore cannot report any further experiences with it here. |
Preface
What the StellarMate Plus from Ikarus Technologies is, and why and for what purpose I purchased it can be found on page Ikarus StellarMate Plus - Information. On this page, I present simple instructions for using it.
|
|
 |
Introduction
On this page, I collect simple instructions for working with the StellarMate Plus from version 1.6 on. In older versions, many things are different, other errors occur; so I can not report on it, because my device came with version 1.5.9. and was updated quickly to versions 1.6.0 and 1.6.1. In the meantime, the software arrived at 1.7.0.
Overview
- Prepare the Equipment for the Observation / Shutdown (Mount as Hotspot , StellarMate Connected via Wifi)
- Prepare the Equipment for the Observation / Shutdown (StellarMate as Hotspot, Mount Connected to StellarMate via Wifi)
- Prepare the Equipment for the Observation / Shutdown (StellarMate as Hotspot, Mount Connected to StellarMate via Cable)
- Connect StellarMate with another Hotspot or with the Home Network (Infrastructure Mode)
- Update the StellarMate OS Software
- Update the StellarMate App (iOS)
- Connect the AZ-GTi Mount via Cable with the StellarMate
- Move Photos from the StellarMate to the Apple Macintosh
Instructions
Prepare the Equipment for the Observation / Shutdown (Mount as Hotspot, StellarMate Connected via Wifi)
First, the equipment (mount, tube, camera, power supply) is set up and connected with cables (power supplies, USB cable between StellarMate and the camer). Then the mount and the StellarMate have to be started as follows:
- Level the telescope tube and point it roughly to the North, then switch on the mount.
- Switch on the smartphone/tablet and check whether the mount's network is running (e.g. operate the direction keys via the SynScan app).
- Switch on the StellarMate.
- Start the StellarMate app on the smartphone/tablet > Go to the "Setup" tab and wait until the connection has been established.
- Select and start the appropriate equipment profile.
If necessary, check the mount settings in the "Port Selector".
If necessary, go to the "Device" tab and check, whether the correct network (that of the mount) has been selected. - Switch to the "Ekos" tab to get a rough overview whether everything
is OK...
If necessary, do further settings. - In the "Ekos" tab: take test photos; if necessary, start the Loop mode for focussing the telescope.
- Switch to the "Targets" tab and select and access a
target (press "Go
and Solve").
Alternatively, stay on the "Ekos" tab, call the mount quick control and press the "Goto/Sync" button for selecting and accessing a target. - In the "Ekos" tab: take photos or start live stacking.
- Save your photos as appropriate (see Tips and Tricks).
- ---
- Go to the "Device" tab and shut down the StellarMate ("Shutdown" button).
- Remove the power cable from the StellarMate (it does not have an on/off switch).
- Turn off the mount and its power supply.
Prepare the Equipment for the Observation / Shutdown (StellarMate as Hotspot, Mount Connected to StellarMate via Wifi)
First, the equipment (mount, tube, camera, power supply) is set up and connected with cables (power supplies, USB cable between the StellarMate and the camera). Then the StellarMate and the mount have to be started as follows:
- Switch on the StellarMate.
- Switch on the smartphone/tablet and connect it to the StellarMate network.
- Level the telescope tube and point it roughly to the North, then switch on the mount.
- Start the StellarMate app on the smartphone/tablet > Go to the "Setup" tab and wait, until the connection has been established.
- Select and start the appropriate equipment profile.
- Switch to the "Ekos" tab to get a rough overview whether everything
is OK...
If necessary, do further settings. - In the "Ekos" tab: take test photos; if necessary, start the Loop mode for focussing the telescope.
- Switch to the "Targets" tab and select and access a
target (press "Go and Solve").
Alternatively, stay on the "Ekos" tab, call the mount quick control and press the "Goto/Sync" button for selecting and accessing a target. - In the "Ekos" tab: take photos or start live stacking.
- Save your photos as appropriate (see Tips and Tricks).
- ---
- Turn off the mount and its power supply.
- Go to the "Device" tab and shut down the StellarMate ("Shutdown" button).
- Remove the power cable from the StellarMate (it does not have an on/off switch).
Prepare the Equipment for the Observation / Shutdown (StellarMate as Hotspot, Mount Connected to StellarMate via Cable)
First, the equipment (mount, tube, camera, power supply) is set up and connected with cables (power supplies, USB cable between the StellarMate and the camera, USB dongle and USB printer cable between the mount and the StellarMate). Then the StellarMate and the mount have to be started as follows:
- Switch on the StellarMate.
- Switch on the smartphone/tablet and connect it to the StellarMate network.
- Level the telescope tube and point it roughly to the North, then switch on the mount and check, whether the mount is connected to the StellarMate network (e.g. operate the direction keys via the SynScan app).
- Start the StellarMate app on the smartphone/tablet > Go to the "Setup" tab and wait, until the connection has been established.
- Select and start the appropriate equipment profile.
If necessary, check the mount's connection settings in the "Port Selector".
If necessary, go to the "Device" tab and check, whether the correct network (StellarMate) has been selected. - Switch to the "Ekos" tab to get a rough overview whether everything is OK...
If necessary, do further settings. - In the "Ekos" tab: take test photos; if necessary, start the Loop mode for focussing the telescope.
- Switch to the "Targets" tab and select and access a target (press "Go and Solve").
Alternatively, stay on the "Ekos" tab, call the mount quick control and press the "Goto/Sync" button for selecting and accessing a target. - In the "Ekos" tab: take photos or start live stacking.
- Save your photos as appropriate (see Tips and Tricks).
- ---
- Turn off the mount and its power supply.
- Go to the "Device" tab and shut down the StellarMate ("Shutdown" button).
- Remove the power cable from the StellarMate (it does not have an on/off switch).
Connect StellarMate with another Hotspot or with the Home Network (Infrastructure Mode)
Purpose
- Other device: The mount as the hotspot (this is also how it is described in the StellarMate manual).
- Home network: Primarily for updating the StellarMate software
Instructions
- Turn on the device that is meant to serve as the hotspot (in my
case, the mount,
namely the AZGTi),
connect your smartphone or tablet to the respective network (in my case called "synscan_xxxx").
I also check with the Synscan (Pro) app, whether the mount is accessible (just using the direction buttons).
Home network (infrastructure mode): Since the home network is always active, you can skip this step! - Turn on the StellarMate, which starts its own network called "stellarmate" (wait for about a minute).
- Connect the smartphone/tablet to the StellarMate network.
- Open the StellarMate app and wait in the "Setup" tab, until the connection has been established.
- Switch to the "Device" tab. On the "Status" screen, click the orange cog wheel icon next to the network data (at the top right).
- In the upcoming dialog, select another
network (field SSID) and click "Connect".
Then you are prompted to join (Join Wifi Network) or cancel the selected network. - Finally, the StellarMate should shut down its own hotspot and connect to the selected network (for example "synscan_xxxx").
- Connect the smartphone/tablet to the selected network.
- In the StellarMate app, go to the "Setup" tab and wait,
until the StellarMate is connected to the selected network (that this
may take some time...)
You may want to check the success in the "Device" tab...
Notes:
- StellarMate usually remembers after shutdown that it was connected to another network and takes this into account when restarting. If this is not the case, you will need to perform the above steps again (which goes fairly fast...).
- If you are using a configuration with another hotspot, e.g. a mount, you must first turn on the corresponding device and then StellarMate. Otherwise, StellarMate will fall back into hotspot mode! This does not apply to the home network (infrastructure mode), which is always active.
- The switch back to the hotspot mode works analogously. Here, the button "Forget WiFi" has to be chosen.
Update the StellarMate OS Software
The StellarMate OS software runs on the StellarMate astronomy computer.
- Connect the StellarMate to the home network (see here), then connect the smartphone/tablet to the home network.
- Once the StellarMate is connected to the home network, run the StellarMate-App one the smartphone/tablet, and go to the "Device" tab.
- In the software section under "Updates", press the button to check for updates.
- If OS updates are available, start the update; then restart the StellarMate.
- Put the StellarMate back into hotspot mode or connect it to the mount's network (see Tips and Tricks). If there is no other network available, the StellarMate automatically switches to the hotspot mode.
Notes:
- The update can also be performed via a computer instead of the StellarMate app. For this, it must also be connected to the home network and to the StellarMate via noVNC (stellarmate.local:6080) . For the update, run the Software Updater (this is self-explanatory...).
- If the update fails, repeat it.
Update the StellarMate App (iOS)
- Download or update the StellarMate pp in the Apple App Store. Search for "stellarmate".
Note:
- Sometimes, there is a newer app state available, but you may not be able to download it from the Apple App Store (typically, the version number did not change in that case). In such a case, do the following:
- Delete the existing version of the app and download a newer version (maybe, the "cloud" symbol is shown). When starting the new version, you will have to sign in to your StellarMate account again. Check in the app (tab "About"), whether it has a new "Bundle" number.
Connect the AZ-GTi Mount via Cable with the StellarMate
After several posters in a Cloudy Nights discussion had written that they use a Sky-Watcher USB dongle (pus USB printer cable) instead of the WiFi to connect the StellarMate to the mount and that this would have significantly increased the stability of the system, I bought such a dongle in December 2021. In addition, a Sky-Watcher employee had recommended this dongle in a YouTube video covering the AZ-GTi mount (including for software updates).
On January 8, 2022, I finally found the time to try out the USB dongle during the day with a test setup. First, I wanted to run the AZ-GTi mount wirelessly to have a comparison, but that failed because the mount did not accept StellarMate as a hotspot (probably my mistake...). I then tried the USB dongle, which I connected to the StellarMate via a USB printer cable. To use this setup, I had to create a new device profile that entailed the "SkyWatcher ALT/AZ" entry instead of the AZ-GTi mount (I still need to look up the exact names...). Overall, the StellarMate now worked fine with my mount and camera in this dry run, but the "proof of the pudding" at night was still pending...
I also tried the Sky-Watcher Star Discovery mount with the StellarMate once more, this time connected via the USB dongle and using the same profile as for the AZ-GTi mount. And lo and behold, while the Star Discovery mount showed a somewhat strange behavior when connected via Wi-Fi (and thus was not usable...), it now worked without any problems. According to my first impressions, it worked even better, because it did not overshoot, as the AZ-GTi did and still does.
All in all, the dongle test proved to be successful in my first "dry run". So the question remained, how well the plate solving and GoTo would work at night. I have already had very mixed experiences with this...
Move Photos from the StellarMate to the Apple Macintosh
Not: On page "Tips and Tricks" there is a more thorough instruction.
I did not find an easy way for moving photos from the StellarMate to my Apple Macintosh computer and therefore consulted the StellarMate FAQ. On Linux and MacOS, the FAQ recommends using FileZilla (Pro) to connect to StellarMate via Secure FTP (sftp) using the username stellarmate and the password smate (provided, you did not change them...). The port has to be set to 5624.
You can set this in the server manager/site manager (please excuse the screens in German ...):
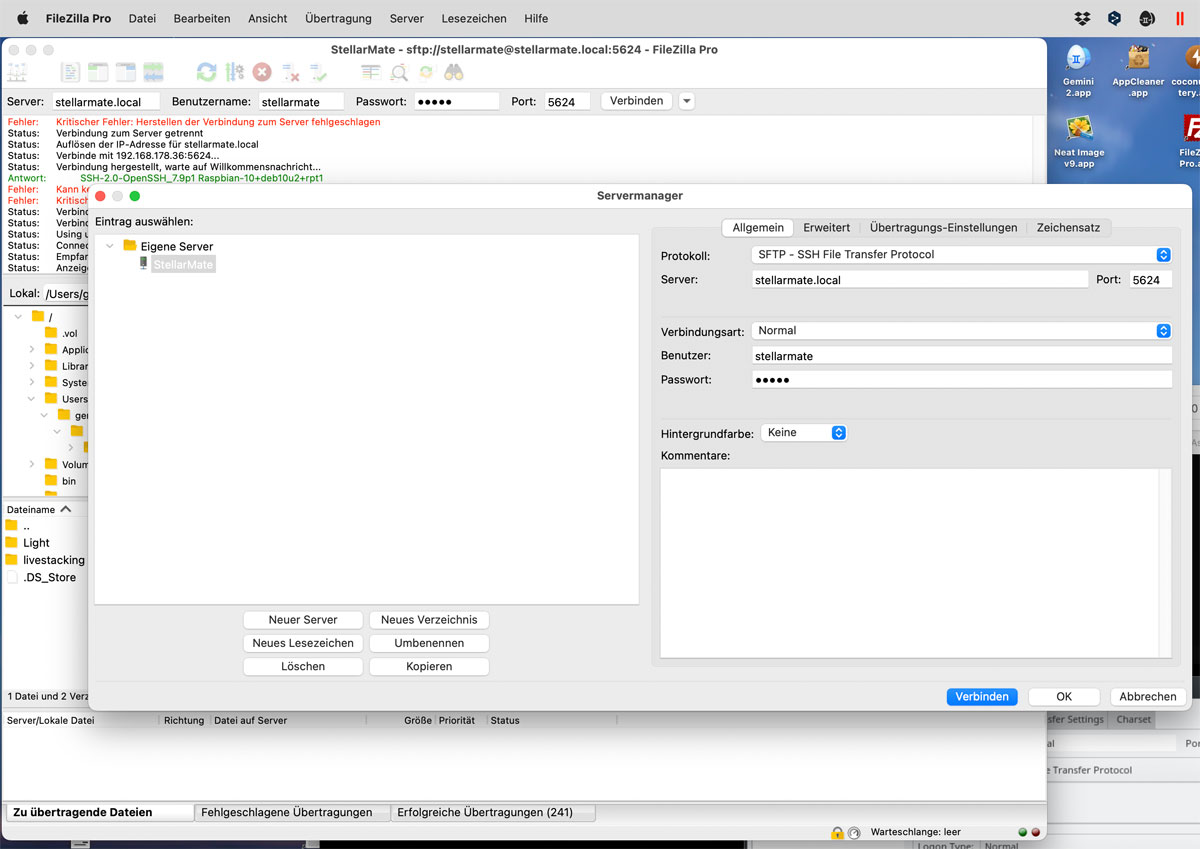

You can also enter this data at the top of the application window (note that the protocol type precedes the server name):
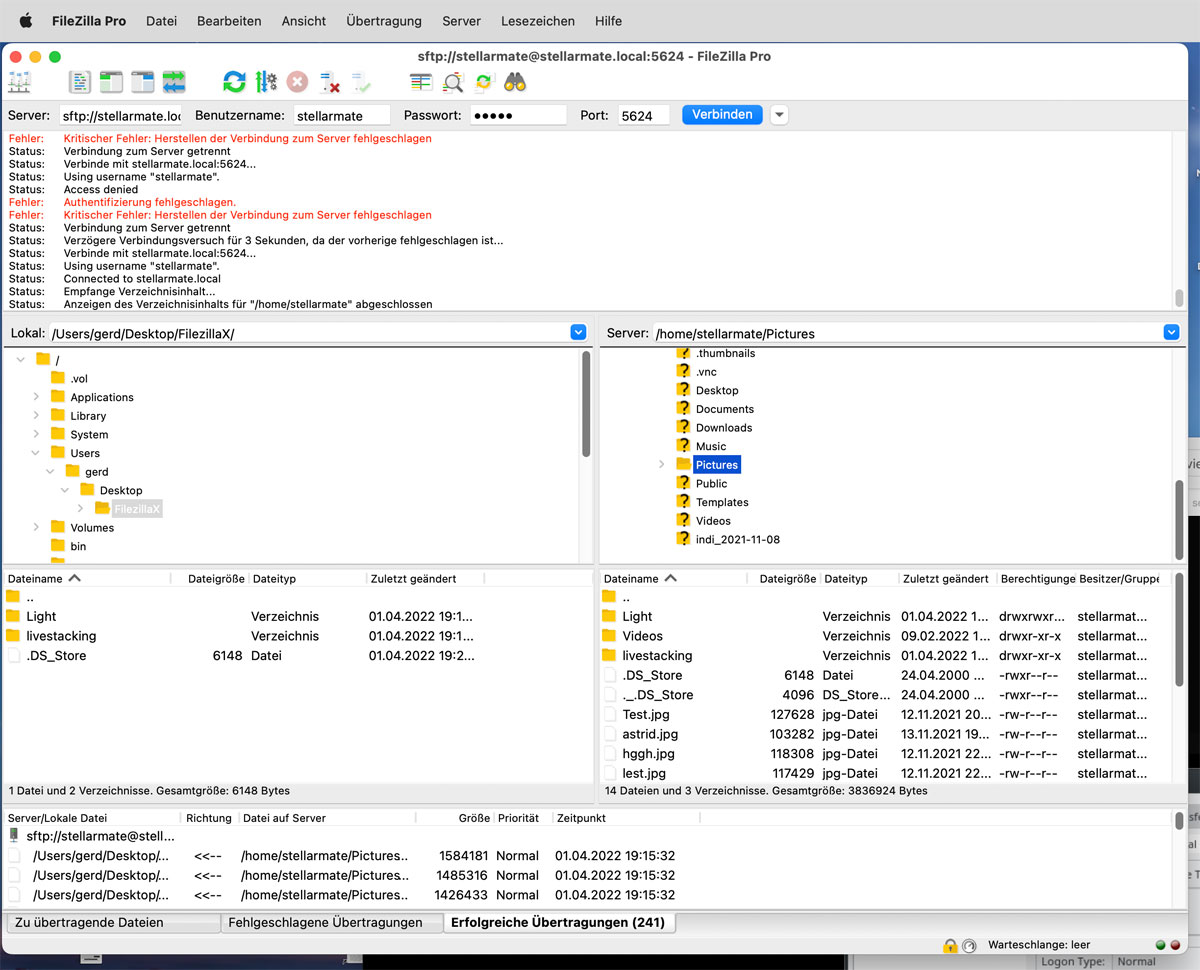
On my Apple Macintosh, I created a folder "FilezillaX" where the data from the StellarMate is stored after a file transfer. All in all, this is not as easy as I would have liked it to be, but it works for me.
Preliminary Conclusions
My preliminary conclusion is that the StellarMate ... made me give up and give it away!
Note: At the beginning of June 2024, I gave my astrophotography computer Ikarus StellarMate Plus away. I therefore cannot report any further experiences with it here. |
Links
- Ikarus Technologies, StellarMate: www.stellarmate.com
- StellarMate Manual: www.stellarmate.com/help
- Ikarus Technologies StellarMate PLUS Astrophotography Controller (astroshop.eu): www.astroshop.eu/controls/ikarus-technologies-stellarmate-plus-astrophotography-controller/p,68093
- HOWTO: Make a POWERFUL smart TELESCOPE! Better than much bigger telescopes! (Cuiv the Lazy Geek): youtu.be/0JdtL950RjQ
- Discussion in Cloudy Nights (CN), which Cuiv started to create attention to his video: www.cloudynights.com/topic/794637-a-beginner-friendly-smart-eaa-setup/?p=11441505
- See also my page offering Astronomy Links.
Appendix: Screenshots
Overview
noVNC
- Connect to Stellarmate via noVNC on the Laptop; StellarMate Desktop, KStars, Software Updater
- Save Photos with the KStars FITS Viewer
- Ekos
StellarMate App
Connect to Stellarmate via noVNC on the Laptop; StellarMate Desktop, KStars, Software Updater
Note: First you have connect your laptop/computer to the same hotspot that the StellarMate is connected to. Currently, I use the StellarMate as hotspot (not the mount, not the home network).
To be able to connect your laptop/computer to the StellarMate, you have to enter "stellarmate.local:6080" in the web browser. The noVNC screen appears:
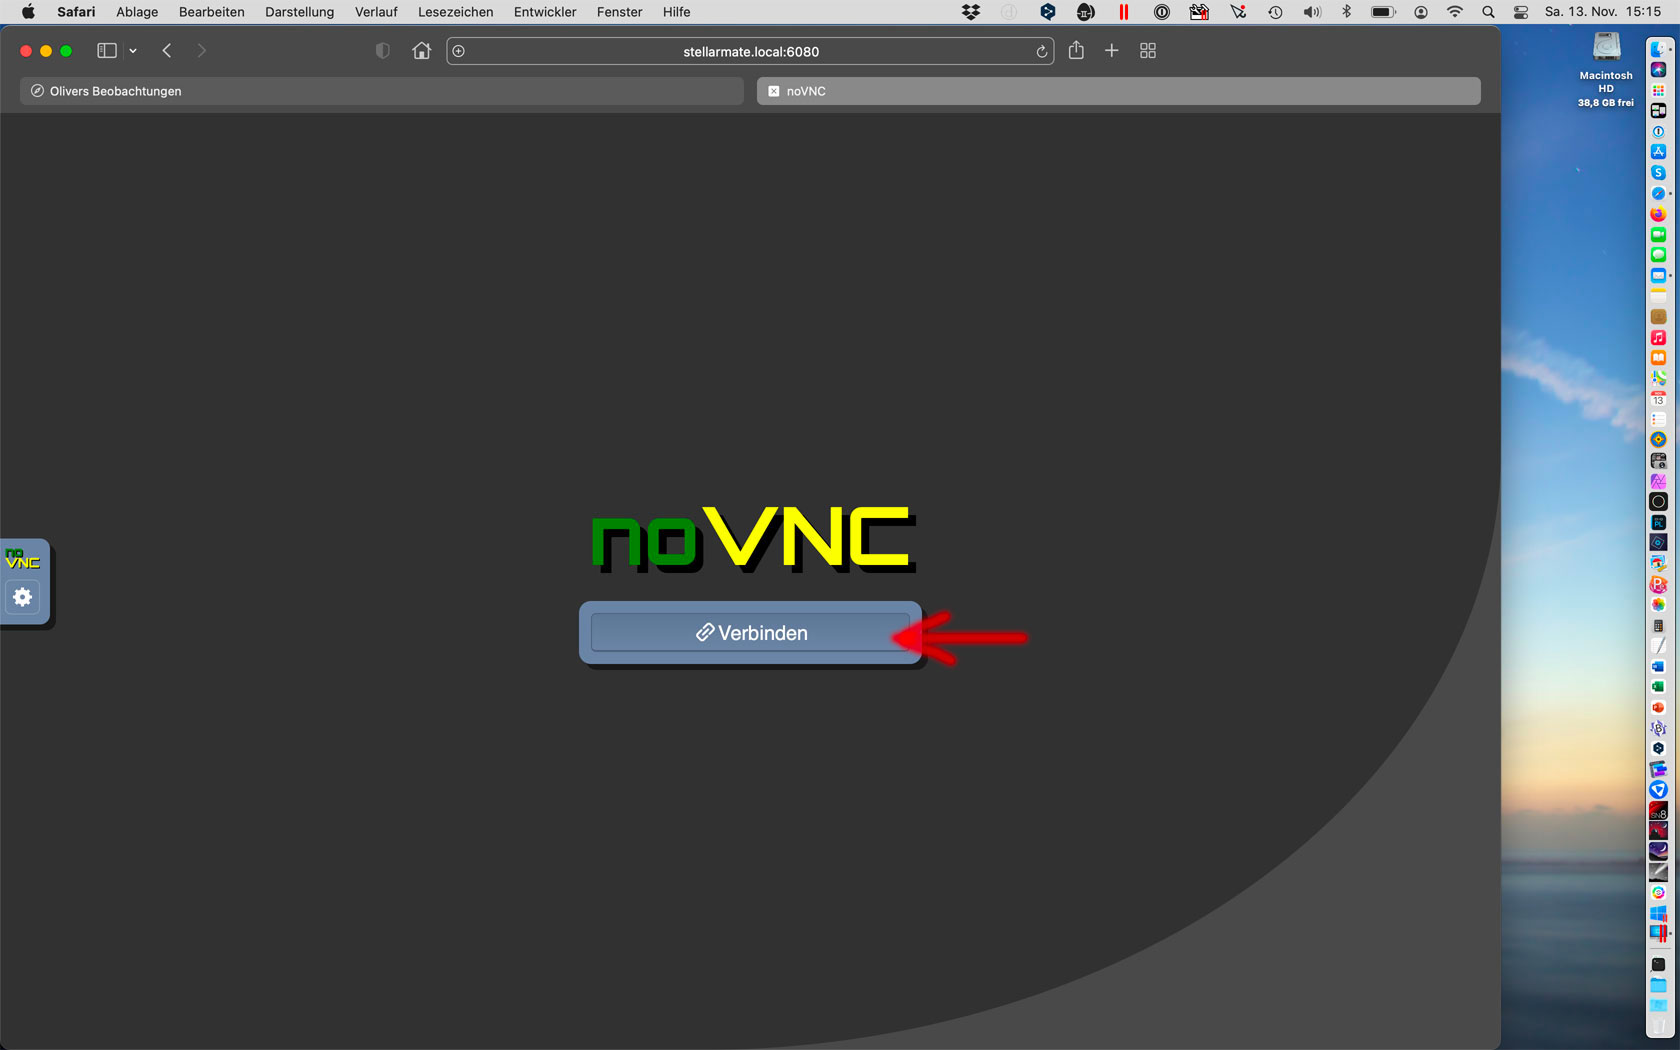
After clicking the "Connect" button, a prompt will appear where you have to enter the password "smate":
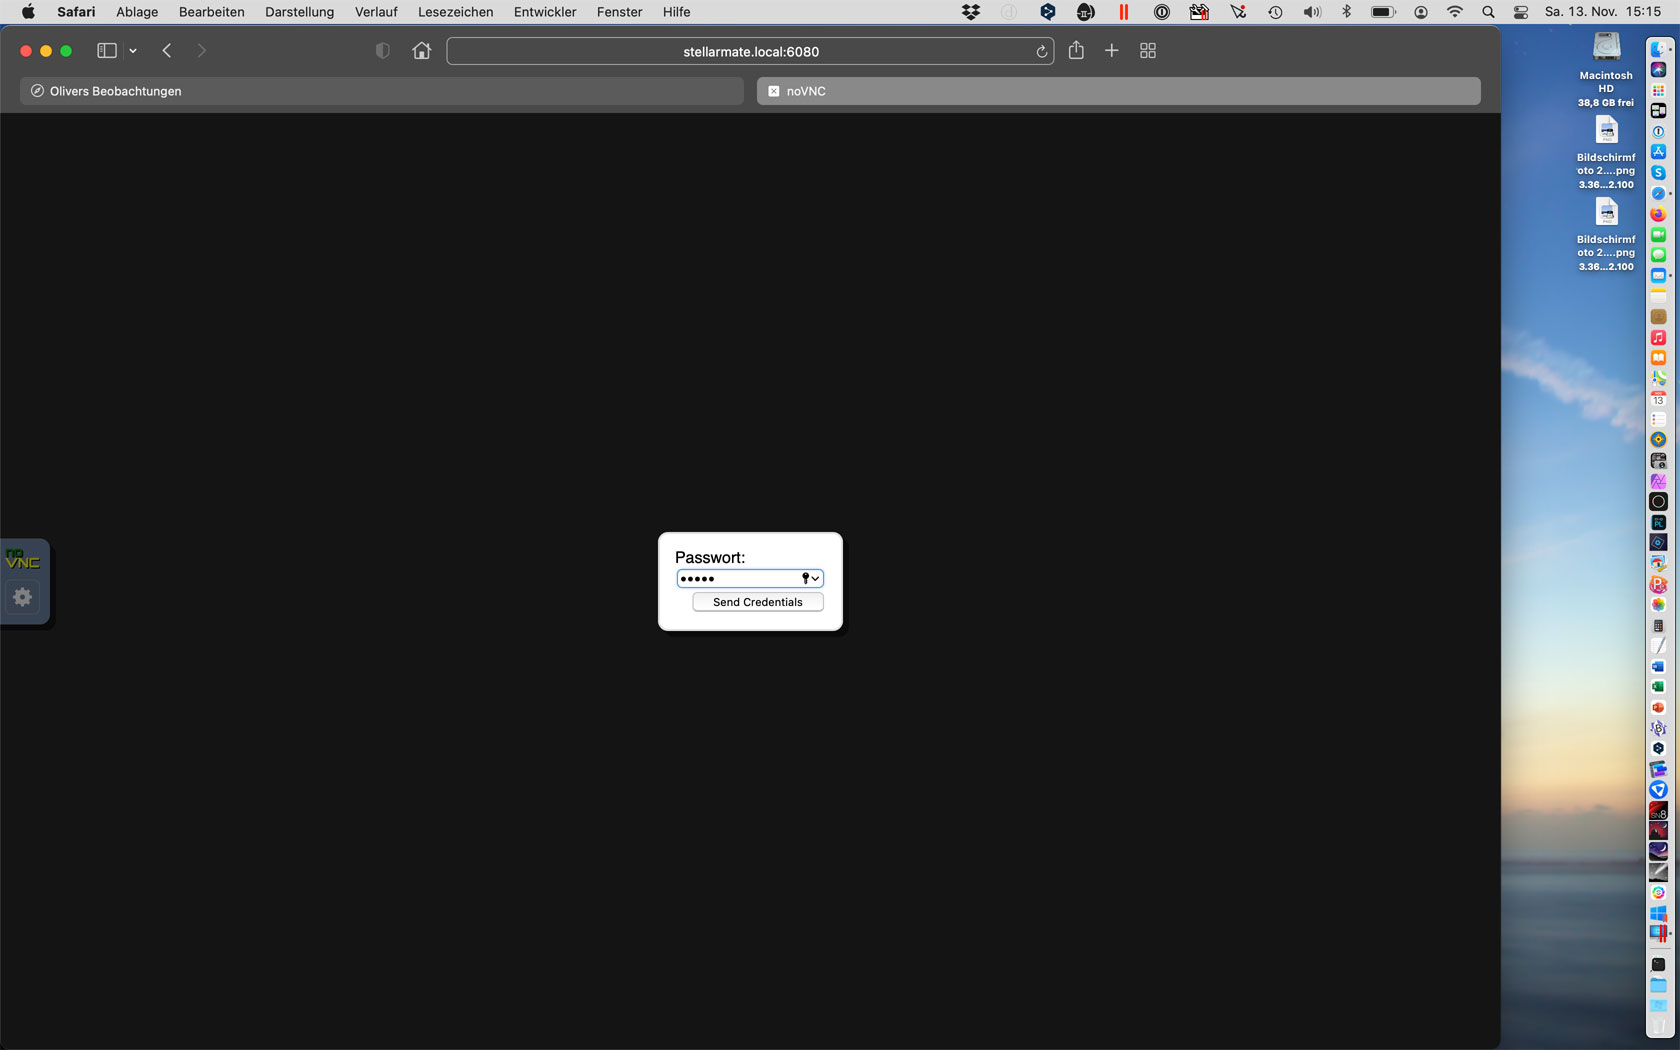
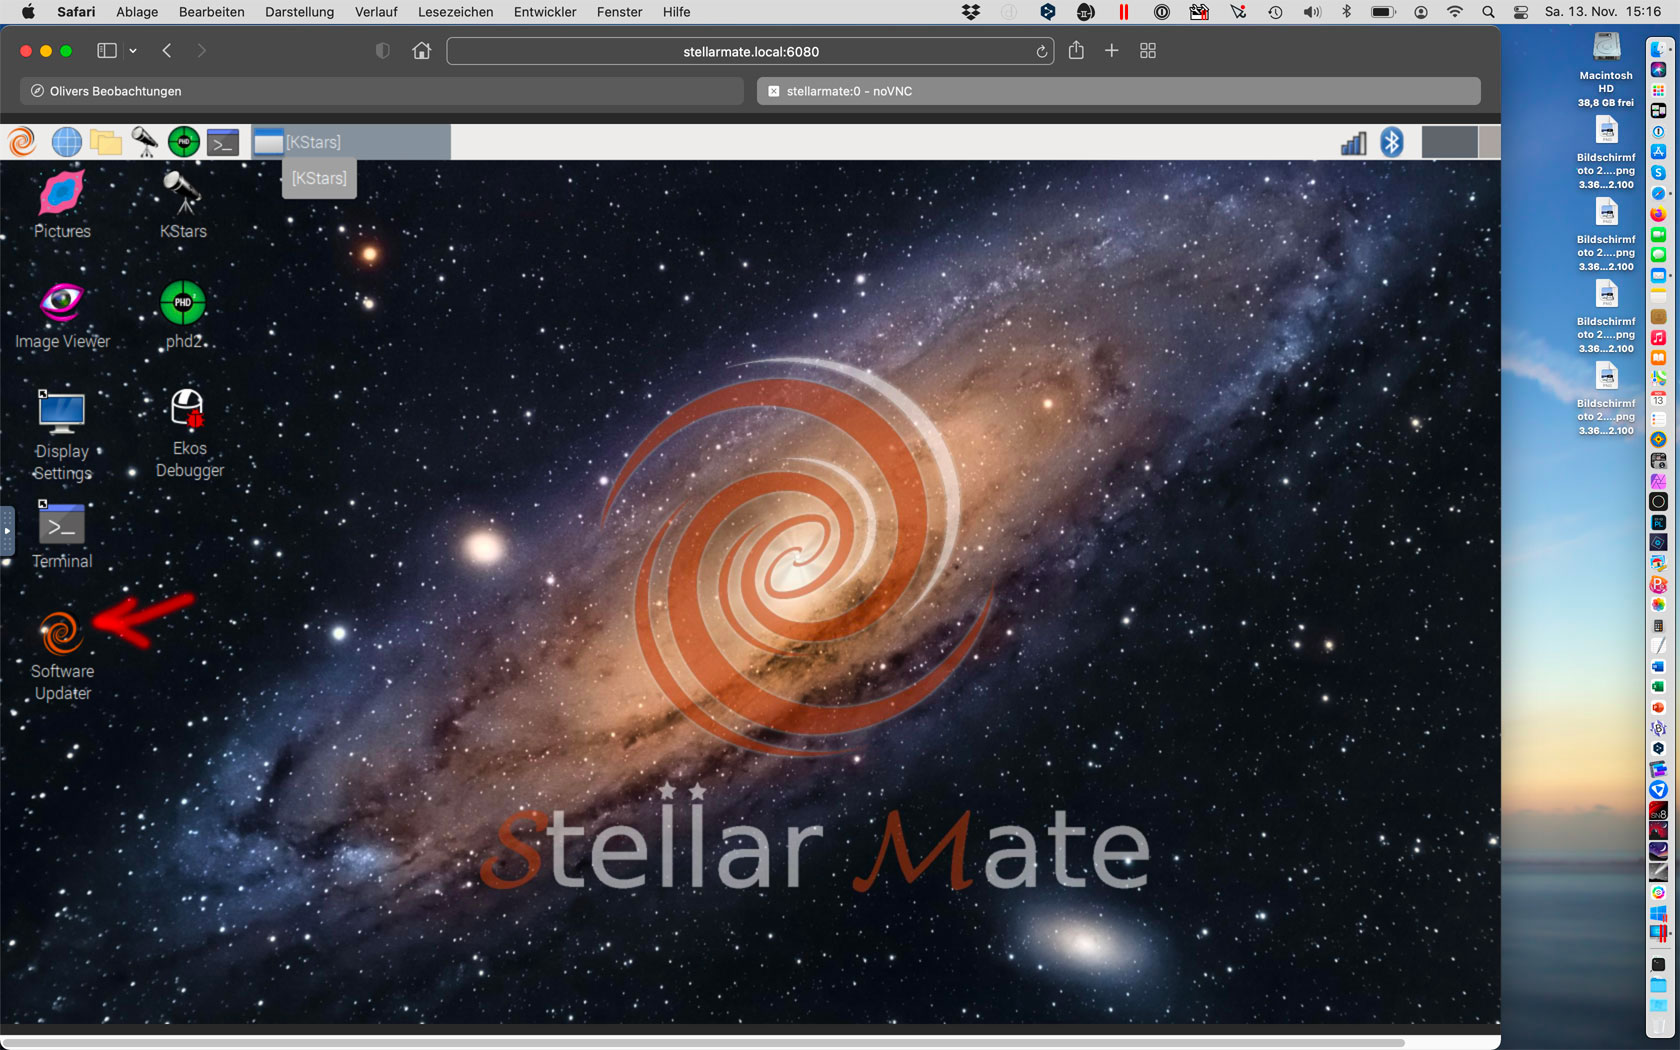
After that, the KStars application starts automatically, covering the desktop:
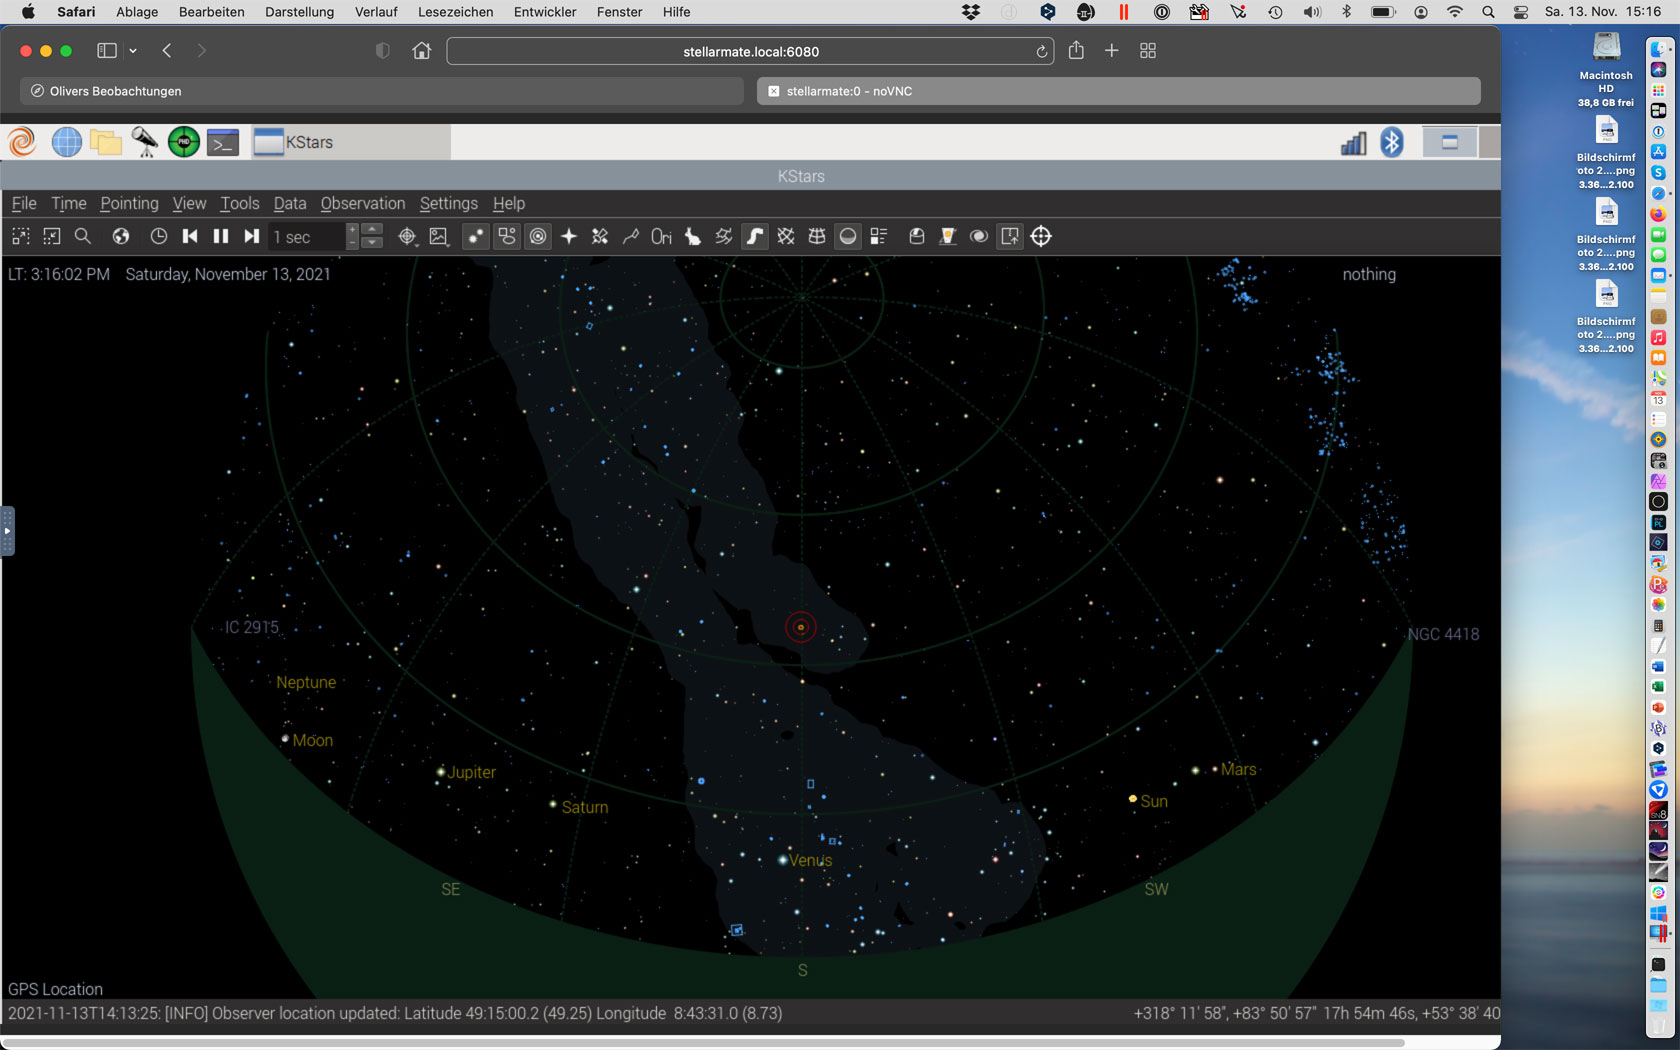
If you click in the KStars tab, the KStars window disappears and you see the desktop. In the middle of the left edge, there is the "Software Updater" icon (StellarMate OS only):
If you double-click it, the "StellarMate Tools" window appears on the desktop:
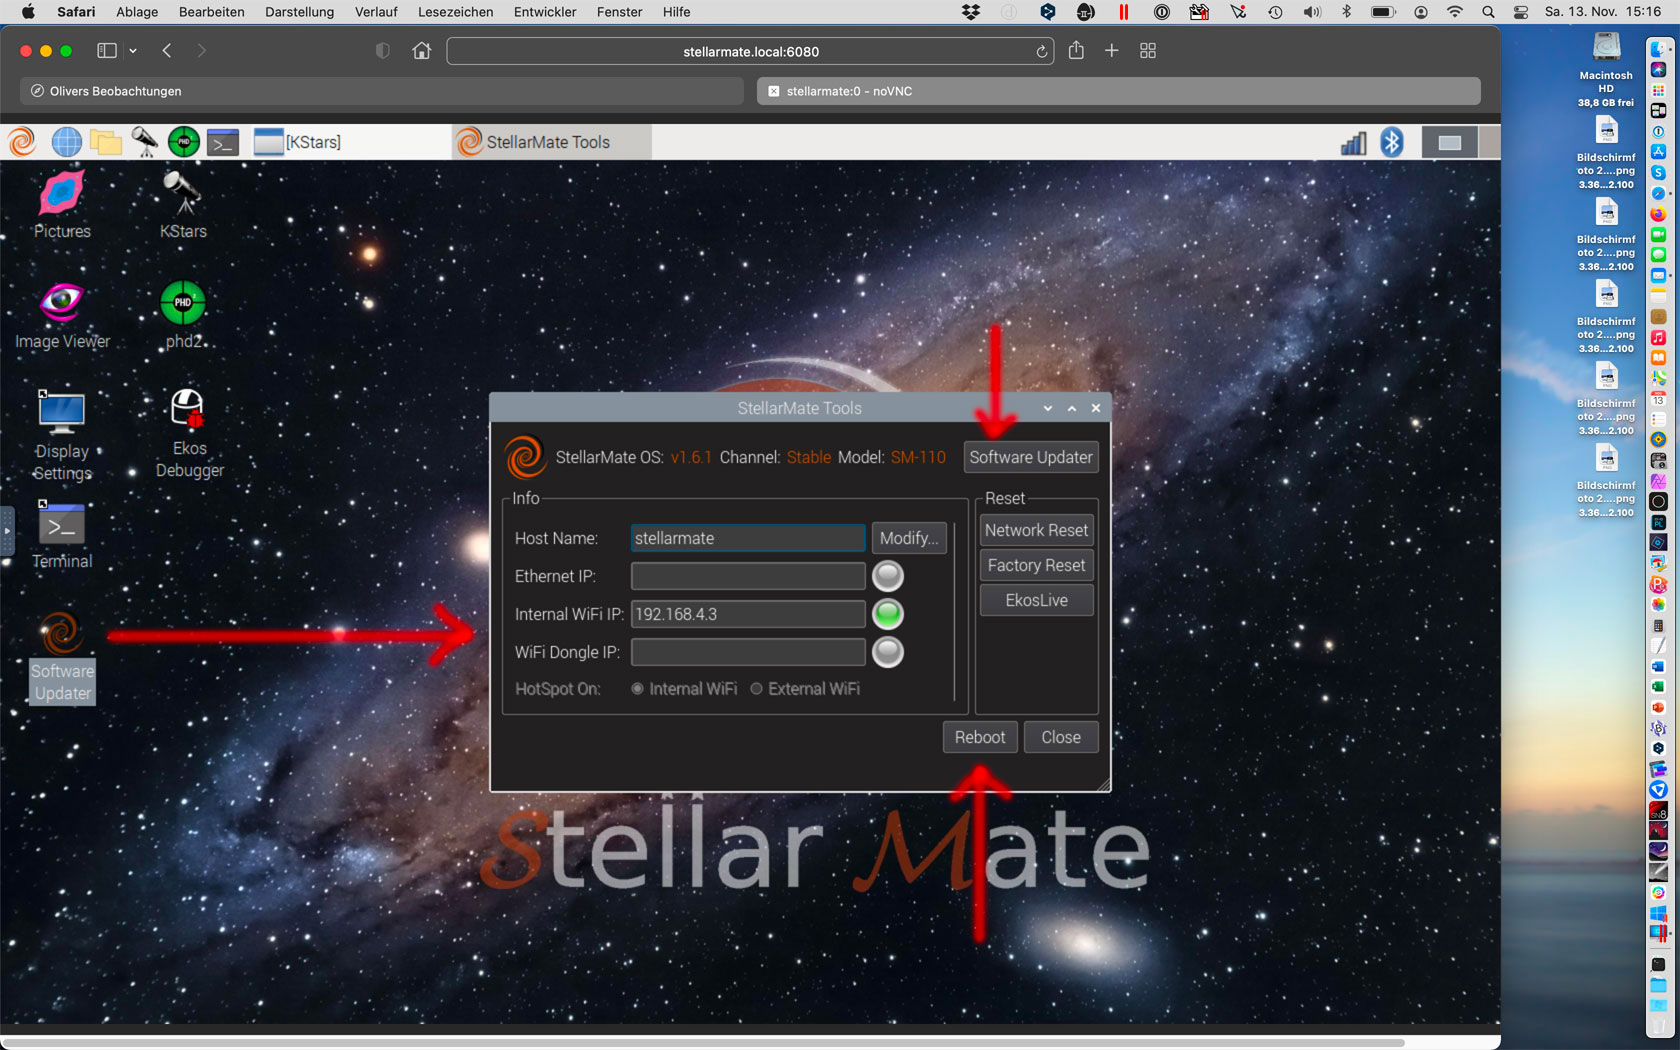
The "Software Updater" button is used to check, whether the StellarMate OS can be updated; if so, you will be prompted to start the update. For this, the StellarMate must be connected to the Internet (typically via the home network).
In addition, the StellarMate computer can be restarted from this dialog. This is necessary, for example, after a successful software update.
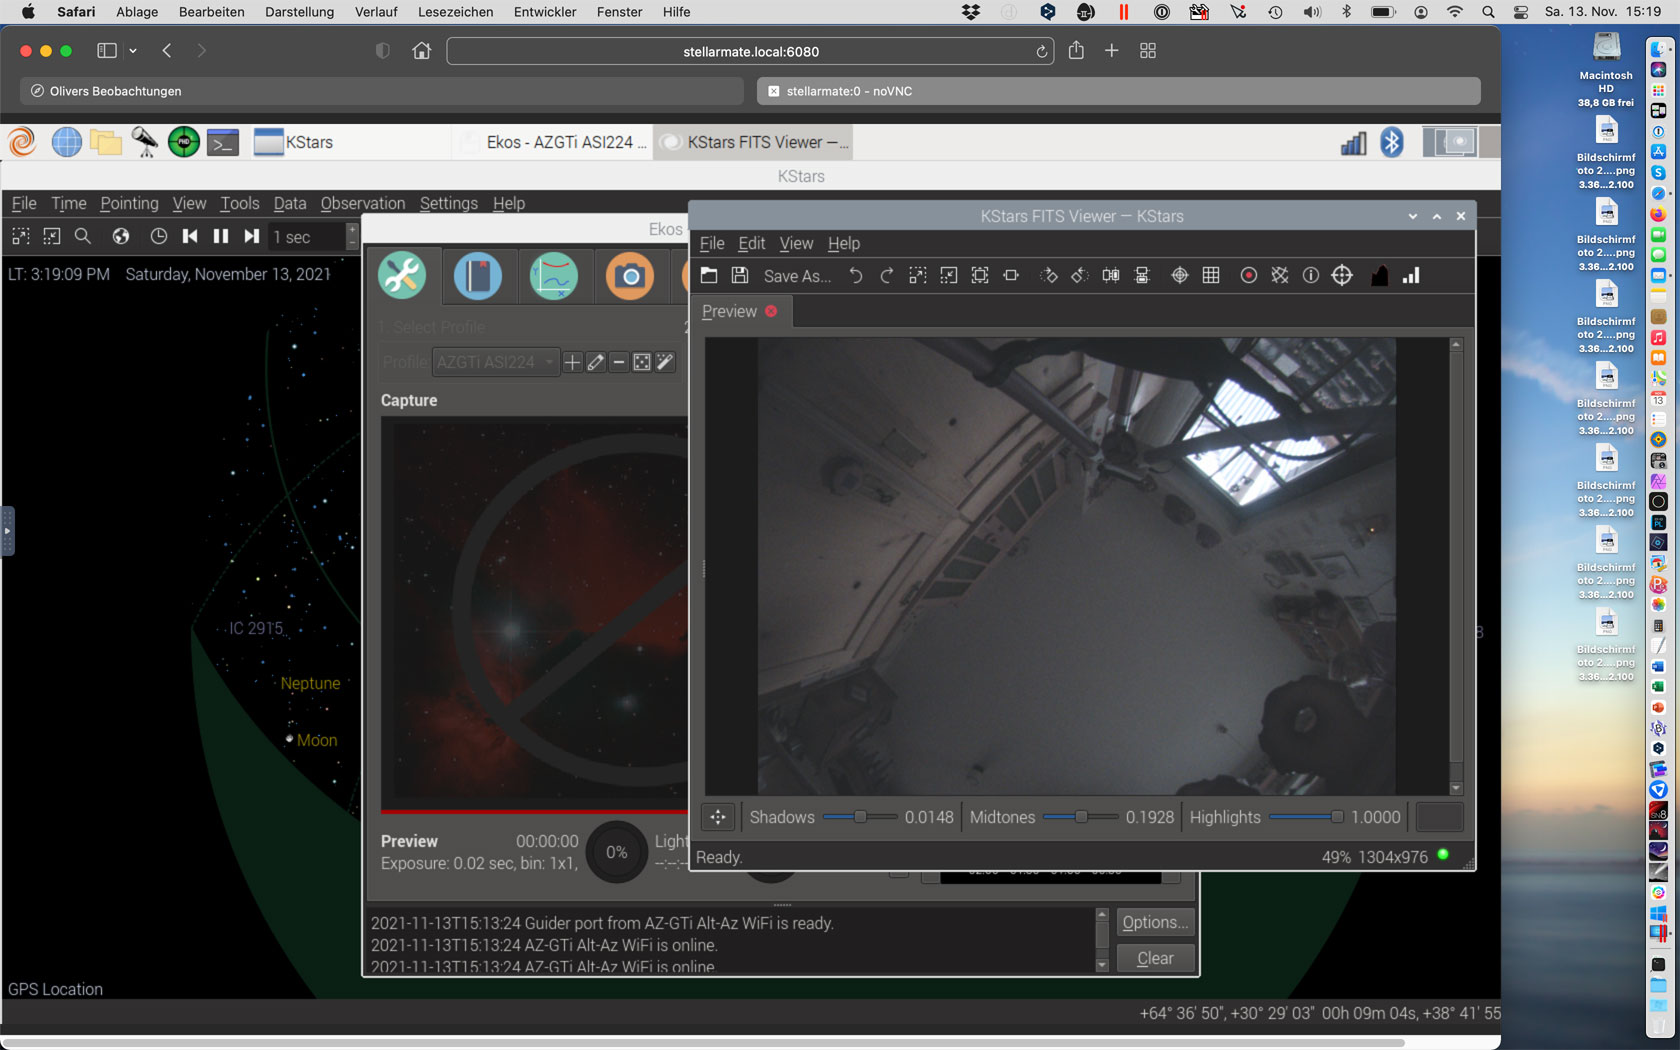
Save Photos with the KStars FITS Viewer
Note: See Saving Photos (Captures) and Live Stack Photos (Captures) with a Trick for more details
Background: So far I have not found a way to save photos (captures) from within the app! The app, however, saves live stacks in this folder: home > stellarmate > Pictures > livestacking.
Connect to Stellarmate via noVNC on your computer/laptop (for details see above), KStars starts automatically:
As soon as I take a photo (capture) on my iPad using the app, the photo also appears in the KStars FITS Viewer on the computer/laptop (the window remains open):
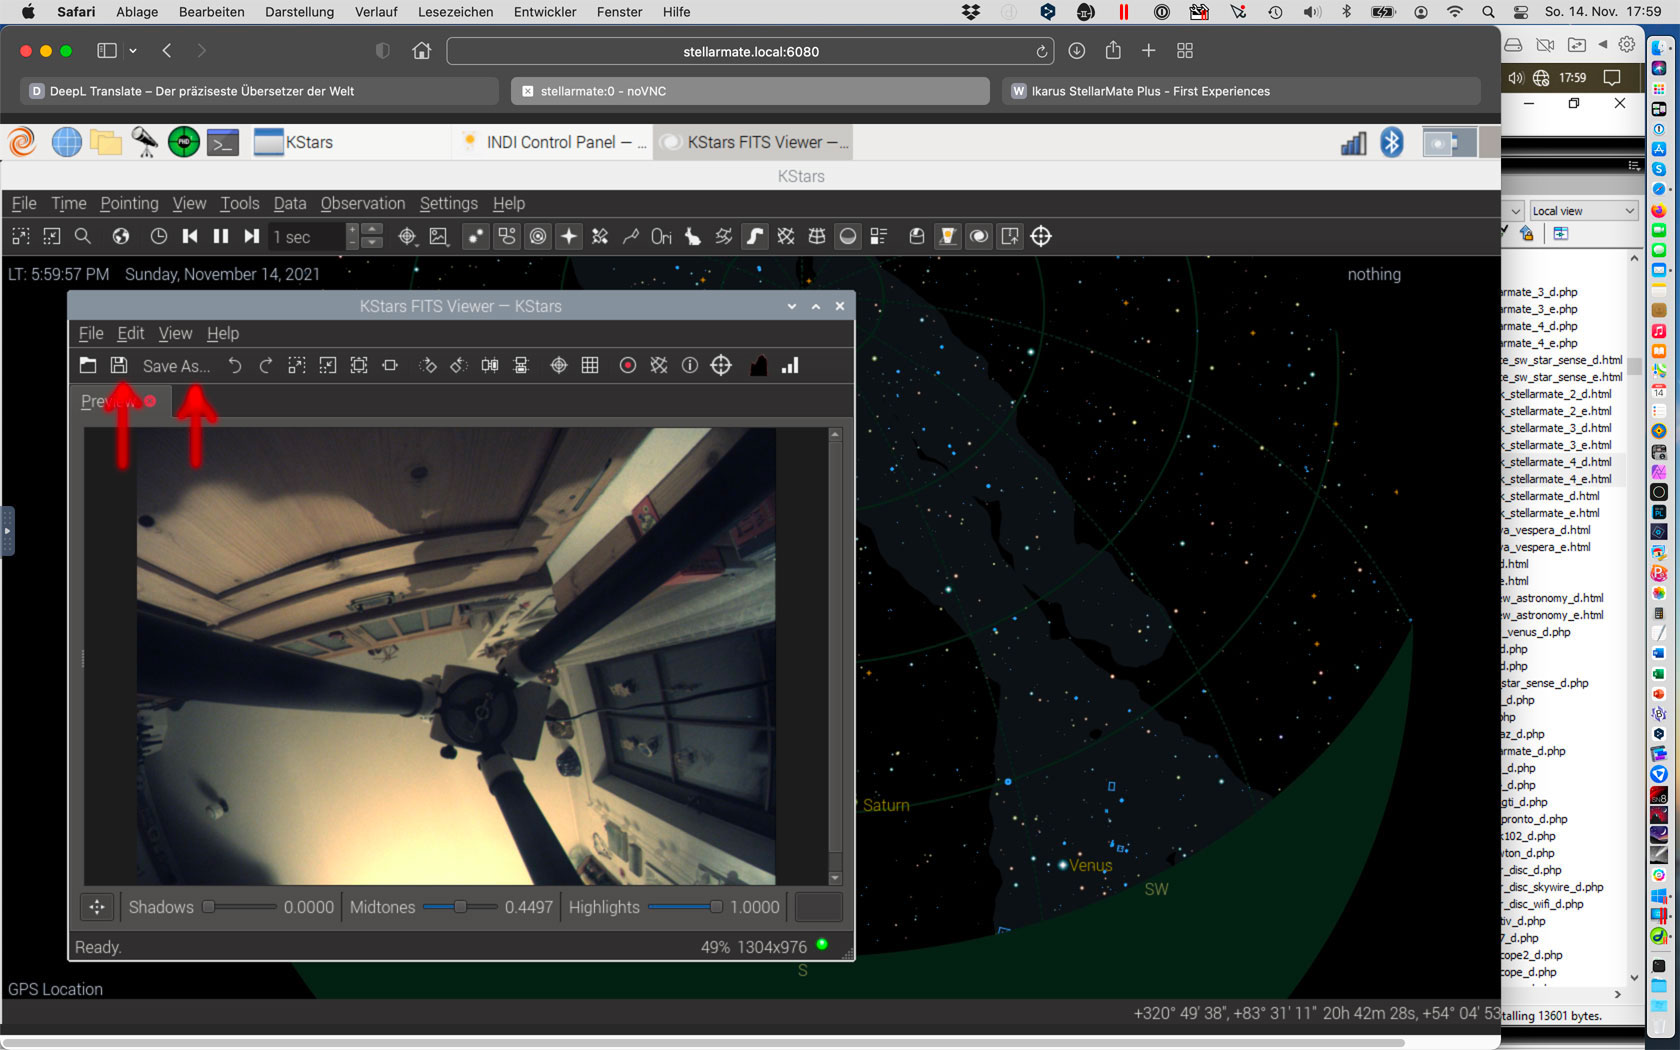
I can save the photo on the StellarMate using either the floppy disk symbol or the "Save As..." button in the Viewer window. A "Save" dialog appears:
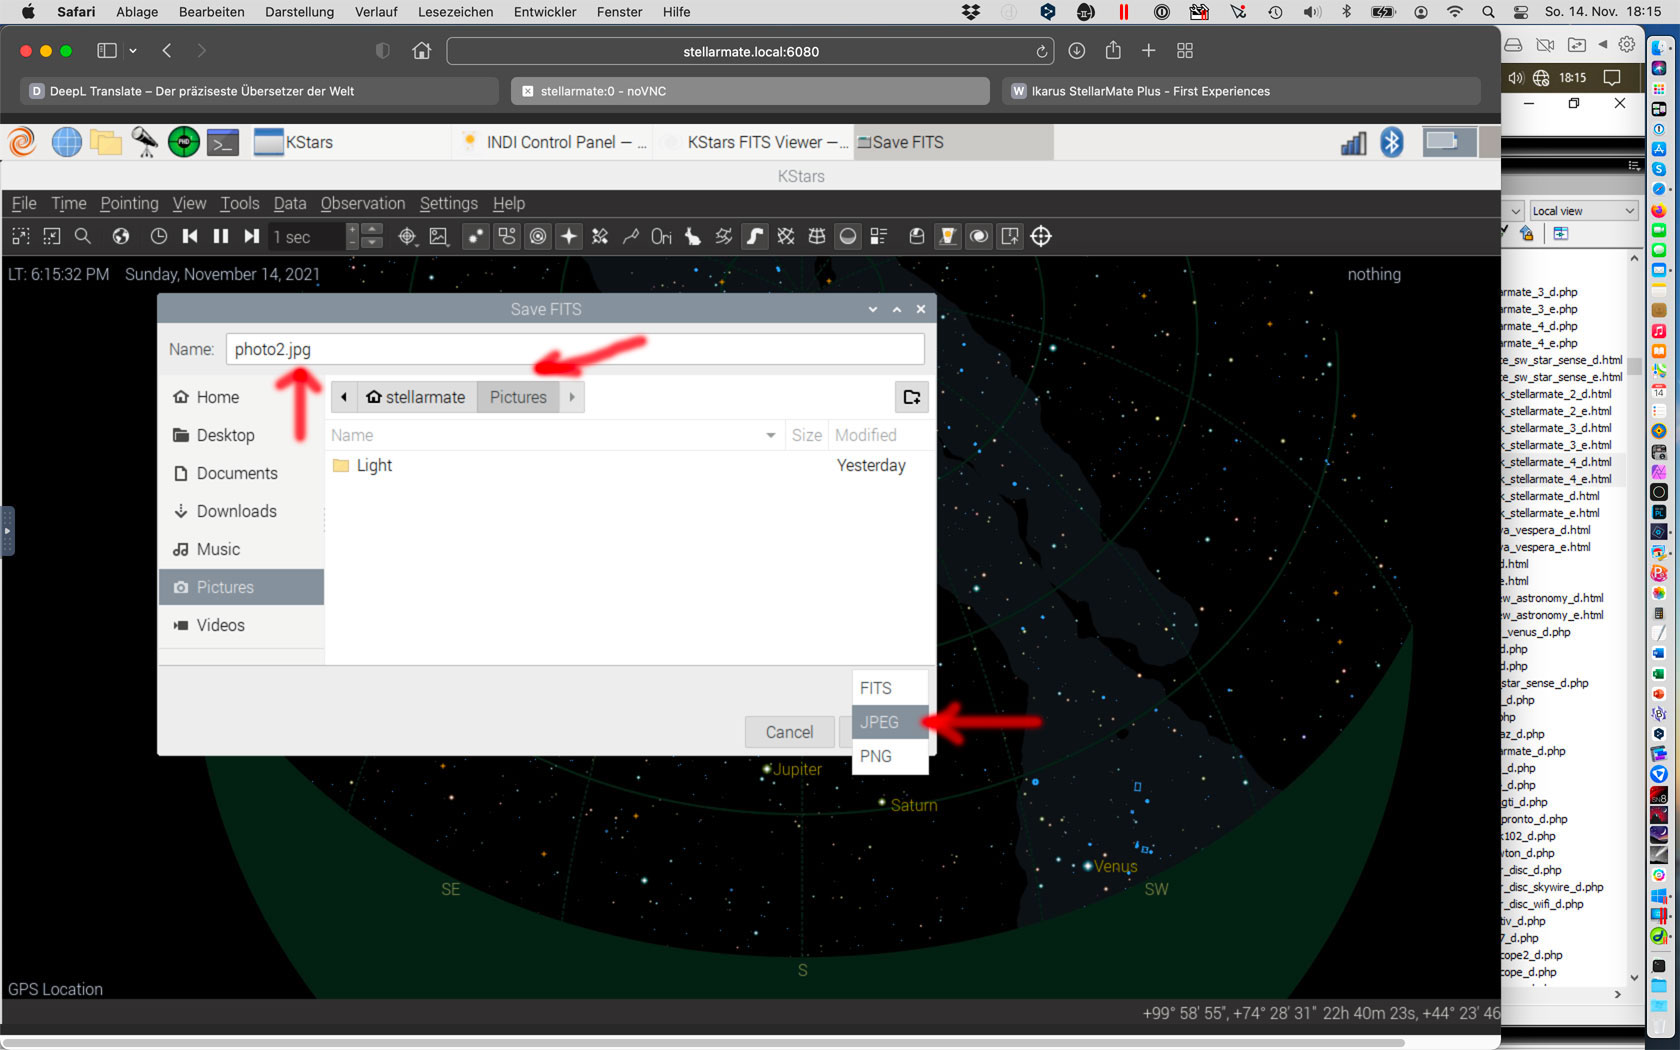
It should be noted that the photo will always be saved in FITS format, no matter what is set in the drop-down list for the saving format, if you do not specify a file extension. If you specify an extension, it takes precedence over the selection in the list. Clearly a programming error! Basically, the photos should be saved in the "Pictures" directory (home > stellarmate > Pictures), but you can save them where you want (StellarMate saves them there by default).
The window will remain active and will be updated after each further photo, so you can save further photos in the same way.
Note: See Move Photos from the StellarMate to the Apple Macintosh to learn how to get at the photos!
Ekos
On the following screenshot, I started the control application Ekos:

But I do not use Ekos on my computer/laptop - I use it via the app. Nevertheless, it can, for example, be quite useful to check certain data/settings that may not be availabe in the app. Here is the INDI Control Panel, which can be called from KStars:

As soon as I take a photo (capture) on my iPad using the app, the photo also appears in the KStars FITS Viewer on the computer/laptop (the window remains open), here together with Ekos:
How to save photos is explained above...
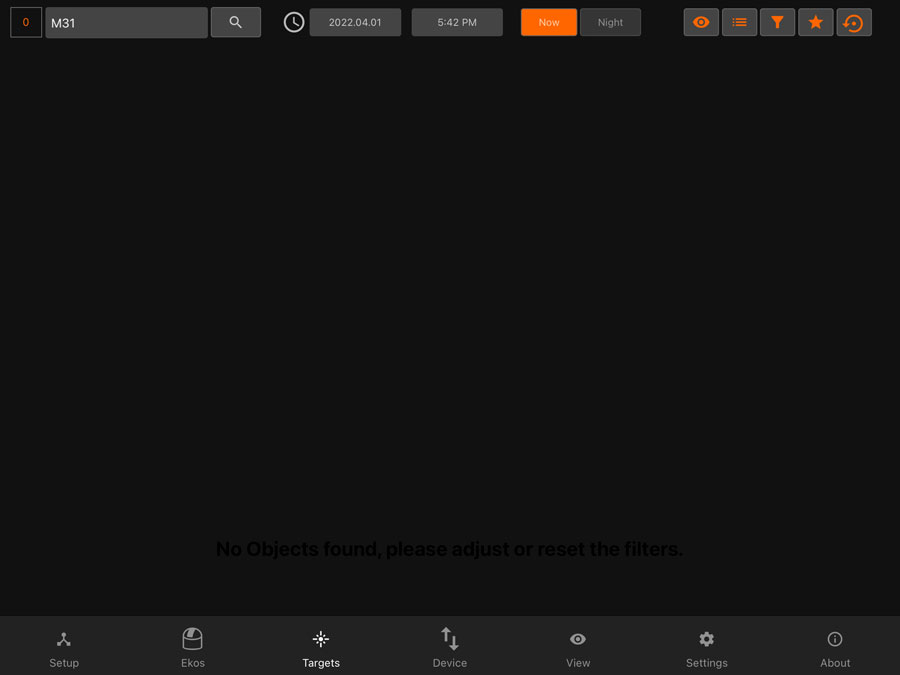
The "Targets" Screen (App)
The "Targets" screen of the StellarMate app (here from app version 2.5.0 on) is one of three (known to me) ways to access targets using plate solving. On the one hand, the DSO type has to be selected (star icon), and on the other hand the beginning of the name (or number) of the object(s) has to be entered in the search field in order to restrict the search. The search is very picky about the correct writing! There are also several filters that I have not yet fully understood.
 |
 |
|
"M31" leads to an empty target list |
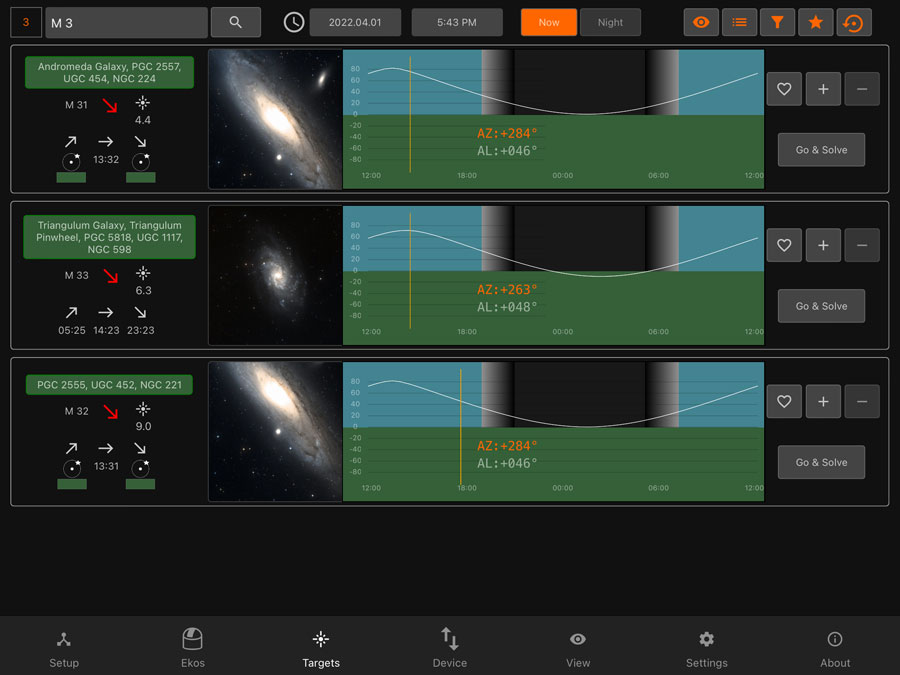
"M 31" leads to just M 31, the Andromeda Galaxy (galaxies selected) |
|
 |
 |
|
"M 3" leads to a couple of galaxies whose number starts with "M 3" (galaxies selected) |
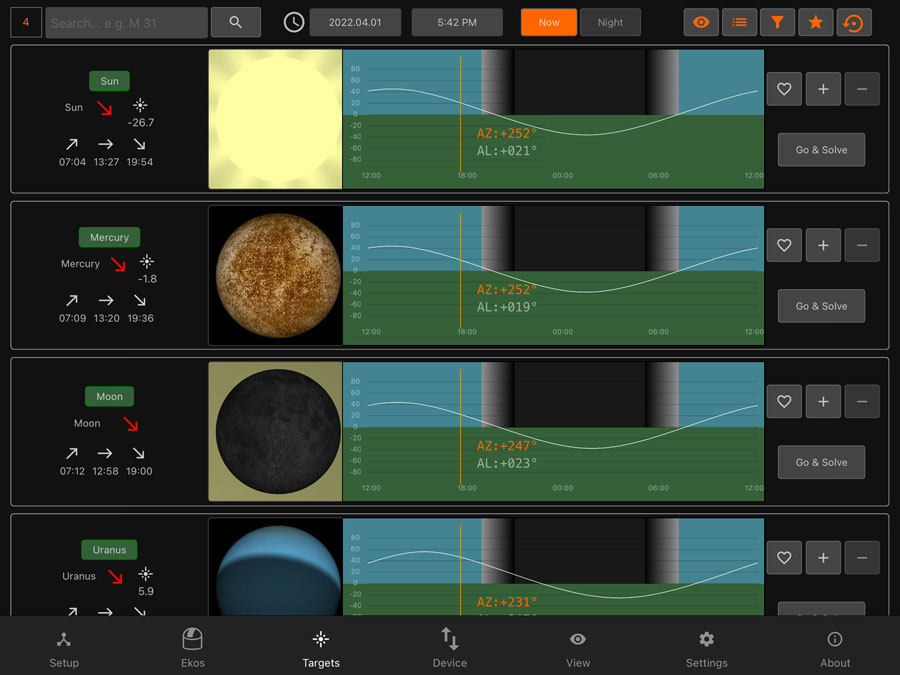
The Moon and the Sun can be found among the planets... |
|
made by |
| 08.06.2024 |