Ikarus StellarMate Plus - First Experiences (Part 1: with Wi-Fi only)
Preface | Introduction | First Steps | Frustration is Creeping in... | Power Supply | Testing Another Telescope Tube, Preview | Preliminary Conclusions | Links
Archive
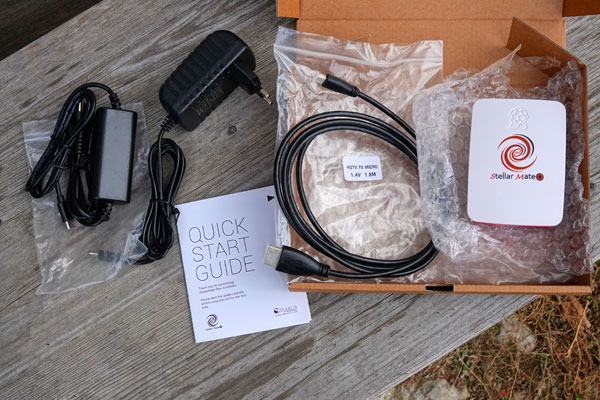
On this page and a second one, I report on my first experiences with my new astrophotography computer Ikarus StellarMate Plus (ordered on October 21, from Astroshop, arrived on October 26, 2021). I put the "cut" between both pages at the time when I started to connect the mount no longer via Wi-Fi but via a USB dongle with the StellarMate (end of December 2021/beginning of January 2022).
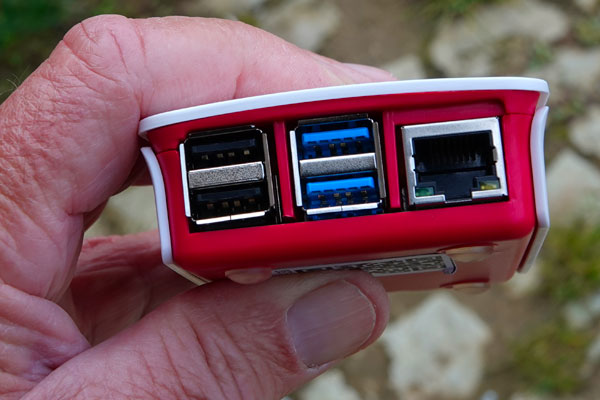
Note: For simplicity reasons, I will often call the device just "StellarMate"...
See also:
- Ikarus StellarMate Plus - Information Archive
- Ikarus StellarMate Plus - First Experiences (Part 1: with Wi-Fi only) Archive
- Ikarus StellarMate Plus - First Experiences (Part 2: with USB Dongle) Archive
- Ikarus StellarMate Plus - Further Experiences Archive
- Ikarus StellarMate Plus - USB Dongle, Web Discussions Archive
- Ikarus StellarMate Plus - Instructions Archive
- Ikarus StellarMate Plus - Tips and Tricks Archive
Note: At the beginning of June 2024, I gave my astrophotography computer Ikarus StellarMate Plus away. I therefore cannot report any further experiences with it here. |
Preface
What the StellarMate Plus from Ikarus Technologies is, and why and for what purpose I purchased it can be found on page Ikarus StellarMate Plus - Information. On this and a subsequent page, I report on my first experiences with it. Initial experience relates to getting the technology to work, and gaining some experience using different cameras and how well these cooperate with StellarMate.
|
|
 |
 |
 |
 |
Introduction
Besides reading the StellarMate manual and watching videos about the StellarMate from "Cuiv the lazy geek" and the manufacturer, my "approach" to the StellarMate consisted of simple, careful steps:
- Turn on the StellarMate, wait for it to boot, and connect to it (initially only with the laptop), using the StellarMate as a Wi-Fi hotspot.
- Connect the StellarMate to the home network and update its software > put StellarMate's Wi-Fi in "infrastructure mode" to do this.
- Connect a mount (by Wi-Fi and connect it to the Wi-Fi network* or by cable) and a camera to the StellarMate, but still in the form of a "dry test".
- Put together a complete setup with all necessary components, test it "dry" first and then at night. Try it until everything is working (I am not quite there yet...).
*) It turned out initially that I was not able to follow Cuiv's procedure, only the one from the manual, i.e.: the mount and not the StellarMate has to act as hotspot. After hours of failed attempts over several days, which almost drove me to despair, I have managed to operate the StellarMate in all three possible network configurations. However, for my observations I will operate the StellarMate as a hotspot and connect the mount via cable connection to the StellarMate (see below). This requires one more cable connection, but seems to be the most reliable setup.
My attempts with the StellarMate lasted from November 2021 until April 2022.
On this and a subsequent page*, I would like to describe my first experiences and
not go too much into details. I will compile the exact instructions that I
came up with on separate pages (at the moment, there is only one page). I also started
a "tips
and tricks" page...
*) I put the "cut" between both pages at the time when I started to connect the mount no longer via Wi-Fi but via a USB dongle to the StellarMate (end of December 2021/beginning of January 2022).
Those Who Want it Short...
...do not need to read this page, but can use the StellarMate as a hotspot and connect the mount via USB dongle to the StellarMate*. Continue with page Ikarus StellarMate Plus - First Experiences (Part 2: with USB Dongle).
*) Power supply: StellarMate at PowerBank, mount at PowerTank, camera depending on whether operated with 5V or 12V...
Note: Once the "first experience" problems are overcome, it makes sense for visitors to this site to jump directly to More Experiences!
First Steps...
Turning StellarMate on and Update StellarMate OS
For "organizational reasons", I had the StellarMate sent to our vacation home. However, I only had a slow 2G network there, so I was not able to not try out many things. In between, we were at my relatives with a faster network, but there I had little leisure to try around. So it remained to turn on the laptop with the StellarMate as a hotspot and to explore the interface of the StellarMate OS via web browser and noVNC. This requires connecting the laptop or computer to the StellarMate hotspot.
Towards the end of the time, I even ventured into the software updater and tried to update the OS. However, this only works when the laptop AND the Stellarmate are connected to the home network that has access to the Internet (this is called "infrastructure mode"). After waiting endlessly, the update finally started and even came to an end - only to find out afterwards that nothing had happened... Back at home, I tried the same thing with faster internet - and the same thing happened, namely at the end nothing was installed after all. Then I tried the software update via app on the iPad (which Cuiv advises against in his first video, but encourages this in the second...), and in the second attempt I was successful (OS version 1.6.0)! To do this, as I already mentioned, the StellarMate and the iPad have to be connected to the home network. Later, I even updated to OS versions 1.6.1 and 1.6.2.
Connect the Camera and Mount to StellarMate
To be able to work with the StellarMate, one has to create at least one device profile, which specifies which devices are used in a certain configuration, that is, together. Additionally, you have to specify the telescope that you want to combine with the profile and enter its data. This can be done before the devices are wired or connected to the wireless network.
 |
 |
Note: The StellarMate initially starts in hotspot mode. If you run it in infrastructure mode, it remembers the corresponding network and starts again in this mode. However, this only works if this network is already present when the StellarMate is started. This is normally the case with the home network. However, if the mount serves as a hotspot, this only works if the mount is switched on before the StellarMate. Otherwise, the StellarMate starts as a hotspot and must be manually reconnected to the mount's network. In my experience, starting in infrastructure mode works sometimes and sometimes not...
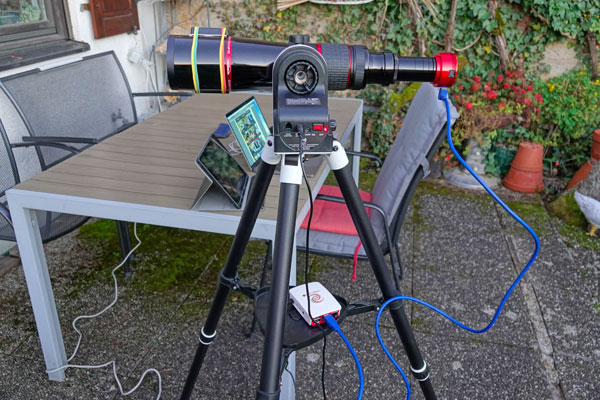
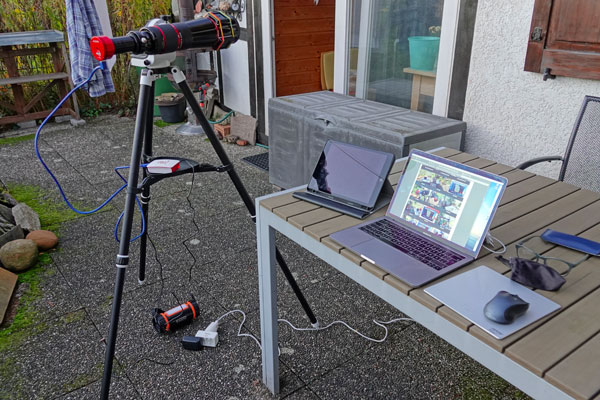
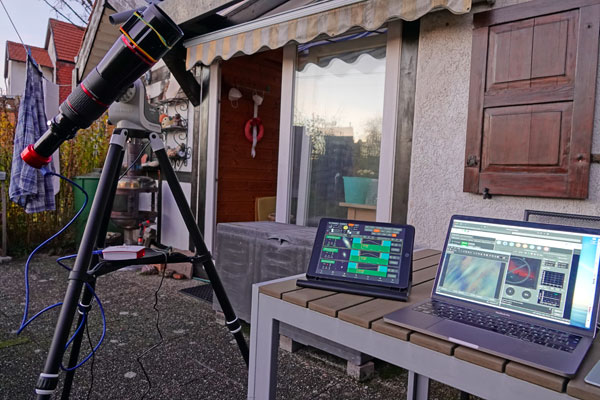
And Now a Complete Equipment with "Dry Run" and Test at Night (November 9, 2021)
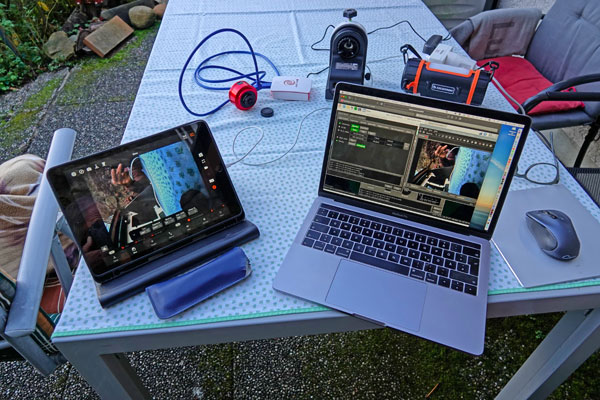
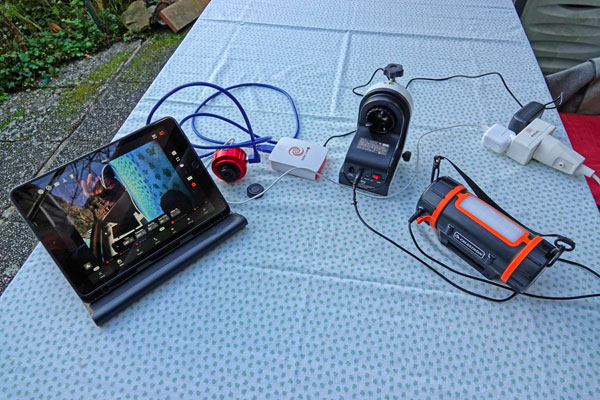
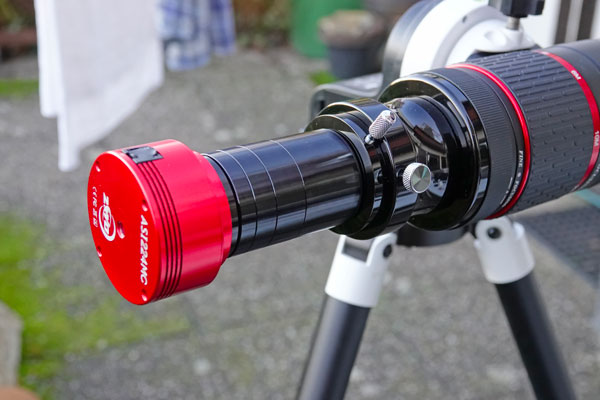
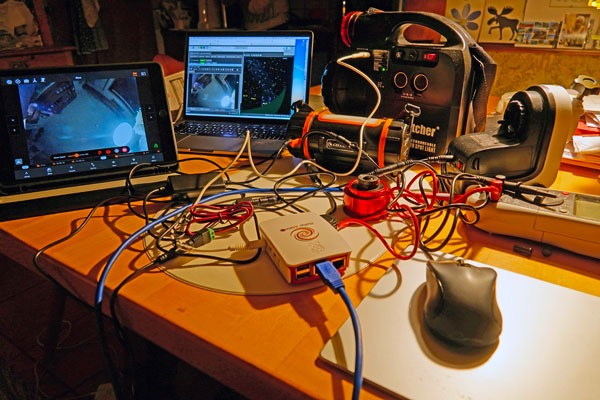
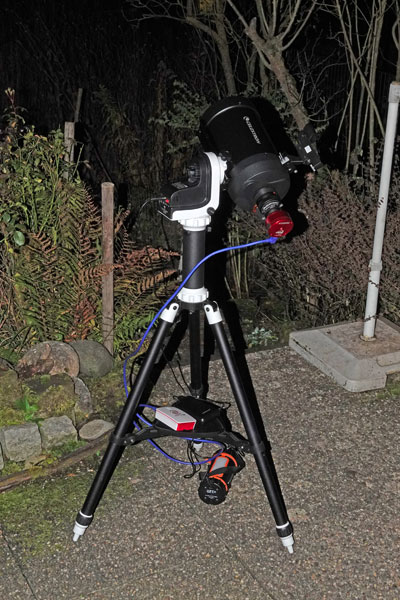
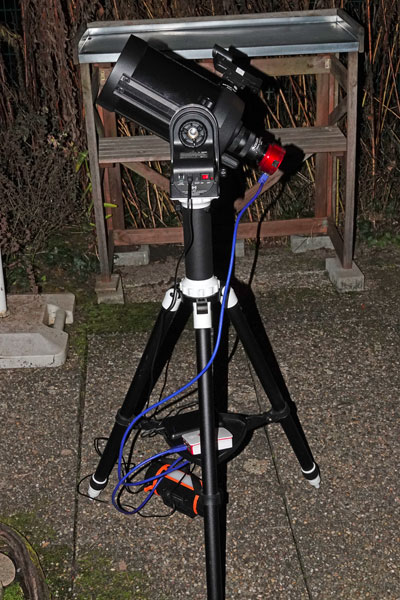
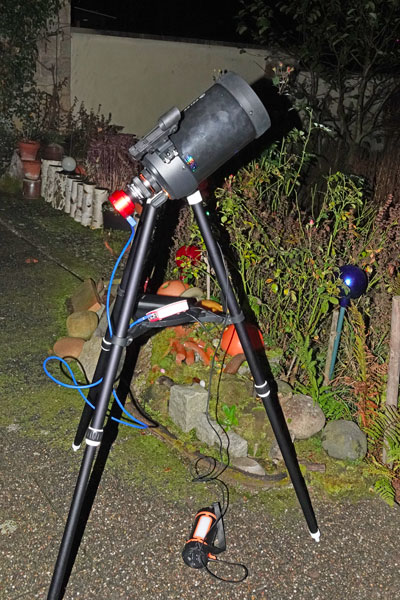
After I had succeeded in getting the StellarMate to work together with the AZ-GTi mount and ASI224 camera, using the mount as a hotspot, it was time for the next step, namely to assemble a complete EAA equipment. It consisted of my Omegon PS 72/432 refractor, the AZ-GTi mount head on the AZ Pronto tripod, powered by a Celestron PowerTank, the ASI224 camera (with UV/IR cut filter), the iPad with the StellarMate app for controlling everything, and finally the StellarMate, powered via a power supply. I also had my laptop connected to the StellarMate in parallel via noVNC and ran the KStars application on it. Here are some photos of the equipment (November 9, 2021):
|
|
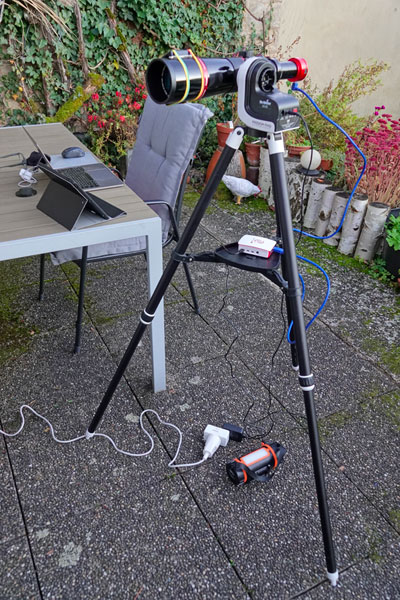 |
|
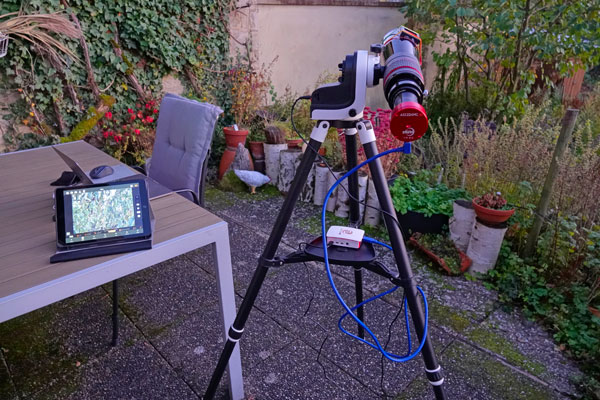 |
Here are the options for mounting the camera to the refractor with extension sleeves and an 2" to 1.25" adapter or the corresponding TwistLock adapter:
 |
 |
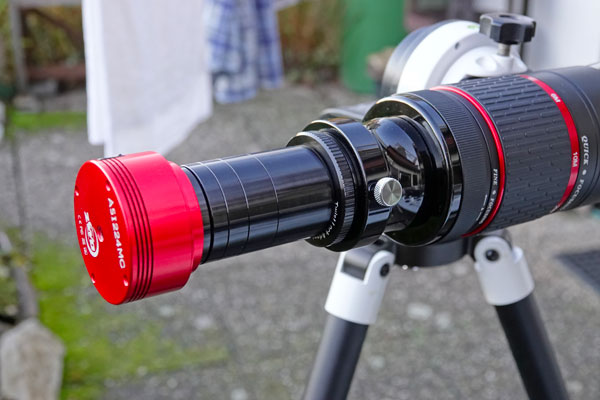 |
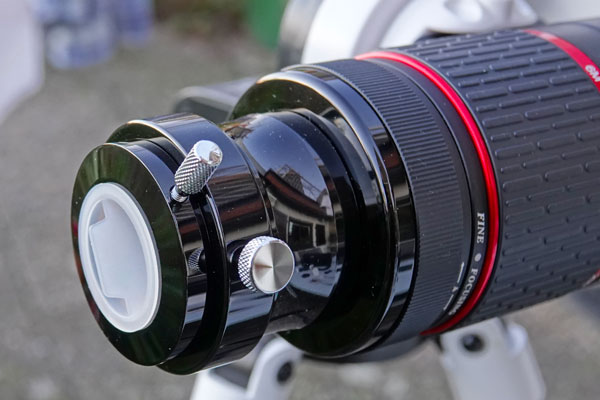 |
 |
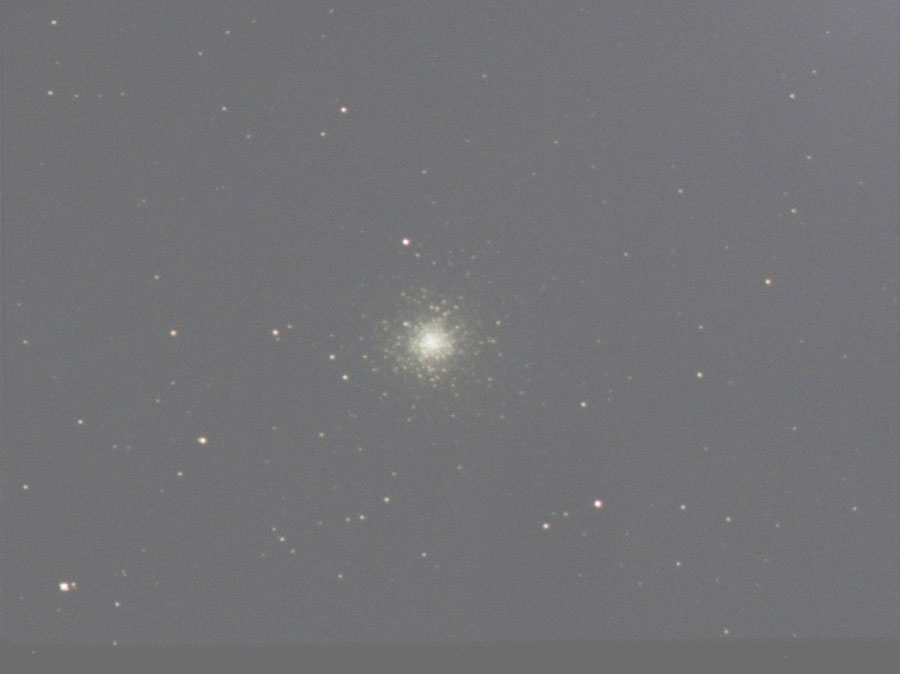
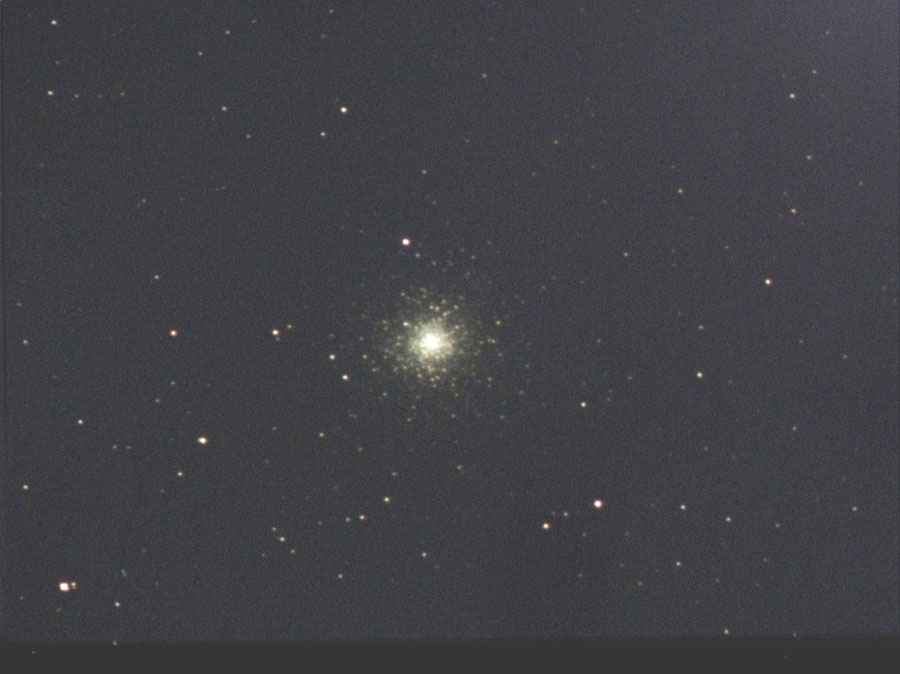
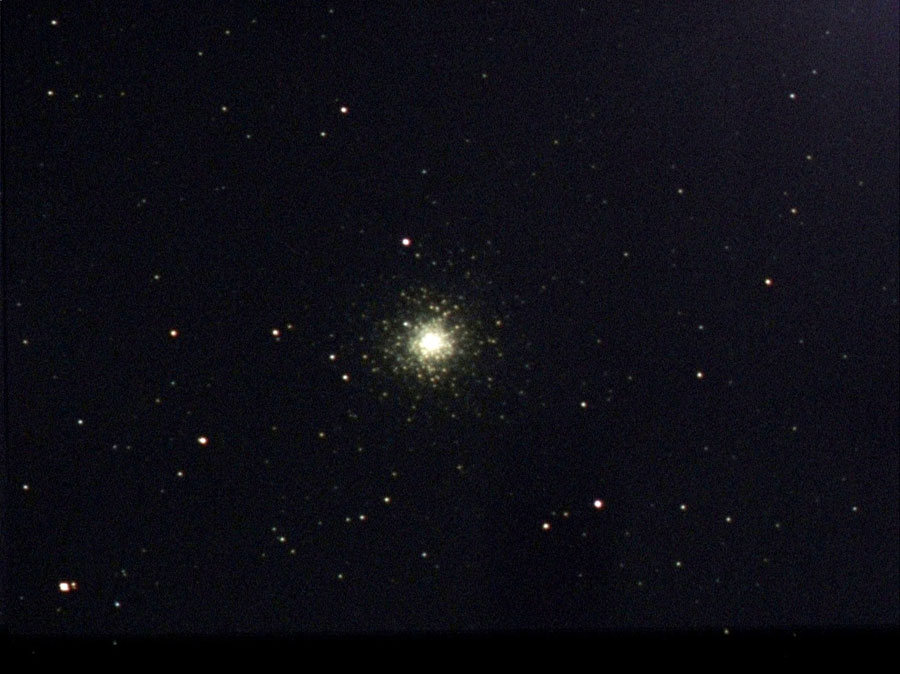
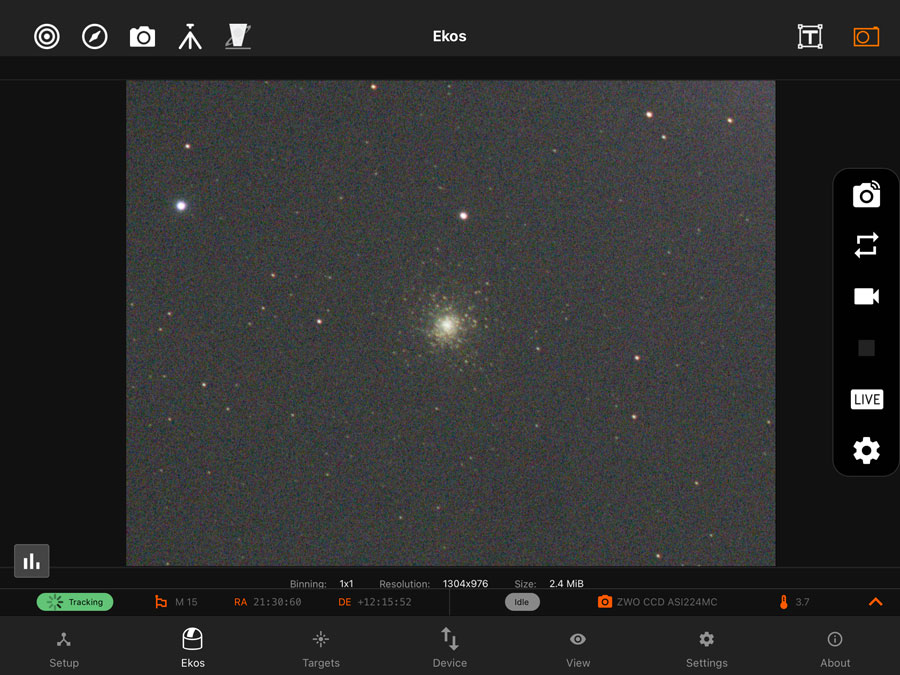
I used the above setup for a first night test on November 9, 2021, where I approached M 2 and M 15 (via "Go and Solve"):
M 2 |
M 15 |
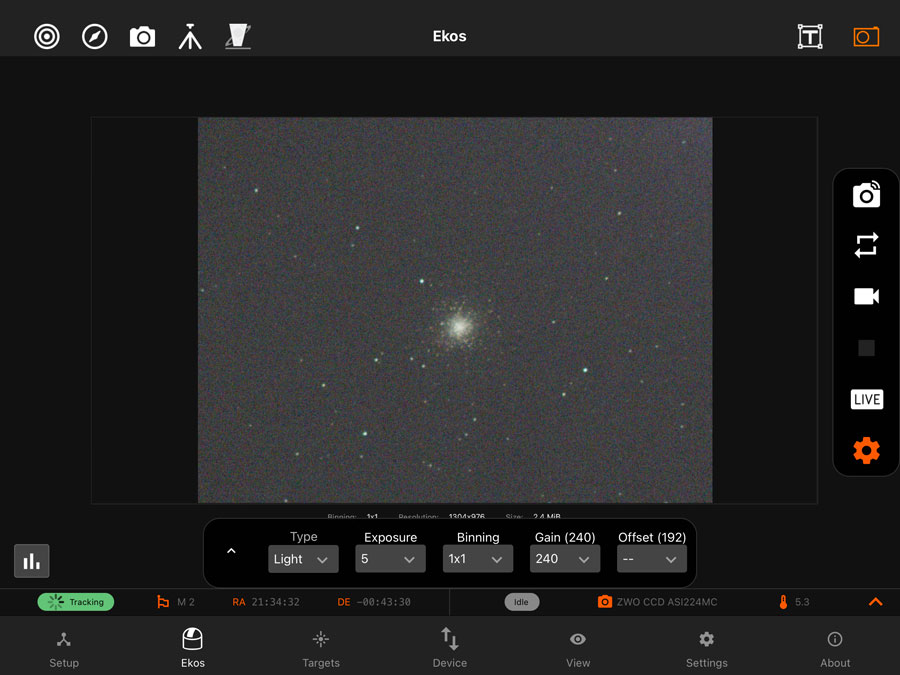
M 2 was approached correctly on the first try, M 15 gave a little trouble,
but was then also found. Since the Live Stacking did not work properly yet
- or I did not yet know how to operate it properly, I came up with only two "Live
View" photos.
I also did not know how to save the photos* and therefore took screenshots.
All in all, I was quite pleased with the first results (except that I struggled
a bit with focusing, but that was because of the refractor...).
*) Meanwhile (Nov 13, 2021), I still do not know how to save photos in the
app, but I found a trick to be able to save photos after all. For this, I have
to connect my laptop to the network of the current hotspot (StellarMate or
mount), start noVNC in the web browser and start the KStars application. As
soon as I take a photo, the photo is also displayed in the KStars FITS viewer
and can be saved from there (in FITS, JPG and PNG format). The viewer has its
own peculiarities, though... This "trick" applies to single as well as
to live stack captures (the latter can also be saved on the tablet computer, on which the app is running).
+) In the meantime, I learned how to save photos in Live Stacking mode (floppy disk icon)!
Frustration is Creeping in...
A lot of Frustration... and Some Light at the End of the Tunnel (November 11-13, 2021)
After these first successes, I actually thought that I was "out of the woods" with the StellarMate. Unfortunately, the opposite was the case. Instead of leaving everything as it was, I had the ambition to get both Cuiv's configuration, working with the StellarMate as a hotspot, and the configuration in infrastructure mode, where all devices connect to the home network, going. I tried that for hours on the evening of November 11, 2021 and got both to work once. My main problem was to put the mount into station mode using the SynScan app. This failed again and again despite what I thought was correct input data and port number. This was especially annoying with the home network, the password of which is a long sequence of arbitrary digits. So I had at least made both configurations work that evening once!
The next afternoon and into the evening (Nov 12) I tried to replicate these results - without any success! The system went havock, the network did not recognize correct passwords anymore. It was like horror, and it did not take much, and I would have thrown the StellarMate out of the window. Finally, I tried again the configuration recommended by the manual, where the mount is the hotspot - and indeed it did work! I would have preferred Cuiv's configuration with the StellarMate as the hotspot, but at least everything seeemed to work this way.
In addition, I discovered how I was able to save the photos "with a trick" (normal photos via camera icon or live stack photos), albeit with a detour to my laptop. For this, the laptop has also to be included in the mount's network, then I start noVNC in the web browser (stellarmate.local:6080) and finally KStars. As soon as I take a photo, it appears in the KStars FITS viewer and can be saved from there. The viewer can save photos in FITS (black and white), JPG, and PNG formats, but this only works correctly for me if I specify the correct file extension - the viewer does not care, what I specify in the selection list for the file format...
When I switched on the mount first, and then the StellarMate on the next day (Nov 13), it showed that, at least this time, StellarMate had remembered the latest network configuration (it is not too difficult to change this...). And everything worked as desired! Regrettably, I was not able to try out the StellarMate at night, because we had continuous rain and clouds. One more thing: At one point in time, the PowerTank, which supplied the AZ-GTi mount with power, switched off. Of course, the StellarMate switched back to hotspot mode. When the mount started broadcasting its network again, I was able to reset the StellarMate to it, but it took some patience to do so.
Overall, I thought that I was "out of the woods", that the "processes" would settle in for me, and that there would be the "danger" that I will eventually succeed after all! And with that result, it was time that I start writing some instructions!
A Post at Cloudy Nights (Nov 13, 2021)
Just a short update from my experiences with the StellarMate (which I upgraded recently and the app just now...).
I had the same experiences on "dry runs" as some users report here. I also felt everything was "running downhill" and was close to throwing the StellarMate out of the window. So, I finally decided to use the AZ-GTi mount as hotspot as is recommended in the manual (not the StellarMate as hotspot as Cuiv recommends). This seems to work fairly reliably, whereas other network configurations worked just once for me...
I also want to tell about two discoveries that I made:
When I also connect my laptop (a MacBook) to the mount's network and run KStars
on it, the FITS viewer comes up, whenever I take a photo with the camera icon
in the app. In the viewer, I can save the photo in three formats (FITS, JPG,
and PNG). But it only saves JPG and PNG, when I manually add the respective
extension (.jpg, .png) - irrespective of what the dropdown list states. Definitely,
a bug. But at least, I found a way to save my "live views".
I still do not know how to save live stacks, though...
>> I just found out that this works for live stacks as well!
Secondly, I also had the issue of empty target lists. I just tried "M31" again
for confirmation - and the list was empty. Then I tried "M 31" -
and there it was! With "M 3" you get even more galaxies. Or you get
M 3 if you switch to globular clusters.
Thus, the targets work*, but the algorithm is very "picky" about
blanks!
*) Actually, there still some quirks left...
Star Discovery Mount? (Mid-November 2021)
For one afternoon in mid-November, I tested whether the StellarMate would work together with my Sky-Watcher Star Discovery mount, respectively vice versa. Since the IP addresses had changed a bit compared to the AZ-GTi mount, it took me some time to find out the correct IP address - in which I finally succeeded. But nothing helped, because I was not able to move the mount with the manual control buttons in ghe StellarMate app. Sometimes, it would instead suddenly start running, only to stop again at some point in time. Anyway, that is not usable yet! Still an open question is for me, which of the numerous Sky-Watcher configurations ín Ekos is the right one for the Star Discovery...
Update: On January 8, 2022, I tested the Star Discovery mount using the Sky-Watcher USB dongle. And this time, it worked. See here for more information. But after I installed the software version 1.6.2 on February 11, 2022 and tested the mounts afterwards, the Star Discovers was not recognized anymore despite the USB dongle (I attempted this for several days...).
More Light at the End of the Tunnel! (November 17, 2021)
On November 17, 2021, I somehow "untied the knot in my head" regarding the StellarMate, and finally managed to switch between different network configurations: StellarMate as the hotspot as Cuiv does it, the AZ-GTi mount as the hotspot as Jasem does it, and finally connecting the StellarMate to the home network for updates of the StellarMate software. And, very important, I was able to repeat this! I would not say that the switching went smoothly each time, there were always some obstacles to overcome, but in the end, I succeeded.
In other words, this means that all three configuration modes, StellarMate as the hotspot, the mount as the hotspot, and infrastructure mode are possible. But I think that I will go for the StellarMate as the hotspot now, because this mode seems to afford the least effort, and the StellarMate always falls back to this mode in the cases of network issues.
So, what was the "knot in my head" that cost me hours and hours of frustrating failed attempts? I assumed that, starting from the mount as the hotspot, I would be able to change the mount's WiFi settings to station mode, while the StellarMate was still connected to the mount's network. That did not work, although I tried over and over... On that day, I finally had the idea that the StellarMate hotspot must already be ON, when I switch the mount's network to station mode. And in fact, that worked (and analogeously in the other direction; the home network, on the other hand, is active all the time...). And when I watched Cuiv's video again, I found that he did not explicitely mention that the StellarMate network must be "on", but it was "on" when he demonstrated the switching of the network mode for the SynScan app.
Now I was only waiting for a clear night to finally test the go & solve, tracking and live stacking!
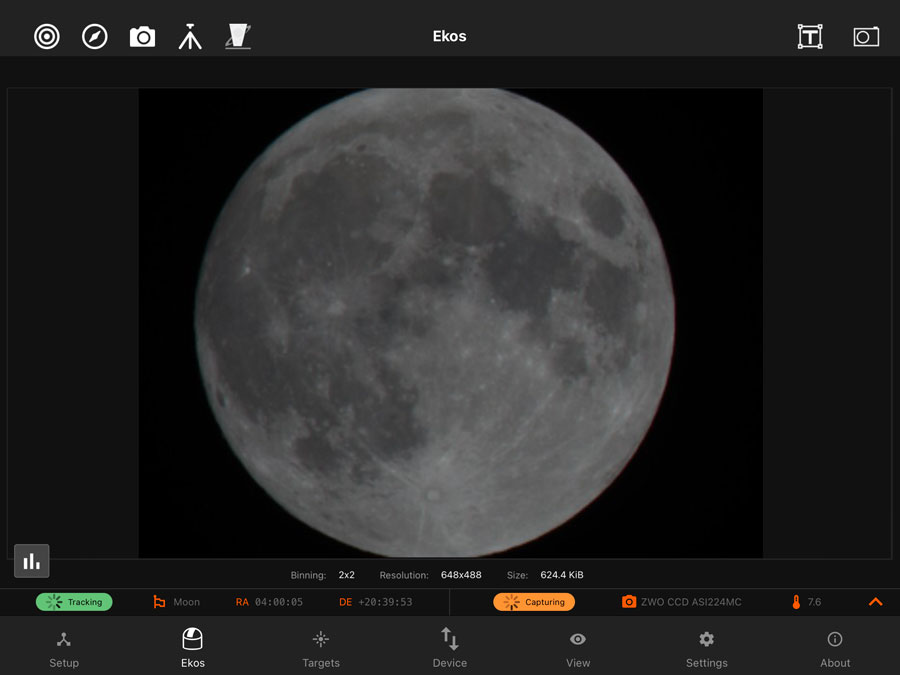
Moon as Screenshot (November 18, 2021)
The next day, or better, the next night, the sky was unfortunately not clear, but it was sufficient for a view of the moon (PS 72/432, AZ-GTi). However, the mount did not approach the moon correctly, and I had to approach it laboriously with the direction keys of the Ekos application. It was laborious, because the controls were not sensitive and I was always "overshooting" the target. And since I did not yet know how to save a photo in "Live View", I made screenshots; this is one of them:
Moon unprocessed |
Moon processed |

Power Supply
Tests with Different Power Supplies... (November 20, 2021)
So far, I had operated the AZ-GTi mount with my 12 V Sky-Watcher PowerTank and the StellarMate with its power adapter. However, I would have liked to use my Celestron PowerTank for this purpose because it is smaller and lighter than the Sky-Watcher one. However, I had read that the Celestron PowerTank can deliver either only 12 V or only 5 V. Now I checked this, it indeedthis is the case! A second battery or PowerTank would work if I would use it with 5V. I tried this once with the Celestron PowerTank for 12 V and the Sky-Watcher PowerTank for 5 V, the current seemed to be sufficient. But that would now be the "maximum solution" in terms of weight....
Alternatively, I might also use the 12V to 5V converter from the StellarMate. The Sky-Watcher PowerTank has two 12V outputs, and with that and the converter from StellarMate the power supply also worked.
But it also works with just one Celestron PowerTank, if I use a 12V doubler cable. However, mine has socket and plug exactly the other way round as I would need it. So I had to try around with my cables and the 12V to 5V converter from the StellarMate. In the end I, was missing a cable with sockets at both ends to connect the converter with the doubler. Fortunately, I had the idea to ask the neighbor's son, and he actually had two 12V sockets with screw connectors at the other end in his "stock". This way, I was able to "close the gap", and it seemed to work. However, the StellarMate did not always boot reliably with it....
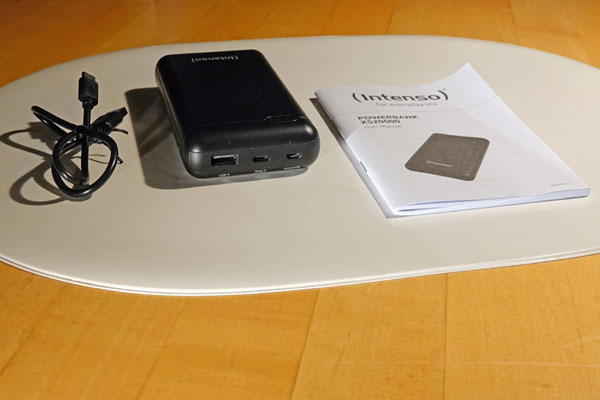
All in all, I had now tested several alternatives for powering the equipment, but I preferred the version with one Celestron PowerTank. Regrettably, however, my self-made adapter did not work reliably. I therefore ordered a small PowerBank, like the one that Cuiv uses (5V, 20,000 mAh, from Intenso), in order to attach the StellarMate including the PowerBank to the telescope tube if needed. The small PowerBank means that there is more one part, but it also saves various cables!
Here is a photo of my trial and error sessions (before the arrival of the PowerBank):
PowerBank, First Live Stacking at Night, a "Partial Success" (November 23, 2021)
On November 19, 2021, I ordered an Intenso 20,000 mAh PowerBank, similar to what Cuiv uses, and it arrived on November 23, 2021. Since the sky cleared up that evening, I immediately tried the new power supply variant with the PowerBank for the StellarMate and the Celestron PowerTank for the AZ-GTi mount. Once more, my PS 72/432 refractor served as the tube, the ASI224 served as camera (needs 5V only, supplied via USB).
Intenso 20,000 mAh PowerBank |
Ditto |
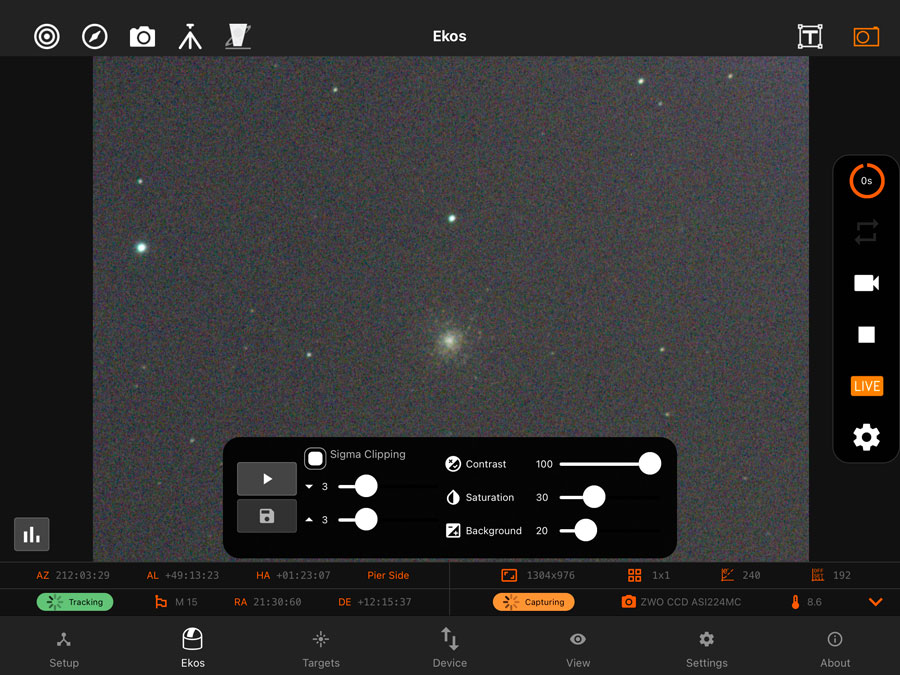
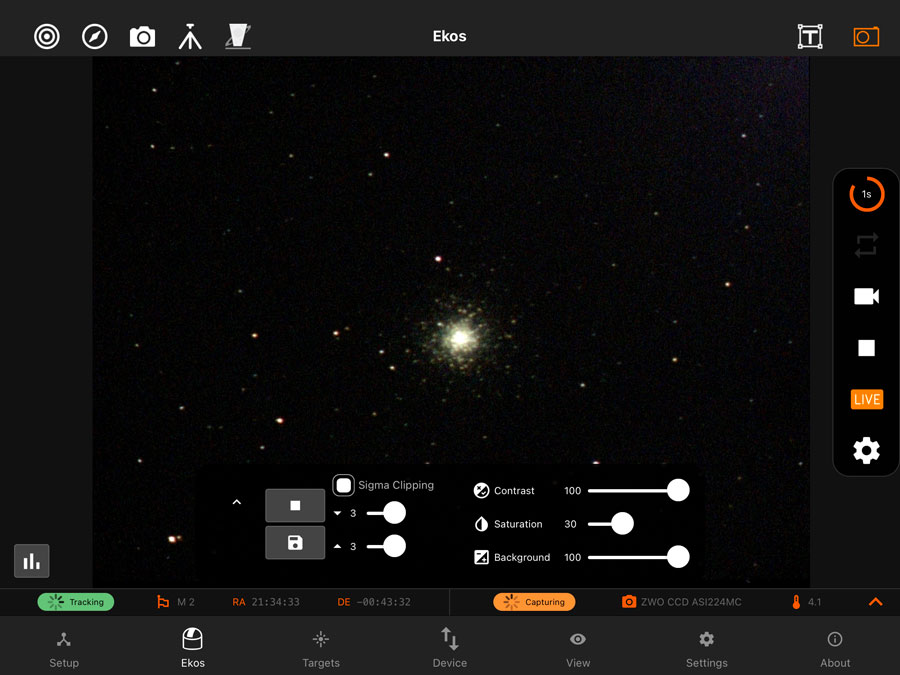
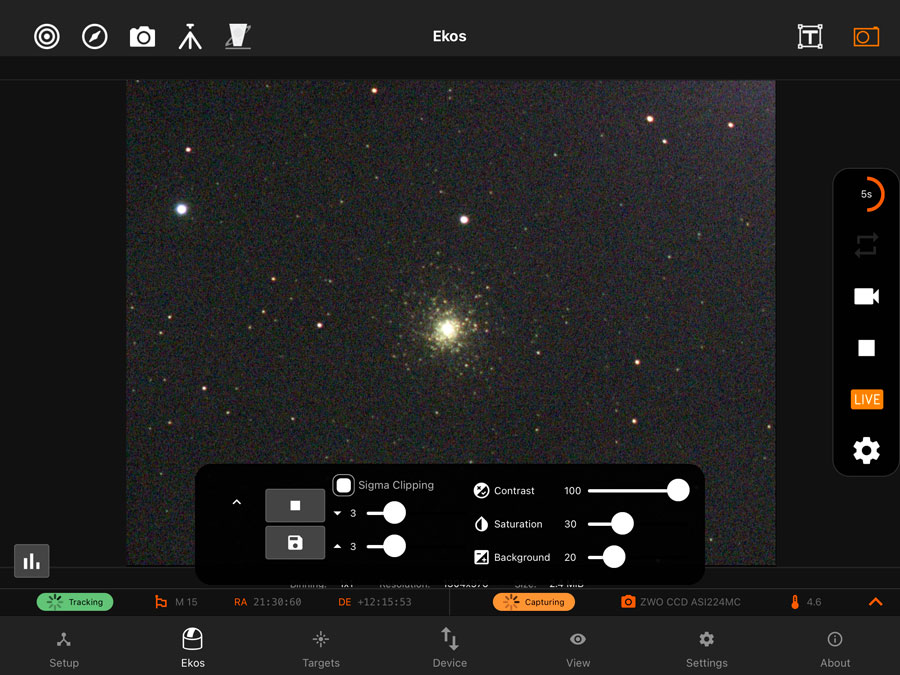
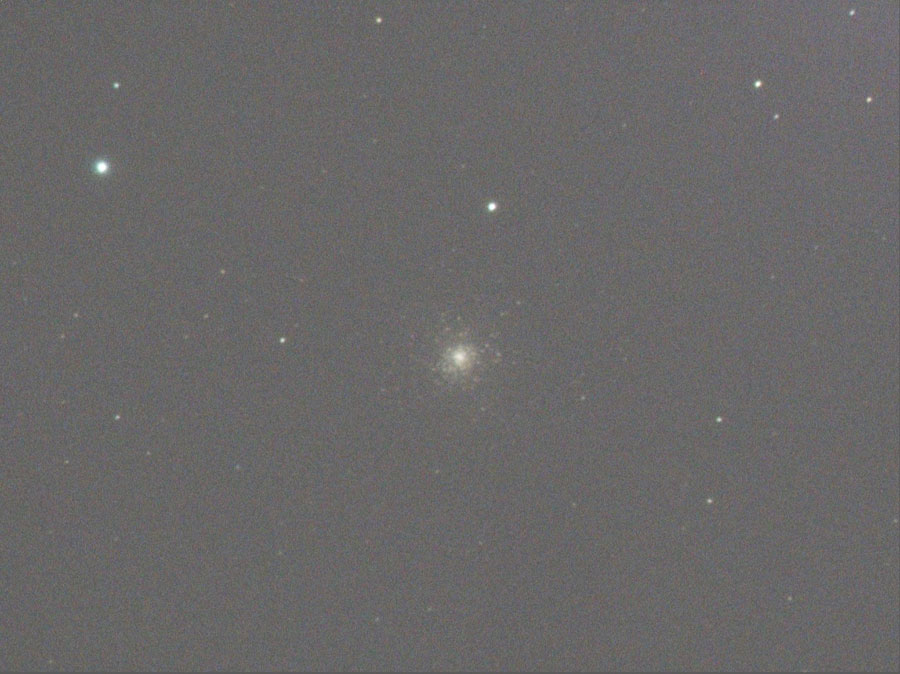
Focusing was done on Jupiter with the Bahtinov mask for my PS 72/432 refractor (later, the correct focus was lost again and again...). I had M 2, M 15, M 27, M 71, M 56, M 57, M 92, and M 13 on my observation list, but only a small fraction of this could be realized. I searched in vain for M 27, M 57, and M 13 and found only M 2 and M 15, for which, this time, even the live stacking worked. So you might say that it worked out "right" for me for the first time, even though I found the plate solving behavior quite inconsistent.
And what also was important: I was able to save the current state of the stack with the floppy disk icon during LiveStacking (the photos were saved in the Photos app of my iPad)! This saved me from having to save photos via my laptop or screenshots. In short, I felt I was almost there, or at least not too far from my goal....
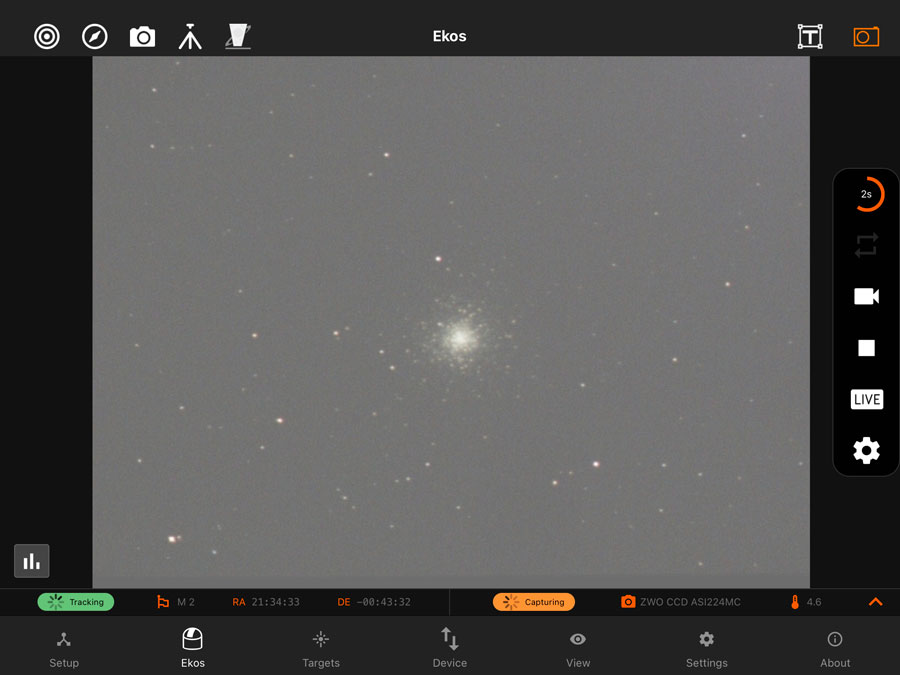
The following photos show some "states" while observing M 2 and M 15 without and with live stacking:
M 2 as "preview" (static) |
Ditto, another photo |
M 2 as "Live Stack", live stacking active |
Goto with platesolving support; on the left, theere is a photo taken for platesolving, on the right you can see how the target is being approached |
Photo taken in "Loop" mode ("Live View") |
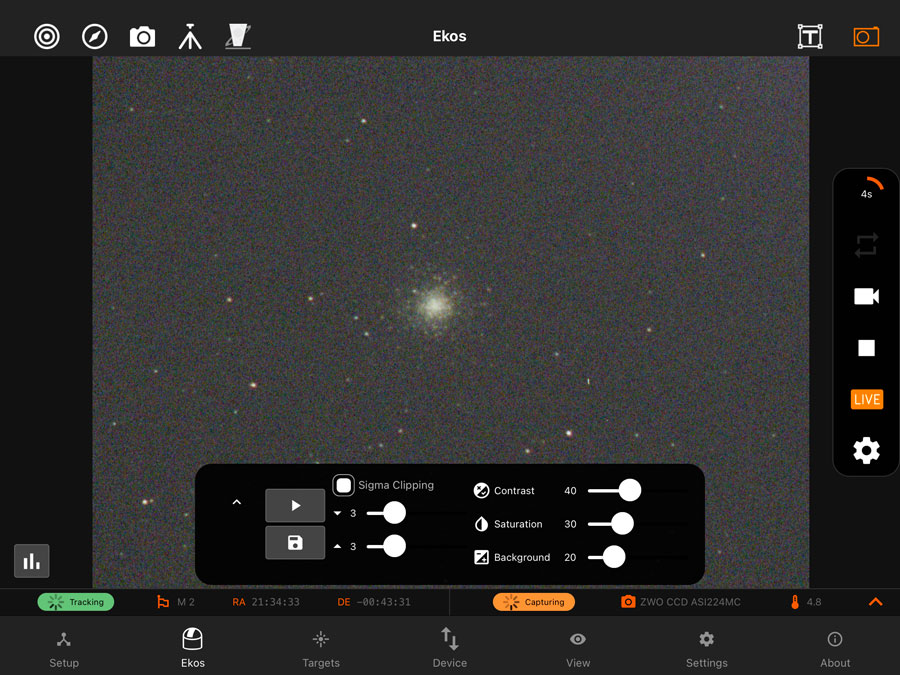
Panel for controling the live stacking opened; ready for live stacking (currently, a live view photo is taken in Loop mode) |
Panel for controling the live stacking opened; live stacking is activated |
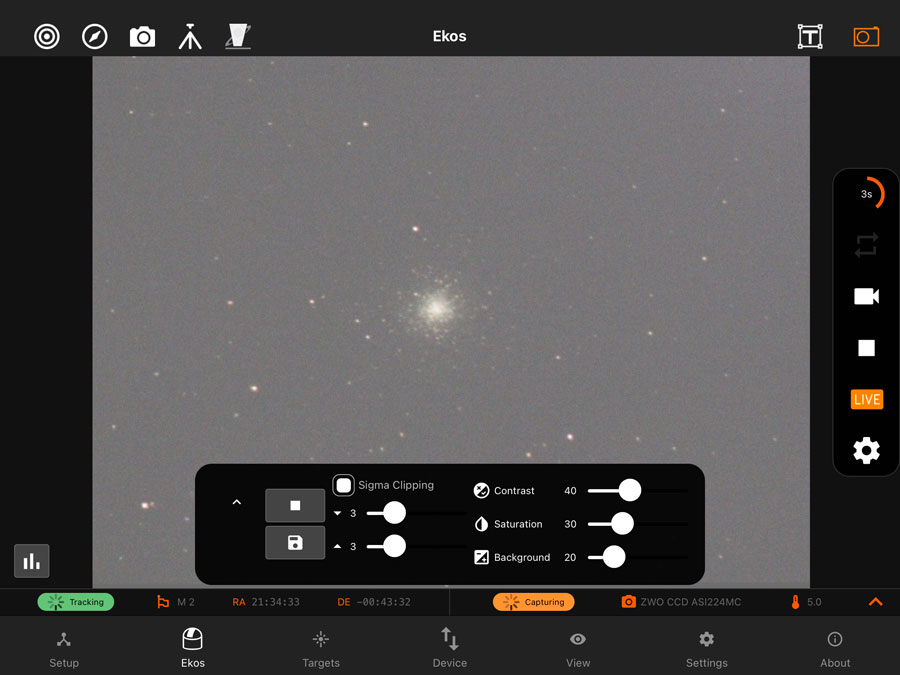
Panel for controling the camera opened (exposure time is 10 seconds) |
Panel for controling the live stacking opened; live stacking is activated (one 10 seconds exposure has been finished); you can save the current stte of the live stack using the floppy disk icon |
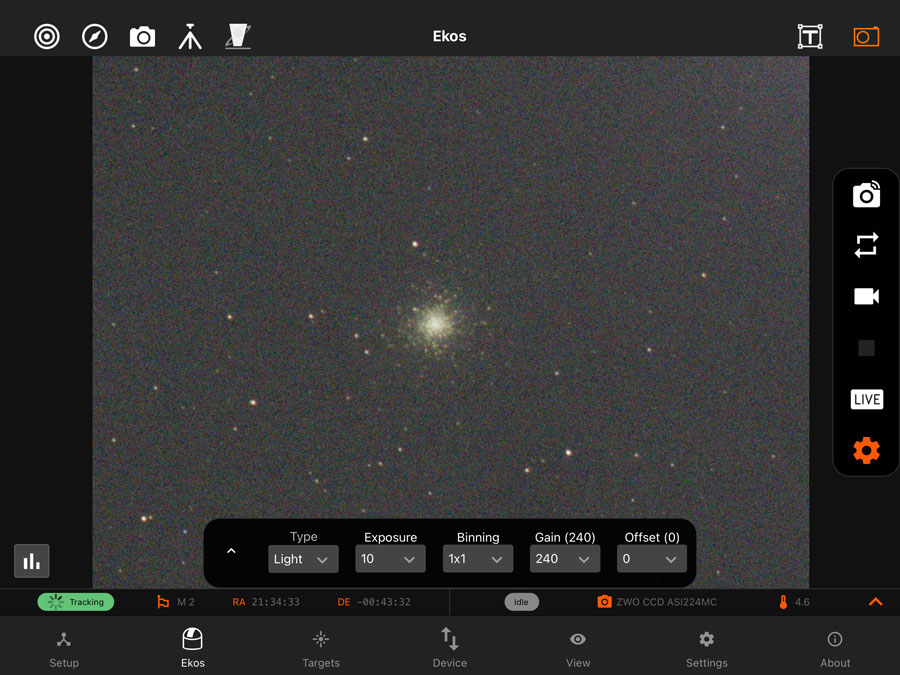
M 2 stack saved |
Ditto, a little later |
Ditto, later |
M 15, preview (static) |
Early M 15 stack |
M 15 during live stacking |
M 15 stack |
M 15 during live stacking |
M 15 stack |


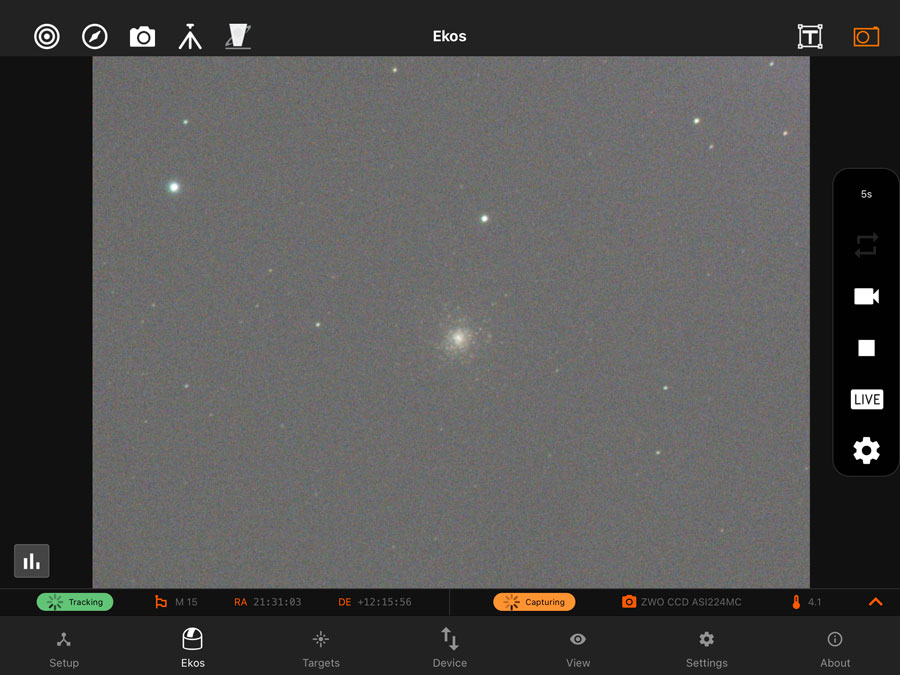
Strong brightness fluctuations occured during live stacking; the so far "experimental feature" live stacking still needs some work...
Testing Another Telescope Tube, Preview
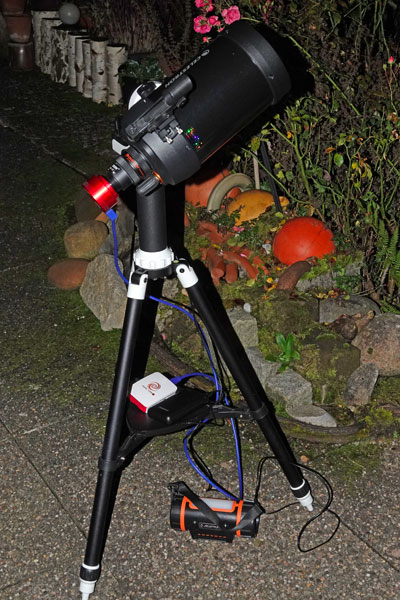
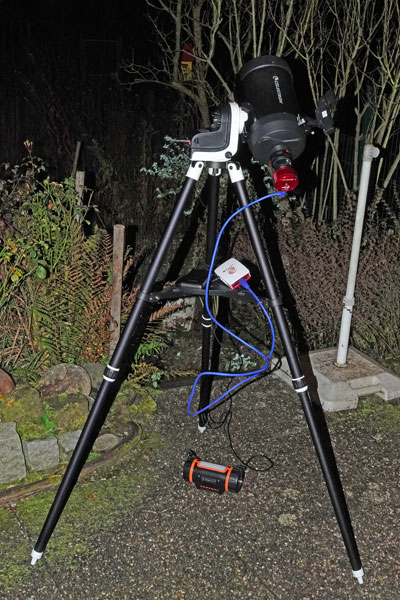
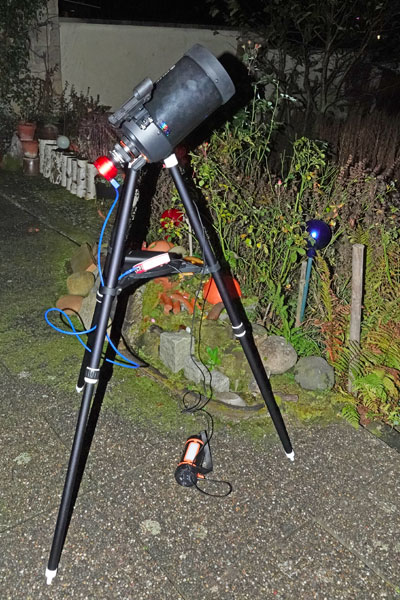
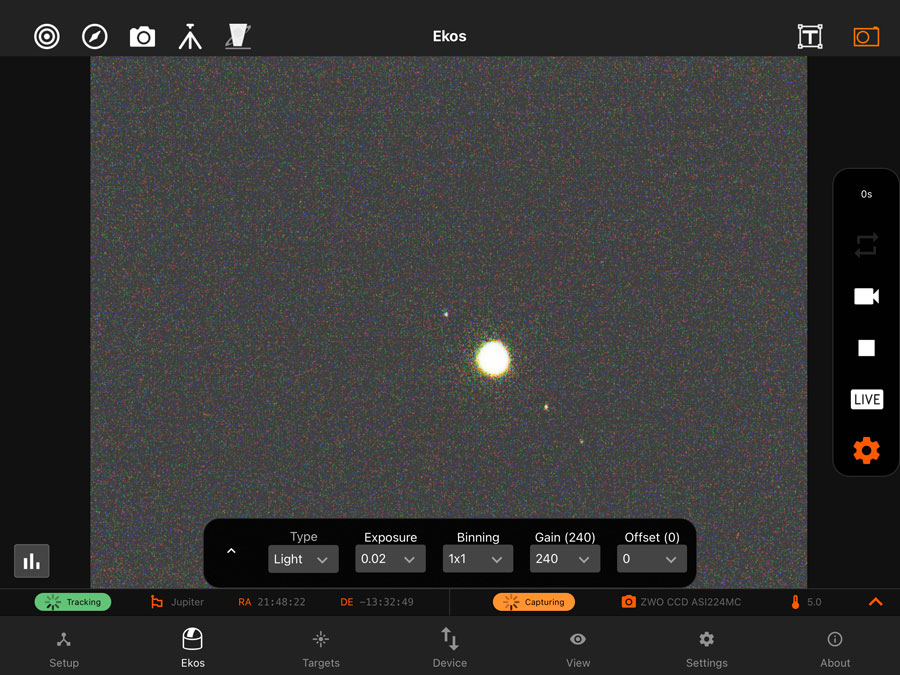
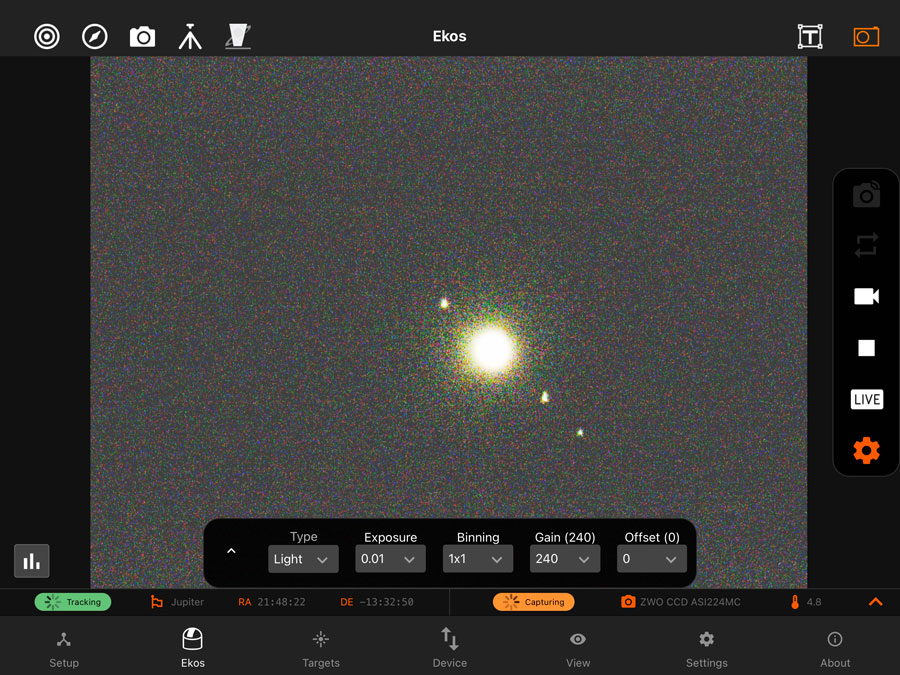
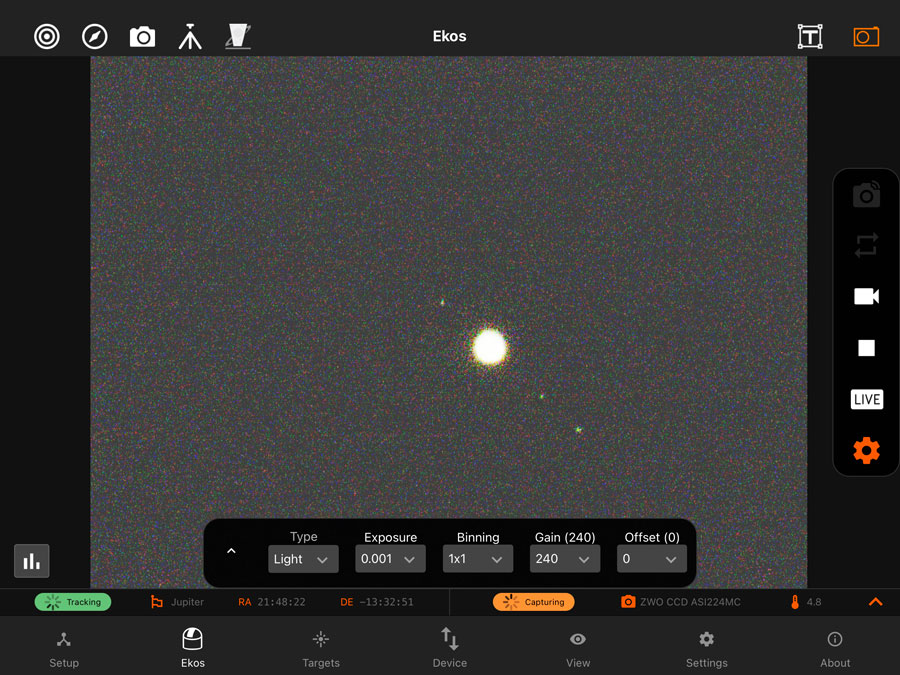
StellarMate with Celestron C5 (November 24 and 27, 2021)
Even though it was not yet clear whether the StellarMate would work consistently with the PS 72/432, I thought it was about time to try another telescope tube. Here, the C5 presented itself as the "first choice" because my other two telescopes require the Star Discovery mount, which I had not yet been able to "persuade" to cooperate with the StellarMate. As always up to then, I used the ASAI224 as camera.
On my first attempt with the C5, clouds prevented observation, on my second, aligmnent/platesolving NEVER worked, no matter what I tried. I even had the impression that no images were taken for platesolving at all, but only the message "Aligmnent failed"! was output. Unfortunately I cannot prove this...
On November 27, 2021, I only managed to capture Jupiter and three of its moons "manually" (Live View). Unfortunately, I had forgotten to reduce the gain to make the surface of Jupiter more visible. Probably, I would not have been able to see the moons in that case...
StellarMate equipment with C5, mount with center column (Nov 24, 2021) |
Ditto |
Ditto |
StellarMate equipment with C5, mount without center column (Nov 27, 2021) |
Ditto |
Ditto |
Jupiter with 3 Moons, 0.02 sec |
Jupiter with 3 Moons, 0.01 sec |
Jupiter with 3 Moons, 0.001 sec |
Conclusion: I have not yet been able to get the StellarMate to work with the C5 and the ASI224 camera. Maybe the field of view is too small...
AZ-GTi with Sky-Watcher Dongle (January 8, 2022)
After several posters in a Cloudy Nights discussion had written that they use a Sky-Watcher USB dongle (pus USB printer cable) instead of the WiFi to connect the StellarMate to the mount and that this would have significantly increased the stability of the system, I bought such a dongle in December 2021. In addition, a Sky-Watcher employee had recommended this dongle in a YouTube video on the AZ-GTi mount. From this moment on, I always connected the mount to the StellarMate via the USB dongle. More on this on page Ikarus StellarMate Plus - First Experiences (Part 2: with USB Dongle)!
Preliminary Conclusions
From the beginning, the StellarMate astronomy computer produced very ambivalent impressions for me: sometimes everything seemed to work, sometimes nothing worked, and everything got only worse. This was not only my own experience, but it was also reported several times in a Cloudy Nights discussion. The StellarMate software, especially the app seemed to be the most buggy software I have ever dealt with in my life... Irrespective of whether this is true or not, I often have to restart the app the get things going again or to fix certain things (I rarely had to restart the StellarMate OS so far...).
After all this struggling, I think that I found a viable way for working with the StellarMate by using the StellarMate as Wi-Fi hotspot and connecting the mount via USB dongle to the StellarMate. I therefore put the "cut" between both "First Experiences" pages at the time when I started to connect the mount no longer via Wi-Fi but via a USB dongle with the StellarMate. What is remaining for me is still a lot: reproducible plate solving-based GoTo and a functional live stacking that delivers satisfying image results. Continue with page Ikarus StellarMate Plus - First Experiences (Part 2: with USB Dongle) to see how I am struggling there!
Note: At the beginning of June 2024, I gave my astrophotography computer Ikarus StellarMate Plus away. I therefore cannot report any further experiences with it here. |
Links
- Ikarus Technologies, StellarMate: www.stellarmate.com
- StellarMate Manual: www.stellarmate.com/help
- Ikarus Technologies StellarMate PLUS Astrophotography Controller (astroshop.eu): www.astroshop.eu/controls/ikarus-technologies-stellarmate-plus-astrophotography-controller/p,68093
- HOWTO: Make a POWERFUL smart TELESCOPE! Better than much bigger telescopes! (Cuiv the Lazy Geek): youtu.be/0JdtL950RjQ
- Discussion in Cloudy Nights (CN), which Cuiv started to create attention to his video: www.cloudynights.com/topic/794637-a-beginner-friendly-smart-eaa-setup/?p=11441505
- See also my page offering Astronomy Links.
|
made by |
| 08.06.2024 |