Astronomy | GXR · GR · RX100 M1 · RX100 M4 · RX10 M3/4 · TZ202 · X Vario · M240 · General | Photos | Conf. Places | Calendars | Art
Ricoh GR: FAQ
Overview of Questions | Answers
Archive
On this page, I collect some questions regarding the Ricoh GR. For the convenience of the readers, some questions may be redundant with items listed on my other Ricoh GR pages.
Overview of Questions
Latest Questions / Updates
- How can I get vibrant colors similar to the colors of Nikon Coolpix A (I shoot only OOC JPEGs)?
- How can I use the program shift function? Can it be combined with AF/exposure lock?
General, Body
Firmware, Manuals, Number of Shots
- Where can I find information about firmware updates for the Ricoh GR?
- How can I check the number of shots (exposure count)?
- How can I determine the error history (including the exposure count) of my GR?
Specialties
- What do the crop modes do?
- What does the in-buil neutral density (ND) filter do?
- How can I activate/deactivate the in-built ND filter easily?
- Why do I get indistinct Ricoh GR RAW images on the LCD screen?
- How can I configure the Ricoh GR so that it suits my needs?
- What can the custom settings do for me and how can I use them?
- How can I activate/deactivate the camera's level/tilt function?
- Can I change the reference level/tilt angle?
Flash
- How can I release the inbuilt flash?
- When I press the "flash" button nothing happens. What do I do wrong?
Lens
Focusing
- How can I focus manually? Do I need to press the macro button all the time during manual focusing?
- What does snap focus mean and how does it work?
- How can I change the snap focus distance - and how can I do it easily?
- What does full press snap mean? How can I enable and disable it?
- How can I see that full press snap is enabled/activated?
- I cannot see the DOF indicators when using snap mode. What did I do wrong?
- Does face detection work only when the mode dial is set to the "green camera" (Auto mode)?
- Does auto macro work only when the mode dial is set to the "green camera" (Auto mode)?
- Does macro work in manual and snap focus modes?
- Which focus assist modes are available for the Ricoh GR?
- I cannot find focus assist in the menu - where is it?
- How can I lock exposure? How can I lock focus? How can I lock both of them?
Exposure, ISO, Modes, Colors
- How can I lock exposure? How can I lock focus? How can I lock both of them?
- What is the TAv mode?
- Should TAv mode be avoided? In shooting with the Ricoh at night in TAv mode and it chose 25,600 for the ISO for some of the photos.
- The camera wont let me select "Auto-Hi" for some reason, it just goes to "Auto" when I select "Auto-Hi". Am I doing something wrong?
- What does the function "Switch Shooting Mode" do?
- I cannot find item "Switch Shooting Mode" in the "Shooting" menu. What did I do wrong?
- How can I use the program shift function? Can it be combined with AF/exposure lock?
- How can I get vibrant colors similar to the colors of Nikon Coolpix A (I shoot only OOC JPEGs)? new
Display, LCD Screen, Optical Viewfinder, ...
- Is it possible to have an aperture preview with the Ricoh GR?
- Does the GR support an electronic viewfinder (EVF) like the GXR?
Exif Data
Answers
General
Which wrist/shoulder strap do I use?
I started with the original Ricoh wrist strap that is delivered with the GR. However, this strap lacks a means to fix the strap to your wrist - without it, the camera can glide from your arm. I therefore bought the Peak Design Leash and Cuff bundle. With this bundle, I am able to provide three cameras with anchors for the wrist and should straps (I have one of each). This allows me to use the strap that I need with a camera. Also, having two anchors on each side of a camera allows me to attach the wrist strap to the side of the camera that I find useful.
There may be better solutions, but at the moment, I am quite content with this solution...
GR blinking at startup - is this "normal"?
At the dpreview Ricoh forum, a poster (rondom) wrote: I just noticed that my GR's green light above the LCD is blinking for few seconds at the start up. I didn't notice this behavior before, wonder if it is normal? The operation seems fine...
Tom Caldwell replied: It does this on mine until the lens fully extends and the LCD screen pops up. Maybe it is a "working, wait a moment" signal? Other posters confirmed this as "normal" as well, and I observed the same behavior on my GR. All in all, this is "normal".
Firmware, Manuals, Number of Shots
Where can I find information about firmware updates for the Ricoh GR?
You can either directly visit Ricoh's page about firmware updates for the GR or my page, which, however, may not always be up-to-date...
How can I check the number of shots (exposure count)?
I found this information for the Ricoh GXR buried in a thread of the Ricoh forum at dpreview.com (Guy Parsons provided the answer; the procedure is more or less the same as for checking the firmware version). I found out that it also works for the Ricoh GR (where the GXR's "-" on the direction pad is labelled "WB").
Make sure that the camera is turned off. Press both, the PLAYBACK button and the WB button on the direction pad (the bottom one), more than a second. The camera will turn on and show a display similar to this:

ST displays the number of shots with flash, SH displays the number of shots without flash. SH is the same number as the "SHUTTER" value using the other method.
To exit, simply press power "OFF."
How can I determine the error history (including the exposure count) of my GR?
This question, but only for the exposure count, was asked in the dpreview Ricoh forum (post), and another poster referred to the original answer in the ipernity forum. Here is the slightly edited orignal answer:
- While the camera is OFF, select the MOVIE mode (MOVIE mode is mandatory here!)..
- Then press together and hold the PLAYBACK and DISP buttons. So you reach the "ERROR HISTORY" display.
- Now, press left or right button on the direction pad (Fn1, FLASH),
and you will reach the "MECH COUNT" page, which shows a number
of technical data such as the number of power ON and OFF presses, the shutter
count (exposure count), etc.

- To exit, press power "OFF."
SHUTTER is the same number as the "SH" value using the other method.
Specialties
What do the crop modes do?
The Ricoh GR's crop modes simulate other focal lengths than the default focal length of 28 mm (equiv), which creates photos with 16 Megapixels, provided that you do not set a smaller pixel count). The GR, however, offers two modes that simulate larger focal lengths by cropping the image - and thus leading to photos with fewer pixels:
- When the camera appeared on the market in 2013, it offered only cropping to 35 mm equiv. (10.3 Megapixels).
- With firmware V 2.03, cropping to 47 mm equiv. was added (5.6 Megapixels).
*) Earlier sources stated 12.8 Megapixels for 35 mm and 9.5 Megapixels for 47 mm.
For easy access to the crop function, you can assign it to the "Effect" button (or Fn3 button) at the left side of the camera. It toggles you trough the modes 28 mm, 35 mm, and 47 mm. The latter two are indicated on the LCD screen.
Why would you need an "in-camera" crop function when you can crop images in a photo editing program? The simple answer is that this allows you to compose your photo more easily because the viewfinder shows exactly what you will get at the respective focal length.
See page Crop Modes for some more details and sample images.
What does the inbuilt neutral density (ND) filter do?
The inbuilt neutral density (ND) filter reduces brightness for two EV steps (or two f-stops). It can be used in situations where images would be overexposed otherwise, for example, if it is still too bright for the lowest ISO level, shortest shutter speed, smallest aperture opening, or a combination of these. Activating the ND filter reduces the brightness for the camera and may prevent overexposure if two EV levels are sufficient. The filter may also be useful in other situations, for example, when you want aperture to be wide open in order to achieve a narrow depth-of-field (DOF).
The ND filter can be activated in menu "Shooting > ND Filter" (Options:" On" and "Off"). An "ND" symbol on the screen indicates when the ND filter is active. For a faster possibility to activate/deactivate the ND filter see below.
The menu settings for the ND filter need some explanations, though. Option "Off" means that the filter is always off. What happens when option "On" is selected, depends on the setting of another menu item "Setup > ND Filter Settings" having the options "AUTO" and "MANUAL", which differ when menu item "ND Filter" is set to "Off":
- AUTO: The ND filter is used in "Off" state when the exposure is outside the linked range, meaning, when an overexposure would happen without the filter (it can also happen with the filter if it is still too bright); an "ND" symbol on the screen indicated when the filter is activated. Otherwise the ND filter is not used in "Off" state.
- MANUAL: The ND filter is not used in "Off" state; it is always used in "On" state. The use of the filter is indicated by an "ND" symbol on the screen.
Proposal: Set "ND Filter Setting" to "MANUAL" to prevent accidental overexposure. You may combine this with the technique below for more control.
How can I activate/deactivate the inbuilt ND filter easily?
If you want to activate/deactivate the inbuilt ND filter manually and easily, you can assign it to a function button (Fn1, Fn2, or "Effect" button). An "ND" symbol on the screen indicates when the ND filter is active.
Why do I get indistinct Ricoh GR RAW images on the LCD screen?
A poster in the Ricoh forum at dpreview asked: "I usually shoot jpeg on the GR, but at the weekend I selected RAW and shot a couple of frames to process in-camera with the RAW development option. However, I notice when reviewing a RAW picture on the camera (toggling the rocker to zoom into the picture) the resulting image is somewhat blurry/indistinct. Is this normal? Shouldn't I be able to see the RAW image clearly on the camera's LCD screen?"
Obviously, this is normal. With RAW-only, the on-screen image is taken from the embedded JPEG in the RAW file, which is purposefully kept small to keep the file size down - hence the indistinct image on the LCD screen. With RAW+JPEG, the normal JPEG image is used for the image on the LCD screen.
See also the Leica X Vario FAQ for discussions about the other way round, namely that only RAW+JPEG is available (RAW-only is not offered for the X Vario)...
How can I configure the Ricoh GR so that it suits my needs?
There is no easy answer to this question, particularly, since I do not know other people's needs and preferences. Nevertheless, I prepared a page (Configuration), on which the configuration of the camera is briefly described using a tabular overview.
What can the custom settings do for me and how can I use them?
Custom settings allow you to access sets of settings and thus, set the camera, according to your current needs, to a specific "shooting mode," such as macro, indoor shooting, or manual focus. This feature saves you from having to do all the settings work over and over. Of course, you have to think about which sets of settings you really need and what the specific values for the respective options should be. This requires some head work and is probably the reason why most people do not use this great feature.
The Ricoh GR has three primary sets of custom settings MY1, MY2, and MY3 (I will call them collectively "MYx"), which can be easily accessed from the mode dial. They can also be given names that indicate their purpose (provided you choose a proper name...). In addition to the three "MYx" sets of custom settings, the Ricoh GXR offers six more stores for sets of custom settings in the "My Settings Box" (also called "box modes"). The six box mode storage locations are, however, not directly accessible - only the three "MYx" setting sets on the mode dial are. Being only able to access three sets of settings directly, makes things a little complicated: If you need to use another set, you have to copy it to one of the three "MYx" locations and thus, overwrite a set (which should be stored safely in one of the six box mode storage locations).
On page Custom Settings I describe how you can create, store, and refine sets of custom settings and how you can recall them for use. At the moment, however, I do not have any practical experience with this feature.
How can I activate/deactivate the camera's level/tilt function?
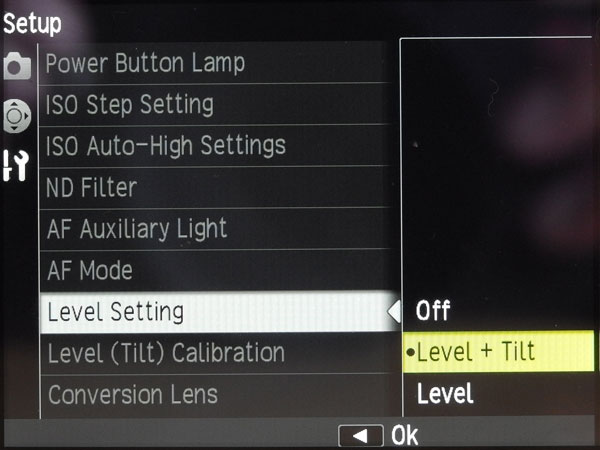
The GR features a level/tilt indicator, which can be displayed in two fashions: (1) level only, (2) level and tilt (as shown in the Figure left below). The tilt indicator is a second line that ideally coincides with the line of the level indicator.
You can activate/deactivate the level/tilt indicator as follows:
- Go to menu "Setup > Level Setting" (see Figure at the center). Options are: Off, Level + Tilt, Level
- Pressing the "DISP" buttons for a longer while pops up a "quick menu" with the same options on the shooting screen (see Figure right)
The "OK" button confirms the setting.
 |
 |
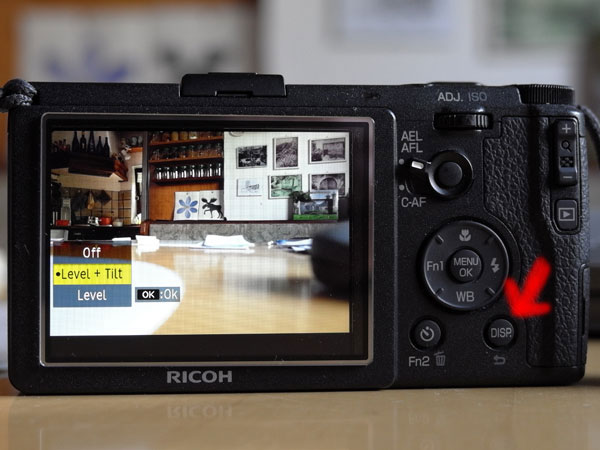 |
Figures: Level/tilt indicator on the shooting screen (left); "Level Settings" in the "Setup" menu (center); quick menu for level settings after pressing the "DISP" button for some time (right)
Can I change the reference level/tilt angle?
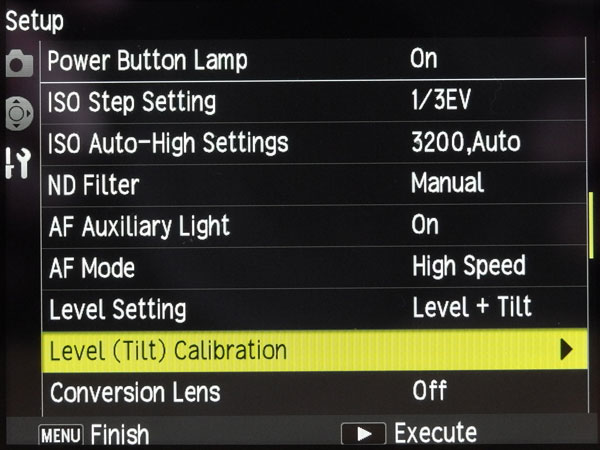
You can change the reference level/tilt angle using the Level (Tilt) Calibration (GR manual page 36). This allows a reference level to be set which can be returned to. In other words if you wish to set a non-horizontal camera tilt reference and be able to replicate it again then the set angle can be something other than horizontal. It of course can be reset to horizontal ("Restore Default"). Thus, you can use this feature to set "unusual" reference angles, but also to recalibrate the original settings ("Restore Default" may not lead to a correct level...).
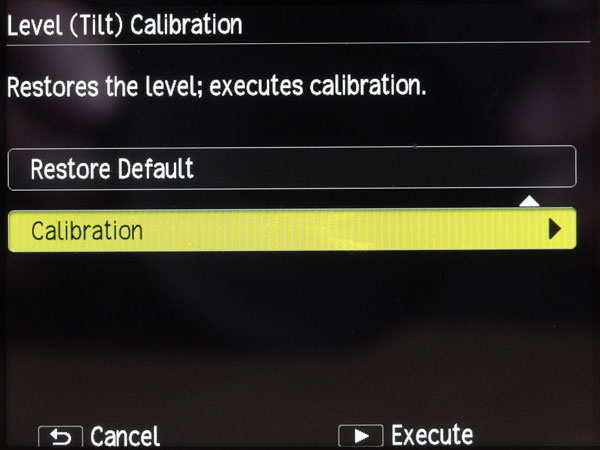
Go to menu "Setup > Level (Tilt) Calibration", press the right button and select "Calibration" to get to the "Calibration Settings" screen. There, you can set the new level by pressing the shutter button or cancel the calibration. See the Figures below for details:
 |
 |
 |
Figures: Level (Tilt) Calibration screens; press the shutter button on screen "Calibration Settings" to set the new level/tilt.
A "wait" symbol appears as long as you press the shutter button, which irritated me somewhat. Obviously it suffices the press the shutter button briefly. It took me, however, some attempts, before I had changed the original level (which I restored afterwards).
Note: Tom Caldwell mentioned this feature in a posting " Reference tilt angle" in the Ricoh forum at dpreview (I used some of his wordings): www.dpreview.com/forums/post/55756853
Flash
How can I release the inbuilt flash?
You can release the inbuilt flash by sliding the "Flash (symbol) Open" button on the left side of the camera (seen from the back) downwards.
When I press the "Flash" button nothing happens. What do I do wrong?
You have to release th flash first (see question above). Then a menu will appear after you press the "Flash" button on the directional pad.
Lens
Does the GR lens have a filter thread?
No. However, you can buy a lens hood and an adapter GH-3 (seem to be sold together). The latter provides a filter thread with a diameter of 49mm.
Focusing
How can I focus manually? Do I need to press the macro button all the time during manual focusing?
To focus manually, first set focus mode to MF (menu "Shooting > Focus"; you can also assign focus mode selection to a function key or a position in the "ADJ." lever settings).
For the actual focusing, while pressing the "macro/up" button on the directional pad, adjust the focus with the up-down dial. This is what the manual states and what a screen message initially says. Actually, this procedure is cumbersome, or better, it is horrible for me. Most often, I loose contact with the macro button and leave the mode for setting the focus (success rate is 1 out of 5 to 10...). This is one of the reasons why I rarely used MF on the Ricoh GR. I preferred to estimate the distance and use snap focus (fix focus)...
But the good news is that I accidentally found relief (I did not find any mentioning of this in the manual)*: It suffices to briefly press the macro/up button. A message appears on the screen stating that you can use the up-down dial for manual focus adjustment. This works until you press the macro button again (no message appears - there is no other indication that the dial now works the "usual way"). After the second button press, the up-down dial works according to the selected exposure mode. That is, the macro/up button works as a toggle now and needs no longer to be pressed all the time. This is, of course, much, much easier! In addition, a white triangle at the distance scale indicates the current distance. It is visible only when focus adjustment is active, and thus, acts also as a status indicator for the toggle button. My only problem is that the LCD screen is not my preferred focusing device, I prefer an EVF...
When turning the dial, you will find that the distance scale is divided into two parts: One ranges from infinity to 0.3 m, and another one from 0.3 m to 0.1 m, which corresponds to the macro mode. Thus, manual focusing includes the macro range. According to Tom Caldwell, there is also a "gear shift" - the adjustment speed is scaled in each section, that is, it is faster for larger distances than for smaller ones.
BTW: In the manual, you will find that macro does not work for MF. Therefore, the button is available for the shortcut that I described above. For snap focus and infinity, the macro button initiates the macro function and is thus, not available. If you press it again you are back to snap focus/infinity.
*) A few days later, I found that Tom Caldwell mentioned this feature already nearly two years before I had "discovered" it in the post "Hooray a bit more" in the Ricohforum (in the "Need some help?" thead).
What does snap focus mean and how does it work?
Snap focus seems to be a specialty of Ricoh camera. In essence, it is a "manual" or fix focus mode, which provides photographers with a small selection of fixed distances (1 m, 1.5 m, 2 m, 2.5 m, 5 m, infinity for the GR). For how you can set the snap focus distance, see below.
Snap focus is particularly useful for street photography: It is much faster than autofocus because the camera is "pre-focused." Snap focus can also be activated in Multi AF and Spot AF mode by quickly pressing the shutter-release button down (full press snap - see below).
How can I change the snap focus distance - and how can I do it easily?
Snap focus distance can be easily changed by holding the "macro/up" button on the directional pad and rotating the up-down dial (original source). This alleviates the need for using a Fn button or an ADJ. lever position to change snap focus distance.
Note that this is similar to setting distance manually. It does only work if focus is set to "Snap." And it works only if a white triangle appears in front of the snap focus distance in the display (often, it does not when I press the "macro/up" button, and so I change something else, instead...).
Other options for changing the snap focus distance are:
- Menu: Shooting > Snap Focus Distance
- Fn button (Fn1, Fn2, Effect): SnapFocusDist.
- ADJ. Lever Setting1...4: SnapFocusDist.
What does full press snap mean? How can I enable and disable it?
Full press snap allows users to press the shutter button in one motion when Multi AF or Spot AF is selected as focus mode and switches the mode to snap focus at a preselected distance. It is intended as a means not to miss a shot due to slow autofocus. The default distance of 2.5 m is useful for street photography and many indoor situations, but less useful for landscape shots.
Note that full press snap is enabled (ON) by default (indicated by an undocumented "FS" in the viewfinder/LCD screen). It can be disabled or enabled in the menu "Shooting > Full Press Snap."
Since full press snap is "on" by default, this function can puzzle users who do not know of its existence - as was the case for me. I decided to disable this function for the moment. See page Specialties for more information on snap focus and full press snap.
How can I see that full press snap is enabled/activated?
When full press snap is enabled, a "FS" symbol is displayed at the location where typically "MF" and other focus modes are indicated, and the snap focus distance is displayed (se photo below). "Multi AF" and "Spot AF" are not indicated, and therefore, full press snap takes the position in case that it is enabled.

Figure: When full press snap is enabled, a "FS" symbol is displayed at the location where typically "MF" and other focus modes are indicated, and the snap focus distance is displayed.
I cannot see the DOF indicators when using snap mode. What did I do wrong?
You can see the DOF indicators only when using snap mode if you set the camera to Av, TAv, or M mode. Probably, you set the camera to a different mode???
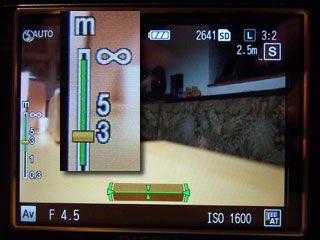 |
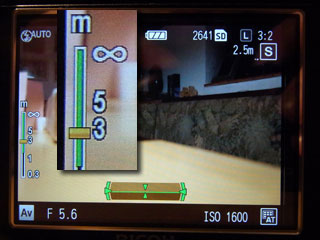 |
Figures: DOF indicator in Av mode. Snap focus set at 2.5 m. f/4.5 (left) is nearly hyperfocal, f/5.6 (right) is hyperfocal
Does face detection work only when the mode dial is set to the "green camera" (Auto mode)?
Unfortunately, this is the case. In addition, it is the only focus option in Auto mode (mode dial set to green camera symbol). See the GR maual, page 33:
In "green camera" mode, pictures are taken with the following settings:
- ...
- Focus [Face recognition priority AF]
- ...
Does auto macro work only when the mode dial is set to the "green camera" (Auto mode)?
Unfortunately, this is the case (auto macro means that the camera automatically switches to macro mode when an object is close). See the GR maual, page 33:
In "green camera" mode, pictures are taken with the following settings:
- ...
- Auto Macro
- ...
Does macro work in manual and snap focus modes?
According to the manual (p. 53), macro does not operate in MF mode (which I was able to confirm). Interestingly, however, it works in snap and infinity mode. If you deactivate macro, snap/infinity mode is restored.
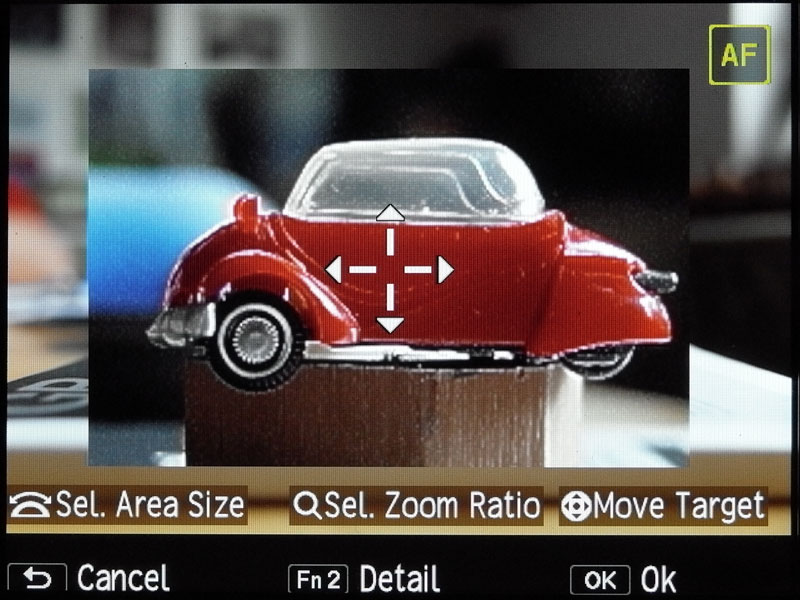
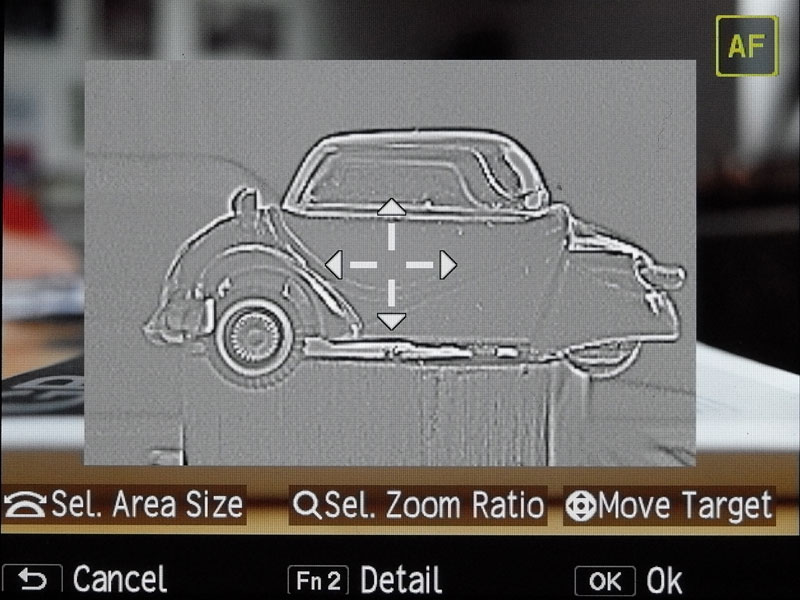
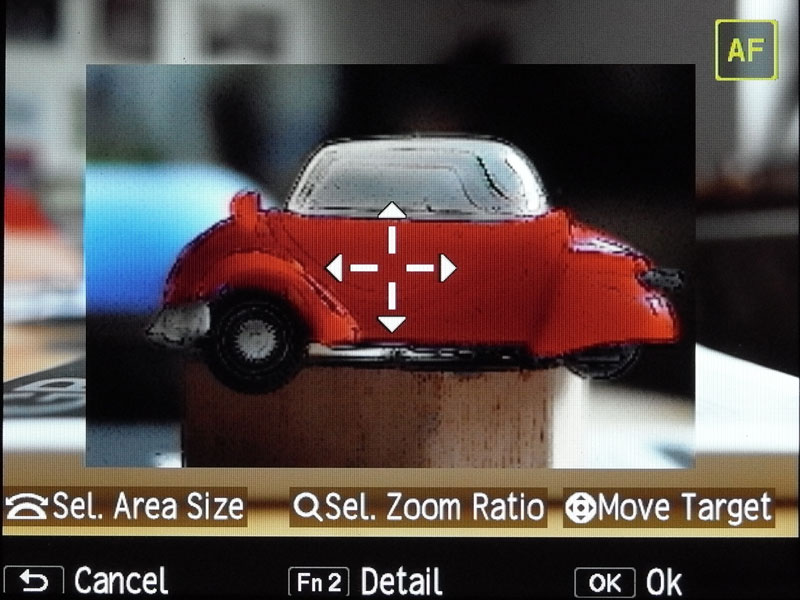
What is focus assist and which focus assist modes are available for the Ricoh GR?
Focus assist is meant to make manual focusing easer. According to the Ricoh GR manual, focus assist "intensifies the outlines and contrast inside the area, making it easier to adjust the focus." The four modes are explained as follows (with additions by me; see also the Figures below):
- MODE 1: Emphasizes contrast and outlines (white shimmering of ourlines)
- MODE 2: Emphasizes outlines (b&w only, similar to a highpass filter)
- MODE 3: Black and white reversal of MODE 1 (cannot see the difference to MODE 1)
- MODE 4: Black and white reversal of MODE 2 (cannot see the difference to MODE 2)
 |
 |
|
 |
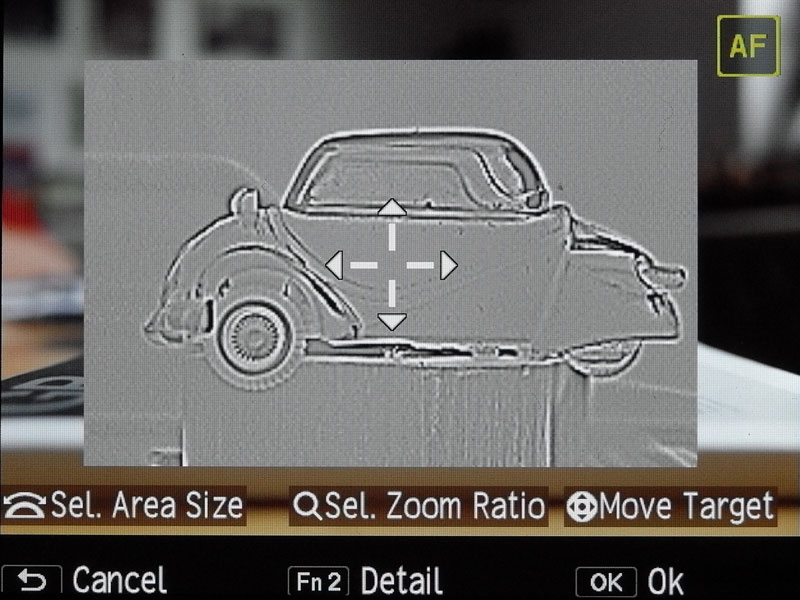 |
Figures: Focus assist Mode 1 (top left), Mode 2 (top right), Mode 3 (bottom left; B&W reversal of Mode 1) and Mode 4 (bottom right; B&W reversal of Mode 2)
Hint: Focus assist can not only be used with manual and snap focus (to find focus), but also with AF and may help to verify that the focus is correct. Tom Caldwell pointed out in a post directed at me that you can set "custom snap distances" this way:
- I don't use focus assist for MF, as MF on Ricoh cameras is a bit of a pain. But I do find it useful in regular MODE 2 magnified with pinpoint focus where the point of focus can be seen as very precise and the DOF very visual even in AF mode.
- So pinpoint focus very precisely and then switch to MF - then you have made yourself a very precise pre-selected custom snap mode.
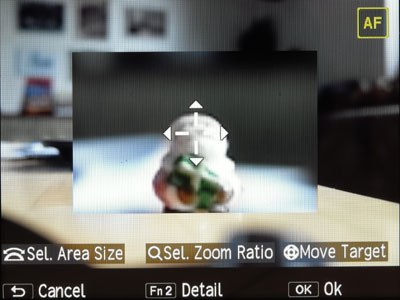
I cannot find focus assist in the menu - where is it?
The Ricoh GR's "focus assist" functionality for supporting manual focusing is somewhat "obscured" in the menu system. Go to "Shooting > FA/Mode Target" to invoke a screen with a lot of options:
 |
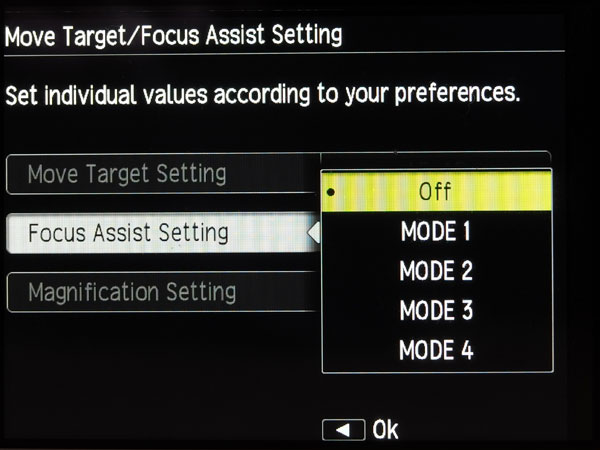 |
Figures: The screens involved using the focus assist functionality; the "Detail" screen in on the right
For details, see page Manual Focusing and Focusing Support (for GR).
Exposure, ISO, Modes, Colors
How can I lock exposure? How can I lock focus? How can I lock both of them?
Lock Focus and Exposure
The simplest method is to lock both, exposure and focus, is to press the shutter-release button down halfway. Then reframe the picture and press the shutter-release button completely to take the picture.
Alternatively, you can press the AF button (see Figure below) to lock both. Before that you have to set the button in menu "Key Custom Options > AEL/AFL Setting" to AEL/AFL.
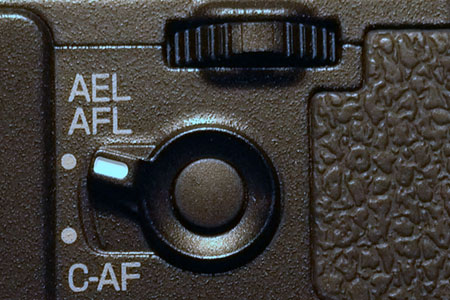
Figure: The AF function switching lever with the AF button at its center
Lock Exposure
For locking exposure alone, you can use the AF button (see Figure above). Before that you have to set the button in menu "Key Custom Options > AEL/AFL Setting" to AEL.
Lock Focus
For locking focus alone, you can use the AF button (see Figure above). Before that you have to set the button in menu "Key Custom Options > AEL/AFL Setting" to AFL.
You can lock focus alone by focusing with autofocus and then switching to manual focus using the "AF/MF" function, which keeps the focus from AF to MF. Typically, you assign it to one of the function buttons.
Finally, you can also use the "Focus" setting in the "Shooting" menu or the Adjust lever settings (if you assigned "Focus" to one of the the five available positions) to switch to MF, but this is more cumbersome.
What is the TAv mode?
The Ricoh GR has inherited the TAv mode from Pentax. In this exposure mode, you can specify both aperture and shutter speed - the camera adjusts ISO for a correct exposure.
The TAv mode caused many discussions in the Ricoh forums on the Internet, and many posters claimed that it has flaws. Since I do not use this mode, I cannot comment on such claims - but see the next question...
Should TAv mode be avoided? In shooting with the Ricoh at night in TAv mode and it chose 25,600 for the ISO for some of the photos.
This question was asked in the Ricoh forum at dpreview in December 2013. The poster also added that he has Auto ISO set with a maximum of 3200 and 1/60 (which is known to be ignored in TAv mode). When there is little light available, it can indeed happen that the camera increases ISO up to 25,600 in order to achieve correct exposure, which may lead to unusable results. Therefore, the question can be answered with "yes" for night shots. This is, however, not so much of a problem in daylight...
The camera wont let me select "Auto-Hi" for some reason, it just goes to "Auto" when I select "Auto-Hi". Am I doing something wrong?
A poster at the dpreview Ricoh forum sent this question (he had bought a new GR). In a follow-up post, he wrote that he had found that he had activated dynamic range compression, and this was the reason for the problem. In the following, I would like to list what the manual states:
On page 46 (Setting the ISO speed), it says in a note:
- If [Dynamic Range Correction] is set in the [Shooting] menu, the ISO speeds that can be set are limited. (=> P. 48)
On page 49 (Dynamic range correction), it states in a "Caution" section:
- When dynamic range correction is set, the ISO sensitivity will work in [Auto] when it is set to [AUTO-HI].
Thus, the manual is not very specific on the "ISO" page (p. 46)... You will find the details on which ISO settings are possible for which strength of dynamic range correction on page 48.
What does the function "Switch Shooting Mode" do?
Ricoh introduced the function "Switch Shooting Mode" to support mode handling for the custom settings. It took me a while to understand that this function actually serves two purposes:
- To temporarily switch the shooting mode when one of the three MYx
settings is set on the mode dial.
This setting gets lost when the mode is changed or the camera is turned off. - To change = edit the shooting mode for an already defined MYx set of custom
settings in the menu.
This setting remains in effect until you edit the set again.
Below are more extended explanations.
1. Switch Shooting Mode when in MYx Mode (Mode Dial)
When you select a MYx mode on the mode dial, the camera sets the shooting mode (Auto, P, A, S, M, or SCENE mode) that was assigned to this MYx mode. You can change the shooting mode temporarily, that is, until you change the MYx mode to another MYx or shooting mode or if you switch the camera off. This is done in the "Shooting" menu using item "Switch Shooting Mode".
2. Change Shooting Mode for a MYx Set of Custom Settings
When you created a MYx set of custom settings and want to change the shooting mode (or you forget to set it properly at the beginning), you can do so by using the "Switch Shooting Mode" function as well, but this time by entering the "Key Custom Options" menu, selecting item "Edit My Settings", then selecting the respective MYx mode and finally item "Switch Shooting Mode". Depending on the Shooting mode, you can also save and aperture (A mode), shutter speed (S mode), or both (M mode).
For screen examples, see page Custom Settings.
I cannot find item "Switch Shooting Mode" in the "Shooting" menu. What did I do wrong?
Probably, your camera is NOT set to one of the three MYx modes on the mode dial. The menu item "Switch Shooting Mode" is only used for switching the shooting mode while the camera is set to on of the three MYx modes.
How can I use the program shift function? Can it be combined with AF/exposure lock?
The program shift function is available in P mode only and allows you to change the shutter speed/aperture combination while maintaining a constant exposure value (EV). This allows you to adapt the shutter speed or aperture to your needs if you do not agree with what the P mode selected.
To measure exposure, you have to briefly press the shutter release button: The shutter speed and the aperture values appear in white (there is a white triangle before each value to indicate that it can be shifted). Then release the button and turn the up-down dial (within about 10 seconds) to set the desired shutter speed/aperture combination if needed. When you shift the shutter speed/aperture combination, this is indicated by a yellow font color for the shutter speed and aperture values.
Program shift is cancelled after you took the photo.
As with other cameras, you cannot use the program shift function as long as you half-press the shutter release button. So what can you do if you want to use BOTH the AF/metering lock AND program shift? My suggestion is as follows and packaged into a small „procedure":
- Measure AF/exposure by half-pressing the shutter release button.
- Release the shutter button again.
- Turn the up-down dial to use program shift (within about 10 seconds after
releasing the shutter button).
When turning the dial, a yellow font color for shutter speed/aperture indicates that you use program shift. - Half-press the shutter release button again (within about 10 seconds).
>> If you do not move the camera too much, EV does not change, and the shifted values are kept when pressing the shutter release button again (according to my observations; observe the time limit mentioned above!). Sometimes, there can be a small change in the shutter speed (typically, it is negligible), but usually the shifted shutter speed/aperture combination is kept. - Re-frame the photo while keeping the shutter release button half-pressed.
- Take the photo.
This sounds more complicated than it actually is. Sometimes, I do not half-press the shutter release button correctly when re-framing, and the exposure values change. Then I have to redo the procedure.
How can I get vibrant colors similar to the colors of Nikon Coolpix A (I shoot only OOC JPEGs)?
Note: This is the "short" version of an answer to the question above (similar to my email reply). The "short" long can be found on page Making GR Photos more Vivid.
I do not know the Nikon Coolpix A (and its colors...) and usually prefer "standard" (or more subdued) colors to vibrant ones. So I had to look into the GR manual to find out which options you have on the GR for making colors more vibrant. There, I found two options, both of which can be found on the first screen of the shooting menu:
1. Image Settings
Here you have four options (explanations taken from the manual, p. 73):
- Standard (the default): "Normal image quality. This is selected when the image settings are turned off."
- Vivid: "Increases the contrast, sharpness, and saturation beyond [Standard] for an image quality that feels solid."
- Setting 1/Setting 2: "Sets the [Saturation], [Contrast], [Sharpness], and [Vignetting]."
The latter two options allow you to set the strength of "Vividness" (sort of saturation…), "Contrast", and "Sharpness" on a 9-point scale, with 1 = weakest, 5 = standard, 9 = strongest.
"Standard" means that all three items are set to 0, "Vivid" means that "Vividness" and "Contrast" are set to 7 ("Sharpness" remains at 5 here). I found the values for the "Vivid" and "Standard" settings in the Exif data (Ricoh section). Thus, "Setting 1" and "Setting 2" allow you to make your images even more vivid than the "Vivid" setting itself does.
(Note: There is also a setting for "Vignetting" in the dialog.)
2. Effect
Perhaps the following option is interesting for some people (I do not like its look, though; explanations taken from the manual, p. 72):
- Positive Film: "Takes highly saturated images like those taken with positive film. The [Saturation], [Contrast], [Sharpness], and [Vignetting] can be set."
That is, in addition to the "color effect" you can also play around with saturation (called "Vividness" in the menu) and contrast to make images more colorful (it is just the same dialog as for "Image Settings"). By default, all three settings, including sharpness, are set to 5.
By the way: The manual states: "If an [Effect] is set, the [Image Settings] are invalidated." In other words, an "Effect" setting overrides the "Image Settings."
Display, LCD Display, Optical Viewfinder, ...
Is it possible to have an aperture preview with the Ricoh GR?
Yes - the GR even has a dedicated button for it on the left side, called "Effect" button (and having an iris symbol), because it is originally assigned to selecting various effects. But as with the function buttons (Fn1 and Fn2), quite a few other functions can be assigned to it (it's a kind of Fn3...).
To initiate aperture preview, a measurement has to be taken first (you see aperture and/or speed values in the display). Contrary to what the manual states (p. 44), you need not half-press the shutter release button all the time. The preview is shown as long as you press the "Effect" button. An iris symbol appears on the screen to indicate the preview mode. In this mode, you cannot change aperture and also not take a photo.
When there is a function assigned to the "Effect" button (I assigned "crop" mode to it), make sure to press the button longer - otherwise you might change settings.
Does the GR support an electronic viewfinder (EVF) like the GXR?
No. But you can use it with an optical viewfinder. However, as I do not have any experience with these, I cannot make any recommendations. Also note that an optical viewfinder would not support the crop modes (35 an 47 mm equiv.). But perhaps you may buy additional optical viewfinders for these focal lengths (or one that offers frame lines for several focal lengths).
Exif Data
Can I apply the information on this site on the Ricoh GXR Exif data to the Ricoh GR as well?
Regrettably, this is not possible. Up to now, however, I did not have the time to take a closer look at how the GR's stores Exif data - and what hidden information it contains.
|
made by |
| 03.04.2019 |