Astronomy | GXR · GR · RX100 M1 · RX100 M4 · RX10 M3/4 · TZ202 · X Vario · M240 · General | Photos | Conf. Places | Calendars | Art
Ricoh GR: Specialties
Snap Focus | Full Press Snap | Crop | TAv Exposure Mode | Aperture Preview | Macro Mode | Focus Assist | GR In-Camera RAW File Processing | Others | Links
Archive
On this page, I collect Ricoh GR specialties, that is, functions that are special for the GR or that you may not know because they are buried somewhere in the manuals or even missing there.
Snap Focus
Snap focus seems to be a specialty of Ricoh camera. In essence, it is a "manual" or fix focus mode, which provides photographers with a small selection of fixed distances: 1 m, 1.5 m, 2 m, 2.5 m, 5 m, infinity for the GR (the GXR has two more options). Snap focus is particularly useful for street photography: It is much faster than autofocus because the camera is "pre-focused."
You can activate snap focus in the menu: Shooting > Focus. You can also assign the focus mode selection to a function button (Fn1, Fn2, Fn3) or an Adj. lever position. Snap focus can also be activated in Multi AF and Spot AF mode by pressing the shutter speed button down (full press snap). Read more about this function below.
You can select the snap focus distance in the menu: Shooting > Snap Focus Distance (default: 2.5 m). Setting the snap distance can also be delegated to an Adj. lever position, a function button (Fn1, Fn2, Fn3), or to turning the up-down dial while pressing the macro button. For details, see above.
When using snap focus, including infinity, a DOF scale appears in the viewfinder with a green depth of field indication (see below), provided you are in Av, TAv, or M mode.
MF and "Custom Snap Focus Distances"
Of course, you can achieve the same effect with manual focus (MF), but with MF you not only lack a set of useful predefined distance settings, focusing the GR manually is very cumbersome in my view. But, of course, you can do this in advance before you go out shooting in the street. You can also use MF if you need a distance that is not available in snap focus. Or you use AF on an object at the wanted distance and switch to manual focus (AF/MF toggle, can be assigned to a function button), thus locking focus and create a "custom snap focus distance" as Tom Caldwell once said.
As with every manual focusing, you have to rely on your subjects being within the depth of field range for your settings, which largely depends on the aperture and distance values. For achieving more depth of field, you may also want to rise ISO to higher values than usual so that you can use smaller apertures.
Snap Focus and Hyperfocal Distance
On page Hyperfocal Distance and Combining it with Snap Focus, I discuss how snap focus and the so-called hyperfocal distance can be brought together. Hyperfocal distance means that everything between half the hyperfocal distance and infinity will be sharp on a photo. In some cases, for example, when taking photos of people, it may also not be too important that the depth of field really extends to infinity... For the Ricoh GR with its fixed lens it is quite easy to calculate tables that give you some guidance, which aperture to set at which snap distance to achieve hyperfocal or near hyperfocal distances.
There is, however, a solution that makes it unnecessary to calculate and print such tables - and it is already built into the Ricoh GR (and GXR), albeit not for all the exposure modes. Elsewhere, I also propose a so-called "hyperfocal autofocus" (HFAF), which would automatically set the camera to a hyperfocal distance. In certain exposure modes, the camera can even pre-focus, in others has to perform simple calculations after exposure has been determined to set the distance. But this should be much faster that normal automatic focusing.
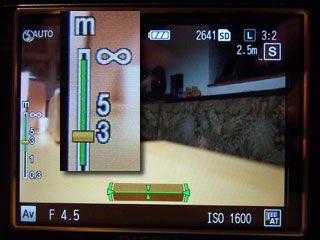
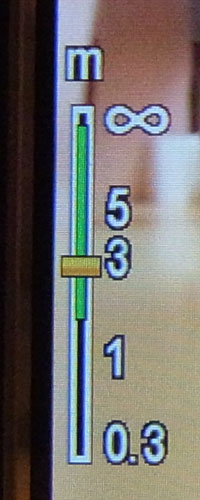
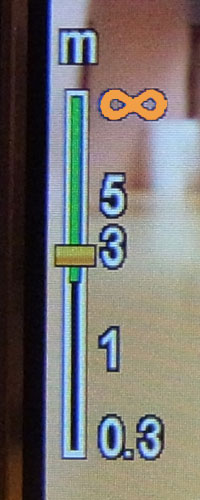
The simple solution that I mentioned is the DOF indicator that the GR displays in the Av, TAv, and M exposure modes (GXR: A and M). Just turn the front wheel to set the aperture so that the green DOF bar touches (Figure 2) or nearly touches (Figure 1) infinity - that's it. You can do so in advance so that this step does not waste precious time.
 |
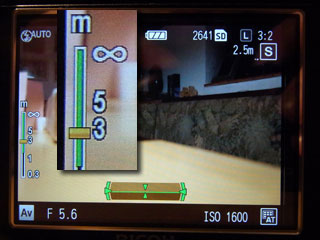 |
Figures 1-2: Snap focus set at 2.5 m. f/4.5 (left) is nearly hyperfocal, f/5.6 (right) is hyperfocal
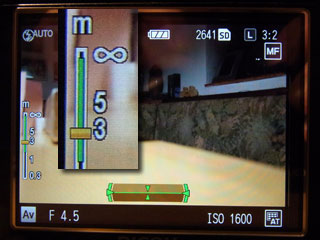
The same approach can also be used for manual focusing (see Figures 3-4). The advantage that you get here is that, in my opinion, changing aperture manually is much simpler than setting distance manually (you need not press the focus button while turning the up-down wheel).
 |
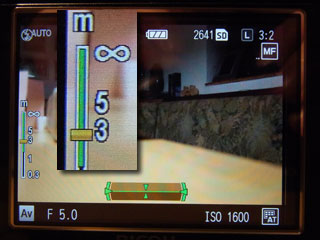 |
Figures 3-4: Manual focus set to about 2.5 m. f/4.5 (left) is nearly hyperfocal, f/5 (right) is hyperfocal
I would like to make one suggestion for improvement, though (inspired by Tom Caldwell's proposal): Change the color of the infinity symbol from white to green as soon as the far limit reaches infinity. Also change the color to yellow, orange, and finally red (or whatever color), when the far limit would be far beyond infinity, resulting in a too high near limit, that is, inefficient focusing (of course, you may want to have it that way...).
 |
 |
 |
Figures 5-7: Using the infinity symbol as an indicator of hyperfocal distance. White = far limit of depth of field below infinity, green = hyperfocal distance (about), yellow > orange> red = far limit beyond to way beyond infinity
Full Press Snap
Full press snap allows users to press the shutter button in one motion when Multi AF or Spot AF is selected as focus mode and switches the mode to snap focus at a preselected distance. The default distance of 2.5 m is useful for street photography and many indoor situations. However, it is less useful for landscape shots. (See above for how you can set the snap focus distance.)
Full press snap is enabled (On) by default! (indicated by an undocumented "FS" in the viewfinder/LCD screen), because it is intended as a means not to miss a shot due to slow autofocus. This functionality had been requested by Harold Glit and implemented by Ricoh according to his specification (as I was told by him), including enabling the function by default.
Full press snap can be disabled or enabled in the menu: Shooting > Full Press Snap (On/Off/Auto-Hi ISO, default: On; "Auto-Hi ISO", is like "On" and also sets ISO to "Auto-Hi"). When full press snap is activated, "FS" and the snap focus distance are displayed in the viewfinder/LCD screen.
Here is the description of the full press function taken from the GXR manual (adapted):
- Take photographs without pausing to focus the camera when Multi AF or Spot AF is selected for focus.
- If the function is On the following happens: If the shutter-release
is pressed all the way down in one motion, the camera will take a picture
at the focus distance selected for Snap Focus Distance (which is 2.5 m by
default). Choose this function when quick shutter response is required.
Tip: Autofocus - The camera will focus normally if you press the shutter-release button halfway (page 69 in the English GXR manual, adapted; see also page 58 in the English GR manual).
In my opinion, full press snap is an "expert function" that should not be enabled by default. I assume that some users are not be aware of this function, may not know what the symbol "FS" means, or may just overlook it. Therefore, they may be puzzled by the results that they get from time to time: unexpected fuzziness. They may not realize that full press snap took over, and it will be hard for them to find the real reason for the fuzziness. Probably, they will simply assume that Multi/Spot AF failed.
See my conclusions and suggestions to Ricoh regarding this function.
Crop
Simulation of Other Focal Lengths
By default, the Ricoh GR has a focal length of 28 mm (equiv.) and takes photos at 16 Megapixels (provided that you do not set a smaller pixel count). The GR, however, offers two modes that simulate larger focal lengths by cropping the image (and thus leading to photos with fewer pixels).
- When the camera appeared on the market in 2013, it offered only cropping to 35 mm equiv. (10.3 Megapixels*).
- With firmware V 2.03, cropping to 47 mm equiv. was added (5.6 Megapixels*).
*) Earlier sources stated 12.8 Megapixels for 35 mm and 9.5 Megapixels for 47 mm.
For easy access to the crop function, you can assign it to the "Effect" button (or Fn3 button) at the left side of the camera. It toggles you trough the modes 28 mm, 35 mm, and 47 mm. The latter two are indicated on the LCD screen.
Why would you need an "in-camera" crop function when you can crop images in a photo editing program? The simple answer is that this allows you to compose your photo more easily because the viewfinder shows exactly what you will get at the respective focal length.
See page Crop Modes for some more details and sample images.
1:1 Image Format (Square Images)
Much like other Ricoh cameras, the Ricoh GR allows you to take photos in square format. It crops images to this format and displays them accordingly in the viewfinder. Here there same holds true as for the crop mode: Cropping the image ion the viewfinder makes composing easier than cropping afterwards.
TAv Exposure Mode
Regrettably, with the introduction of the Ricoh GR, Ricoh changed the labels on the mode dial from PASM to PAvTvTAvM, probably in accordance with the Pentax labelling. Thus, aperture priority mode changed from A to Av, and shutter priority mode changed from S to Tv.
On the positive side, the GR also inherits the TAv mode from Pentax, in which you can specify both aperture and shutter speed - the camera adjusts ISO for a correct exposure. The TAv mode caused many discussions in the Ricoh forums on the Internet, and many posters claimed that it has flaws. Since I do not use this mode, I cannot comment on such claims.
Aperture Preview
Quite unusual for a pocket camera, the Ricoh GR offers an aperture preview. The GR even has a dedicated button for it on the left side, called "Effect" button (and having an iris symbol), because it is originally assigned to selecting various effects. But as with the function buttons (Fn1 and Fn2), quite a few other functions can be assigned to it (it's a kind of Fn3...).
Note that to initiate aperture preview, a measurement has to be taken first (you see aperture and/or speed values in the display). Contrary to what the manual states (p. 44), you need not half-press the shutter release button all the time. The preview is shown as long as you press the "Effect" button. That is, you enter this mode by pressing the "Effect" button a little bit longer and then hold it. You leave it when you release the button.
An iris symbol appears on the screen to indicate the aperture preview mode. In this mode, you cannot change aperture and also not take a photo.
ND Filter
The Ricoh GR has an inbuilt ND (neutral density filter) so that you can use the camera in brighter lighting conditions.
In menu "ND Filter" you can select to have the filter always on ("ON"), or that its operation depends on another menu setting ("OFF"). The menu option "ND filter settings" has the values "AUTO" and "MANUAL":
- AUTO: The ND filter is used when the exposure is outside the normal range (note that it is NOT used in P and M mode). According to the manual, it is also used, when a respective icon appears on the screen when you half-press the shutter button. Regrettably, I do not understand, what that means...
- MANUAL: The ND filter is not used.
If you want to activate/deactivate the ND filter manually and easily, you can assign it to a function button (Fn1 or Fn2) or to the "Effect" button. An "ND" on the screen indicates when the ND filter is active.
Effect Button
The new "Effect" button on the left side of the camera (seen from the back) is a new addition and primarily meant to assign effects easily. The following effects are available:
- Black & White: Creates a black and white picture.
- B&W (TE): Adds tint to black-and-white images.
- High Contrast B&W: Takes shots with stronger contrast than [Black & White]. Makes it possible to take images with a grainy feel, such as that created by using ultra-high-sensitivity film in a film camera or by push processing film at the development stage.
- Cross Process: Takes images with tones that differ from the actual colors.
- Positive Film: Takes highly saturated images like those taken with positive film.
- Bleach Bypass: Takes images with low saturation and high contrast.
- Retro: Takes images that look like old photos.
- Miniaturize: Takes pictures that make the landscape look as if it has been miniaturized.
- High Key: Takes images with a bright atmosphere.
The "Effect" button can also be used as a third function button (aka "Fn3") if you do not want to use effects.
Moreover, the "Effect" buttons serves for activating aperture preview. You enter aperture preview mode by pressing the "Effect" button a little bit longer and then hold it. You leave it when you release the button.
Macro Mode
Ricoh's small sensor cameras, including the GRs, are extremely good macro shooters. The Ricoh GXR S10 and particularly, P10 camera units demonstrate what is possible. The introduction of an APS-C sensor to the GR line, however, changed this for technical reasons, which may be a disappointment to some - old and new - GR users. The shortest distance is about 10 cm in contrast to 1 cm for many of the small sensor cameras. Ricoh does not disclose the maximum possible magnification for the GR in macro mode, but lists, at least, a minimum object size of 12 cm x 8 cm in the manual. To verify this, I took a few test shots with both AF and manual focus (both led to about the same result). I found a minimum object width of about 11.2 cm (object height is 7.5 cm for an 3:2 image format). This allows me to calculate the magnification (method from dkpeterborough, L-Camera-Forum):
- Sensor width / object width = 23.6 [mm] / object width [mm]
- 23.6 [mm] / 112 [mm] = 0.21 => 1:4.75 or about 1:5 (my experiments)
- 23.6 [mm] / 120 [mm] = 0.2 => 1:5 (Ricoh data)
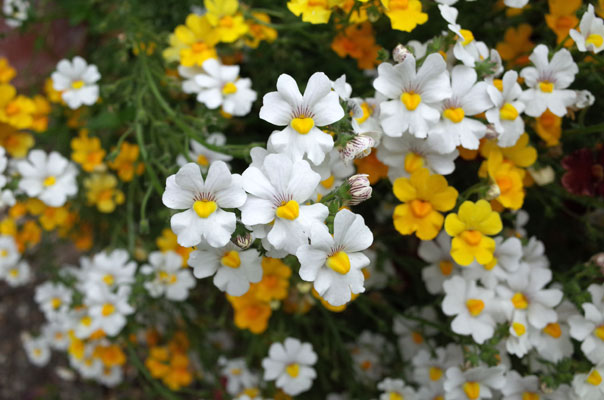
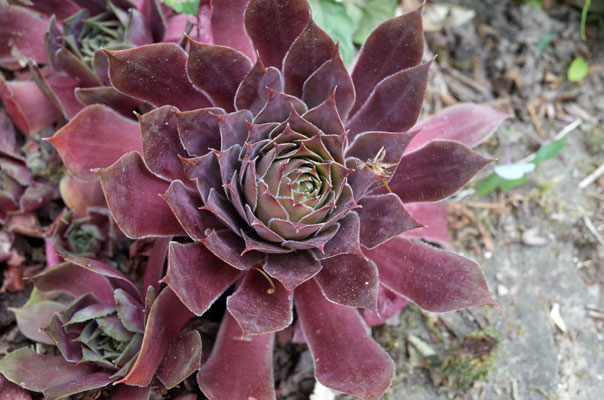
This result is probably not impressive, but for close-up shots of flowers the close-up abilities of the GR are still useful, as the samples below demonstrate.
For more samples, see page Close-Up Samples. For some first experiences, see Taking Close-Up Photos.
Note: For some information on close-op photography with the Ricoh GR (including image examples), see also Macro photography with the Ricoh GR V (Roger Packer).
Examples
Focus Assist
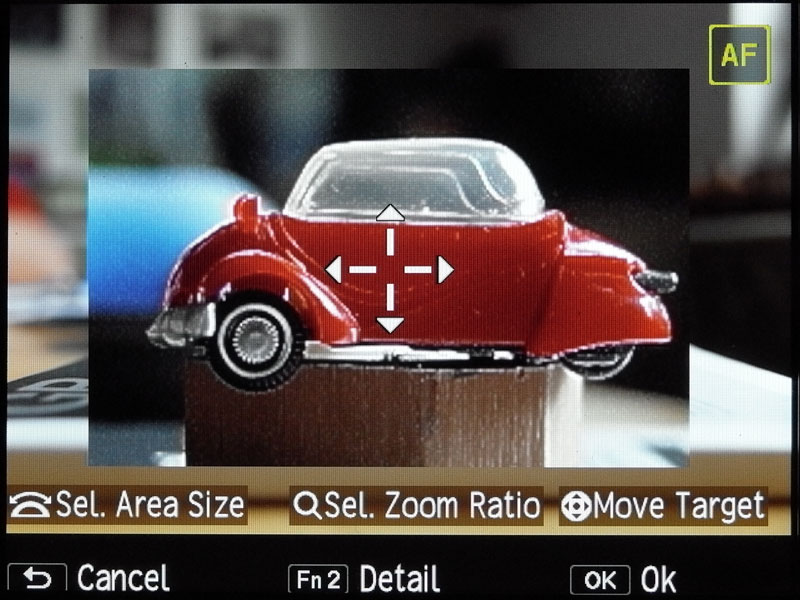
Focus assist is meant to make manual focusing easer. The Ricoh GR offers a "focus assist" functionality for supporting manual focusing - although it is fairly difficult to find in the system menu. According to the GR manual, focus assist "intensifies the outlines and contrast inside the area, making it easier to adjust the focus." The four modes are explained as follows (with additions by me):
- MODE 1: Emphasizes contrast and outlines (white shimmering of ourlines)
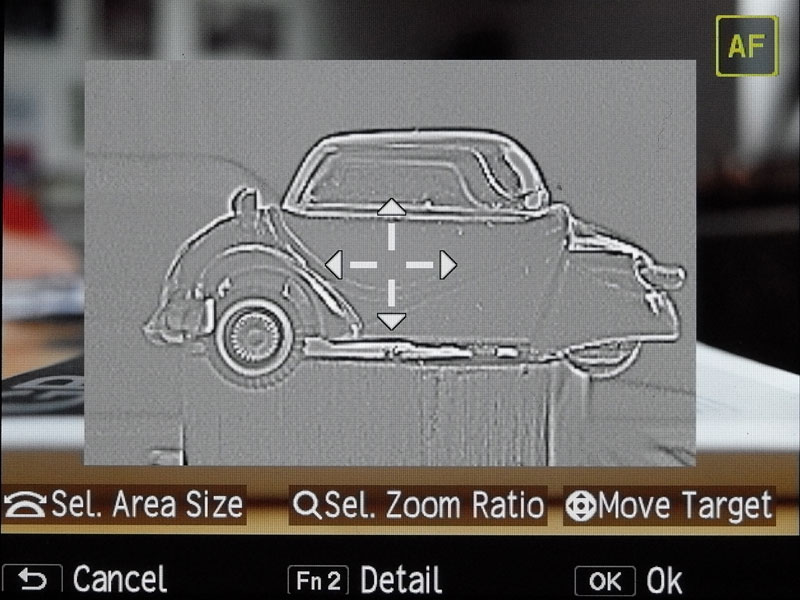
- MODE 2: Emphasizes outlines (B&W only, similar to a highpass filter)
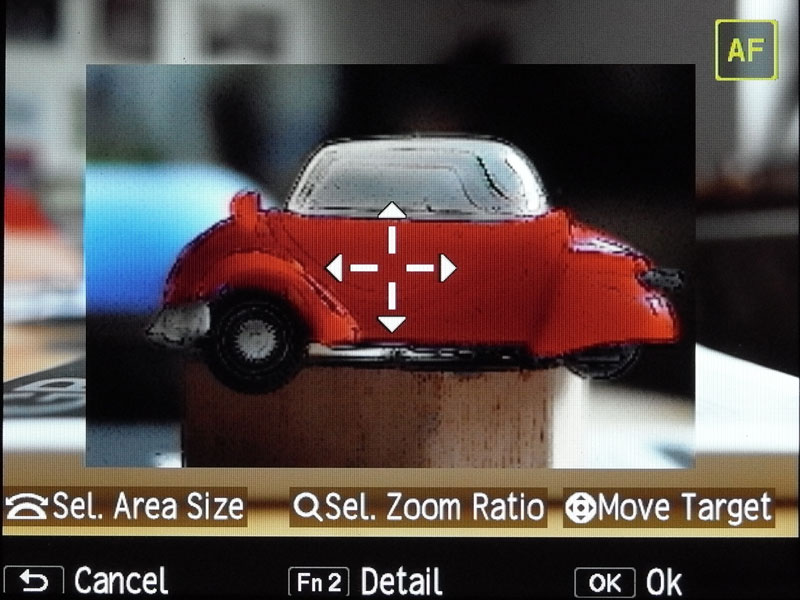
- MODE 3: Black and white reversal of MODE1 (I cannot see the difference to MODE 1)
- MODE 4: Black and white reversal of MODE2 (I cannot see the difference to MODE 2)
 |
 |
|
 |
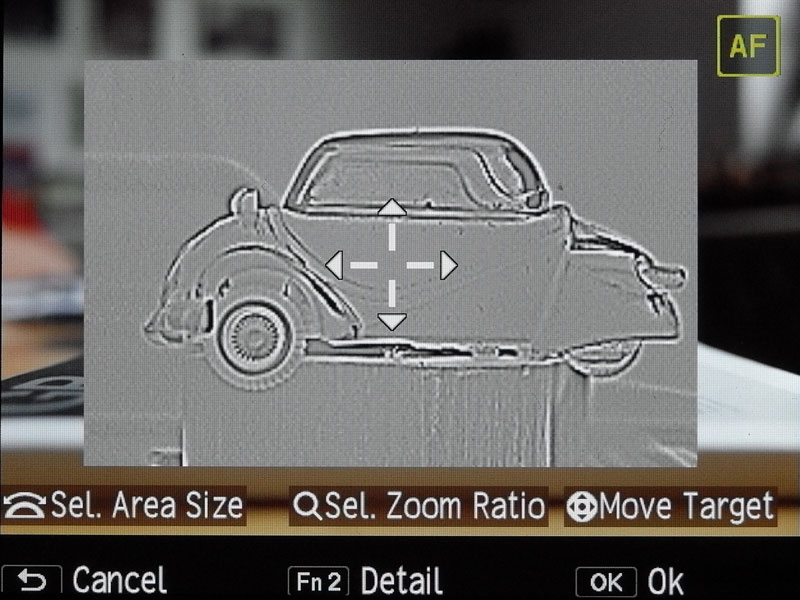 |
Figures: Focus assist Mode 1 (top left), Mode 2 (top right), Mode 3 (bottom left; B&W reversal of Mode 1) and Mode 4 (bottom right; B&W reversal of Mode 2)
Hint: Focus assist can not only be used with manual and snap focus (to find focus), but also with AF and may help to verify that the focus is correct. Tom Caldwell pointed out in a post directed at me that you can set "custom snap distances" this way:
- I don't use focus assist for MF, as MF on Ricoh cameras is a bit of a pain. But I do find it useful in regular MODE 2 magnified with pinpoint focus where the point of focus can be seen as very precise and the DOF very visual even in AF mode.
- So pinpoint focus very precisely and then switch to MF - then you have made yourself a very precise pre-selected custom snap mode.
GR In-Camera RAW File Processing
The Ricoh GR has a built-in RAW processor, which I never have used, since I take only JPGs. Tom Caldwell explored this feature and posted his experiences in a thread in the Ricoh forum on dpreview. He authorized me to post his experiences on my site as well (with a few minor changes). Here they are!
This is perhaps a little used feature. Maybe those who wish to process their RAW files are already well versed in their post production raw file processing. But the in-camera RAW processing does not interfere with the original raw image at all and therefore in-camera can be supplementary as well as complementary and some might even decide that they hardly need any further processing at all. It is very flexible. You need to capture either raw or RAW+JPG for it to work. Complaints have been leveled that if RAW-only capture is used then the zoom in playback is not very good. This is because that even with RAW file capture only there is a necessary small VGA JPG image embedded so that a playback image can be seen. As it is VGA-only the magnification fidelity is just not there. For those that wish to keep capturing RAW-only and still zoom in to the non-existent full size JPG for whatever verification there is a way: In "Playback" the first menu item should be "Raw File Development". Therefore "Menu > Right Arrow > Enter" will quickly create a full size JPG in three quick clicks which will be stacked immediately behind the original RAW file in camera and can be zoomed in at will. When finished it can be deleted therefore retaining a pristine set of RAW only files for downloading to computer. Another little benefit of the RAW file processor is that camera settings such as white balance, exposure balance, etc. can be altered after the event as well as removing "effects" applied or B &W captures can become normal color images. Levels compensation, white balance compensation, color moire correction (on JPG files), trimming, resize and skew correction are all separate functions outside the actual RAW development area and can be applied to JPG files only. Other little helpers that might have gone unnoticed are the fact that every image created by the raw file development is created with identical dimensions and stacked immediately after the original RAW file capture (brilliant). This means that if you zoom in on detail by using the jog lever - right and left (as suitable) you can compare exactly the same magnified area of an image before and after a processing has been applied. Now to move into the RAW Development proper - if you see the message "Cannot convert the RAW file to a JPG file" it actually means that you are trying to convert a JPG file and not a RAW file - you might have to go back one or more images until you find the actual original (first) capture which would include the RAW file data. Or you haven't caught a RAW file with your current cameras settings. Areas that you can adjust in RAW File Development are:
The user gets a small but useful package of processing controls that do not interfere with normal RAW processing functions. I find that this feature can allow me to while away some spare moments whilst the images are still on camera. Rejecting ones that I don't like and trying a few "what if?" looks. I can also capture using say hi-intensity B&W and recover the original color version in camera. Once I have a few versions I can try cropping the JPG in-camera without losing the RAW version's integrity. Why this does not seem to be used very often must have something to do with crowd-consensus that in-camera JPG engines are not very good or "I can fix anything from the RAW file in my computer". But everyone seems very happy with the JPG files the GR produces and if so then a little bit of help might be all that is needed. Besides, I quite like to see what different camera setting might have produced after the event. By Tom Caldwell (www.dpreview.com/forums/post/55742932) |
Others
Interval Shooting
Interval shooting allows you to shoot a series of photos at fixed time steps (1 sec, 2 sec, 5 sec, ... 55 sec, 1 min, ... 60 min) for a definite (1...99) or indefinite number of times (limited by memory space). I used this function only a few times with the GX100 long ago (cloud movie, star movie).
Interval Composite (Shooting Star Trails)
Merges a series of continuous images taken at fixed intervals in such a way that the bright areas remain. Use when you want to record the trails of light formed by stars or the moon by shooting a fixed position in nightscapes.
Multi Exposure Shooting
Shoots images and merges them together. Up to a maximum of five images can be merged.
Links
- GR - in-camera raw file processing (posting by Tom Caldwell, Ricoh forum on dpreview): www.dpreview.com/forums/post/55742932
|
made by |
| 03.04.2019 |