Astronomy | GXR · GR · RX100 M1 · RX100 M4 · RX10 M3/4 · TZ202 · X Vario · M240 · General | Photos | Conf. Places | Calendars | Art
Ricoh GR: Custom Settings
Introduction: How the Custom Settings Are Organized | Creating, Refining, and Using the Settings Sets | Switch Shooting Mode | How to Use the Custom Settings | Conclusions | Links | Appendix: The Settings Screens
Archive
On this page, I describe how you can record up to six sets of custom settings for the Ricoh GR, the six so-called box modes (the overall practice is similar to the Ricoh GXR).
Introduction: How the Custom Settings Are Organized
In the following, I will describe how the custom settings are organized on the Ricoh GR and how you can create sets of them, store them, and recall them for use (note that the overall practice is similar to the Ricoh GXR). The Ricoh GR has three primary sets of custom settings MY1, MY2, and MY3 (I will call them collectively "MYx"), which can be easily accessed from the mode dial. They can also be given names that indicate their purpose (provided you choose a proper name...). So, at least on the GR, there is no excuse for not remembering what a set of settings is good for.
In addition to the three "MYx" sets of custom settings, the Ricoh GXR offers six more stores for sets of custom settings in the "My Settings Box" (also called "box modes"). The six box mode storage locations are, however, not directly accessible - only the three "MYx" setting sets on the mode dial are. Being only able to access three sets of settings directly, makes things a little complicated: If you need to use another set, you have to copy it to one of the three "MYx" locations and thus, overwrite a set (which should be stored safely in one of the six box mode storage locations).
Creating, Refining, and Using the Settings Sets
A set of custom settings comprises a huge number of options, most of which can be edited in a dedicated menu. I would like to refer you to the GR manual and to Appendix: The Settings Screens for details.
In the following, I describe how you can create sets of settings, assign them to one of the nine possible storage locations, edit them, and copy them to the three "MYx" storage locations for direct access from the mode dial.
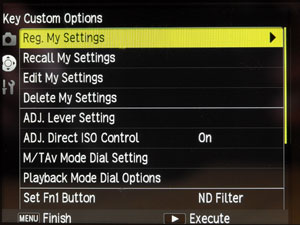
All "settings work" is done in the "Key Custom Options" tab in the menu, where you have three options (starting from the top of the menu page) to deal with sets of settings:
- Reg. My Settings (Register My Settings): Allows you to store the current settings in any storage location, either MY1 to MY3 (three locations), or the "My Settings Box" (six locations).
- Recall My Settings: Allows you to select a set of settings from one of the six storage locations in the "My Setting Box" and assign it to one of the three "MYx" locations (MY1, MY2, or MY3). Actually, it's the other way round: first you select the target location, then the set of settings.
- Edit My Settings: Allows you to edit a set of settings in any of the nine locations, either in MY1 to MY3 (three locations) or the "My Settings Box" (six locations).
In the following, I describe the three functions in more detail.
Register My Settings
Start from a state of camera settings that are useful for a certain purpose and then register these in a set of custom settings using the menu. To do so, press the "MENU/OK" button and select the "Key Custom Options" tab (the second tab).
 |
 |
|
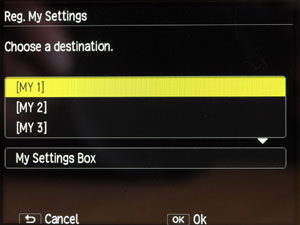
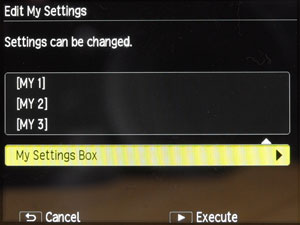
| In the "Key Custom Options", select "Reg. My Settings" and move the cursor to the right. | You can store the current settings in any storage location, either MY1 to MY3 (three locations), or the "My Settings Box" (six locations). | |
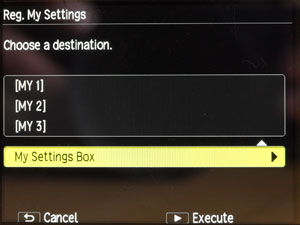
I only show the My Settings Box: |
||
 |
 |
|
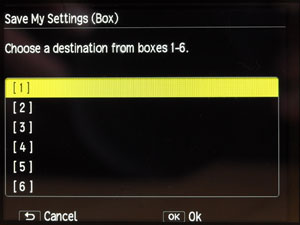
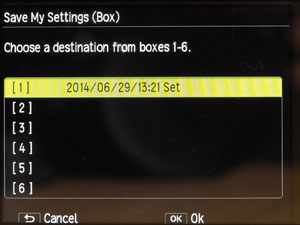
| Select "My Settings Box" and move the cursor to the right. | Select one of the six box locations and press "OK" (you can replace or update an existing setting). | |
Overwriting Existing Settings, Confirmation, Naming
 |
 |
|
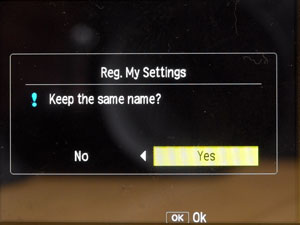
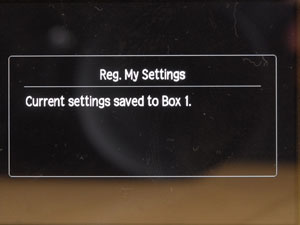
| If there is already data in a storage location, a dialog appears that asks you whether you want to keep the current name of the settings set. | Finally, you get a confirmation message that the settings are registered in the selected location. In this case, it is a box location, namely "Box 1." |
The settings will automatically be given a name that reflects the date of the registering. Here you can see an "automatic name" for the "Box 1" location:
You may change the name later by editing the set (see below).
Edit My Settings
This functionality allows you to edit and thus, refine, a set of settings after you saved it in one of the nine storage locations. Usually, you will find that some changes to the initial settings are required, and this is the way to go if you want/need to refine your settings. To do so, press the "MENU/OK" button and select the "Key Custom Options" tab (the second tab).
|
 |
|
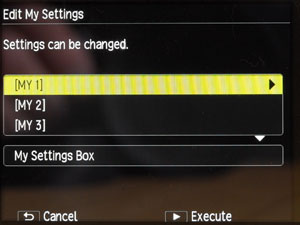
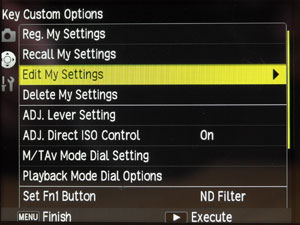
| In the "Key Custom Options", select "Edit My Settings" and
move the cursor to the right.
|
You can edit the settings in any storage location, either MY1 to MY3 (three locations), or the "My Settings Box" (six locations). | |
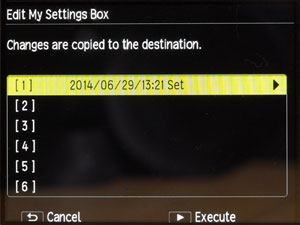
| I only show the My Settings Box: | ||
 |
 |
|
| Select "My Settings Box" and move the cursor to the right. | Choose on of the available sets (in this case, only box 1 stores a set). Move the cursor to the right to arrive at the first of several screens for setting options. | |
 |
 |
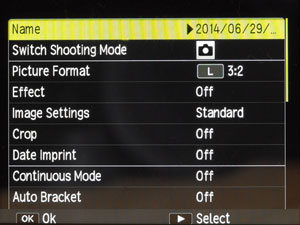
|
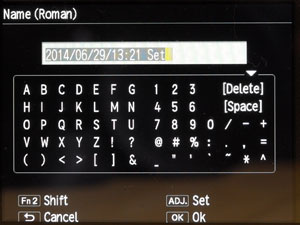
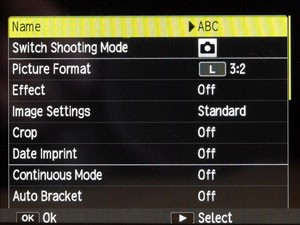
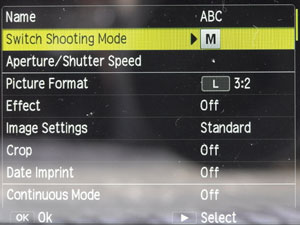
| You start with the first settings screens. The first item on this screen allows you to give a set of settings a descriptive name. | Move the cursor to the right to enter the settings name using a small alphanumeric keyboard. | |
 |
||
| Now the set has been renamed to "ABC". | ||
A set of settings comprises a huge number of options, which can all be set in the settings screens. I would like to refer you to the GR manual for details. See also Appendix: The Settings Screens for all the settings screens.
Display of Custom Settings Name
The Ricoh GR displays the name of the customs settings sets automatically (there is no option for this in the menu settings as is the case for the Ricoh GXR):
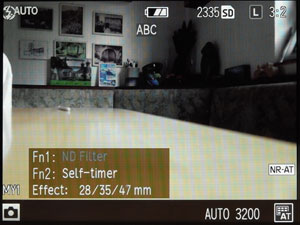
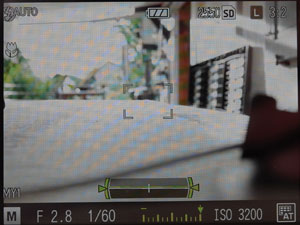
Note that the settings name, here it is "ABC", is displayed only for a few seconds after you turn the camera on or turn the mode dial to the respective "MYx" setting.
Recall My Settings
If you stored more than three sets of custom settings, that is, more than can be directly accessed from the mode dial, you will from time to time need to recall a set, assign it to one of the three "MYx" storage locations, and then turn the mode dial to this "MYx" option to activate the settings.
To assign a set of settings to an "MYx" location, first press the "MENU/OK" button and select the "Key Custom Options" tab (the second tab).
 |
 |
|
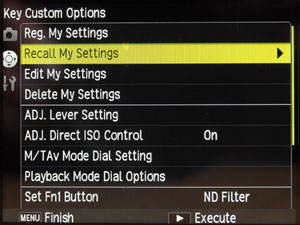
| In the "Key Custom Options", select "Recall My Settings" and
move the cursor to the right.
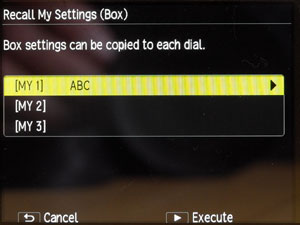
You can recall the settings from the "My Settings Box" (six locations) and store them in one of the three "MYx" locations. |
First, select the "MYx" location where you want to store the set (here it is "MY1") and move the cursor to the right again. | |
 |
 |
|
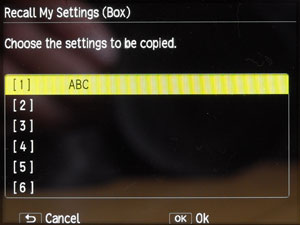
Next, select one of the available box locations and press "OK". |
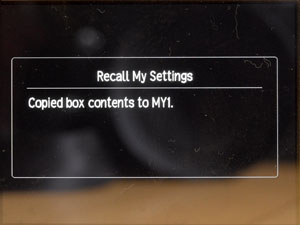
Finally, you will get a confirmation message that the settings will be recalled from the selected location and copied to the selected "MYx" location (in this case, it is MY1). |
There may be many strategies for assigning sets of settings to the nine locations. Since this is quite a complex matter, I will not discuss this topic here.
To activate the settings in an "MYx" storage location, turn the mode dial to the respective "MYx" position. This will also briefly display the name of the set of custom settings.
Switch Shooting Mode
Ricoh introduced the function "Switch Shooting Mode" to support mode handling for the custom settings. It took me a while to understand that this function actually serves two purposes:
- To temporarily switch the shooting mode when one of the three
MYx settings is set on the mode dial.
This setting gets lost when the mode is changed or the camera is turned off. - To change = edit the shooting mode for an already defined MYx set of
custom settings in the menu.
This setting remains in effect until you edit the set again.
1. Switch Shooting Mode when in MYx Mode (Mode Dial)
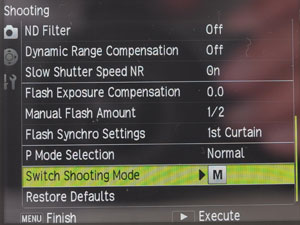
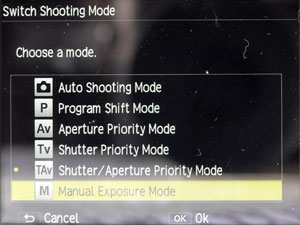
When you select an MYx mode on the mode dial, the camera sets the shooting mode (Auto, P, A, S, M, or SCENE mode) that was assigned to this MYx mode. You can change the shooting mode temporarily, that is, until you change the MYx mode to another MYx or shooting mode or if you switch the camera off. This is done in the "Shooting" menu using item "Switch Shooting Mode" (see Figures below).
 |
 |
|
| MY1 is selected, the camera is in M mode | In the "Shooting" menu, "Switch Shooting Mode" is selected | |
 |
 |
|
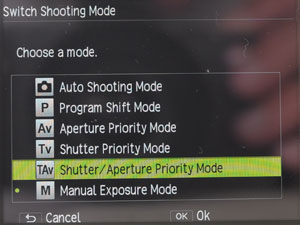
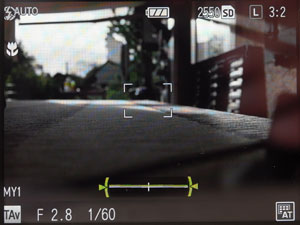
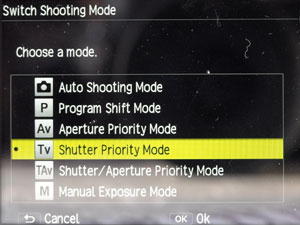
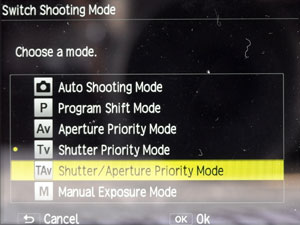
On the "Switch Shooting Mode" screen, TAv mode is selected ... |
... and appears on the shooting screen |
2. Change Shooting Mode for a MYx Set of Custom Settings
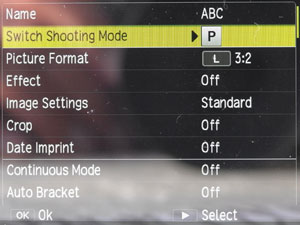
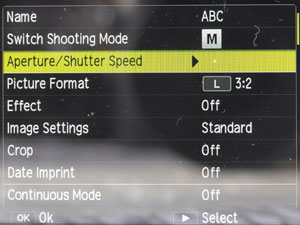
When you created a MYx set of custom settings and want to change the shooting mode (or you forget to set it properly at the beginning), you can do so by using the "Switch Shooting Mode" function as well, but this time by entering the "Key Custom Options" menu, selecting item "Edit My Settings", then selecting the respective MYx mode and finally item "Switch Shooting Mode" (see Figures below). Depending on the Shhting mode, you can also save and aperture (A mode), shutter speed (S mode) setting or both (M mode) (see Figures below).
The Figures below show how you can select a shooting mode and set aperture, shutter speed, or both while editing a MYx set of custom settings.
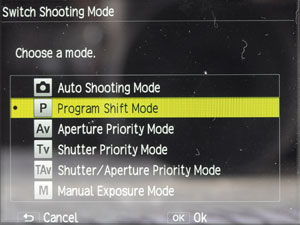
| P (Program) Mode | ||
 |
 |
|
| P mode (aperture and shutter speed not set) | P mode (aperture and shutter speed not set) | |
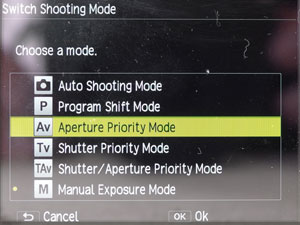
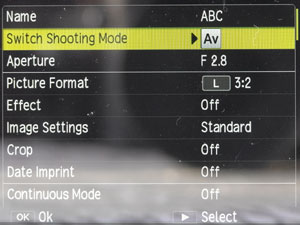
| Av (Aperture Priority) Mode | ||
 |
 |
|
| Selecting Av mode on the "Switch Shooting Mode" screen, M mode was selected | Av mode selected | |
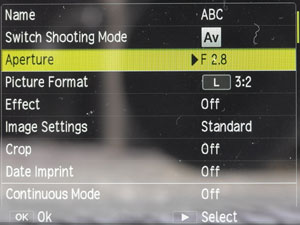 |
 |
|
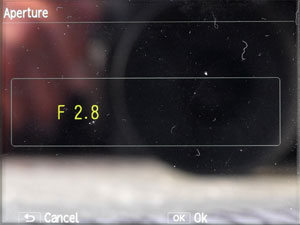
| Setting the aperture value (lists a value if one had already been selected) | Screen for setting the aperture value | |
| Tv (Shutter Priority) Mode | ||
 |
 |
|
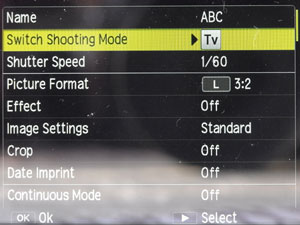
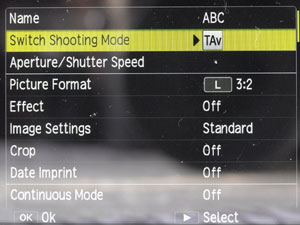
| Selecting Tv mode on the "Switch Shooting Mode" screen | Tv mode selected | |
 |
 |
|
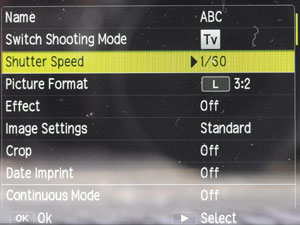
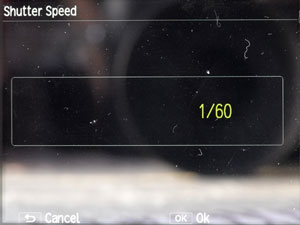
| Setting the shutter speed (lists a value if one had already been selected) | Screen for setting the shutter speed | |
| TAv (Shutter/Aperture Priority) Mode | ||
 |
 |
|
| Selecting TAv mode on the "Switch Shooting Mode" screen, Tv mode was selected | TAv mode selected | |
 |
 |
|
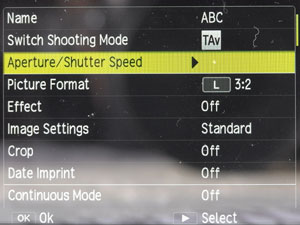
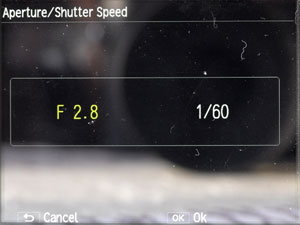
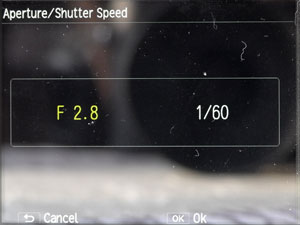
| Setting aperture and shutter speed (does NOT list values if these had already been selected) | Screen for setting aperture (active) and shutter speed | |
| M (Manual) Mode | ||
 |
 |
|
| Selecting M mode on the "Switch Shooting Mode" screen, TAv mode was selected | M mode selected | |
 |
 |
|
| Setting aperture and shutter speed (does NOT list values if these had already been selected) | Screen for setting aperture (active) and shutter speed |
How to Use the Custom Settings
On this page, I more or less describe the "mechanics" of the custom settings for the Ricoh GR. Since I did not use them up to now, I cannot give any useful advice on this matter. I therefore would like to point you to some place on the Web where this topic is dealt with.
In a blog article, entitled Ricoh GR: Why Use Custom Setting Mode?, bigheadtaco discusses the custom settings for the Ricoh GR IV. A lot of this information should also be valid for the GR (V). In a comment, he makes some remarks on this.
Further information on custom settings should be found in the Ricohforum and in the Ricoh forum at dpreview.com.
Tom Caldwell's Comments on Custom Settings (2015)
In 2015, a new discussion about GXR custom settings arose in the Ricoh forum at dpreview.com. See the respective thread "GXR box settings (for Jim)" for details. In this thread, Tom Caldwell made two longer replies to my postings and explained how he uses the GXR custom settings. In a further posting, he published a link to a GRD matrix of cutom settings in Excel format (similar to the one for the GXR and GRD III). He allowed me to cite and adapt his postings for your information. Many of his ideas can also be applied to the GR. Therefore, I repeat on this page what is relevant for the GR as well:
Use of Custom SettingsI have settled on three basic My modes which I have labeled self-descriptively "Good Light", "Quick" (low light / higher ISO) and "Black & White". I store second copies of these in box modes to allow me to play with and adjust the other three in actual use. The other three box modes I use for more "odd" uses such as square format or to switch focus peaking modes. I have not used card storage. A Proposal for Playing Around with Custom SettingsI also note a much easier way to create My/box mode outlines - just use the camera normally - adjusting to your personal taste/requirements then save the current camera state as a copy to a My mode and a box mode. Remember to name each setting saved. Now you can play with your saved My mode and if you improve it then you can update the saved settings. If you like the original you can restore it from the box mode to the My mode. (Original posting: www.dpreview.com/forums/post/55728814) Using My Modes in A "Layered" FashionThe best thing about using modes is that because they are so powerful you can make them into many things. Simply put: I use my modes as several layers of settings. 1) The deepest layer is the box mode, which is the "fall back" to settings that I prefer to use which suit me as:
These are all aperture priority, but there is also a shutter priority in the box modes where good shutter speed is essential for moving objects. Of course I can change any of my aperture priority modes to shutter priority or manual with a short trip into the menu system. 2) The three My modes - always a sub-set taken from my six box modes. These are my regular "start up sets." But often when out and about photographing I find, for example, that the default aperture that I am using doesn't suit the situation and that the shots I am taking are far enough apart to warrant switching the camera off and on. To save adjusting the aperture every time I switch on, I simply save the currently desired aperture and EV to the My mode. In the case of the APS-C zoom, this includes the zoom position of the lens which then can start up zoomed out if you so desire. 3) At the end of the day, I can chose to set my My mode back to the original if the changes were few or to recall the associated box mode and re-save it to the My mode and know that it is back to my known defaults without further need to check or remember. Another possibility is that I might be so overcome by my new grasp of settings that might chose to retain the adjusted My mode and save it also to the associated backup in the box mode. Conclusion: In this context, box mode might be thought of as "backup mode" and "My mode" as "camera switch-on mode". (Original posting: www.dpreview.com/forums/post/55735105) |
Tom Caldwell's "Modes Matrix" of Custom Settings for the GR and GRD III (2015)
Like for the Ricoh GXR, Tom Caldwell published GR and GRD III versions of the modes matrix in Excel format on the Ricohforum. For details on both matrices, see the box below:
GR Version of the Modes MatrixIn a 2015 posting "GR My and Box Mode settings" in the Ricoh forum on dpreview, Tom Caldwell reported on a GR version of the modes matrix that he had posted on the Ricohforum in 2013 and offered a link to the respective Excel spreadsheet: ricohforum.com/phpbb/viewtopic.php?f=72&t=10507#p59308 See the thread in the Ricohforum for details and the discussion around the matrix. (Original posting: www.dpreview.com/forums/post/55743482) GRD III Version of the Modes MatrixIn 2015, Tom Caldwell informed me in a posting that he also made a spreadsheet for the GRD III in 2009 and continued:
In a further 2015 posting "GRD III version of the modes matrix," Tom elaborates on the GRD III custom settings that he had published in the Ricohforum in 2009:
See the thread in the Ricohforum for details and the discussion around the matrix. (Original posting: www.dpreview.com/forums/post/55742516) |
Conclusions
I am just at the beginning of using the custom settings myself. Experience will show, whether I will really use this feature. It took me indeed a while to scan the manuals and search the Internet before I understood how it works. Once understood, it is, however, fairly simple.
Links
- Ricoh GR: Why Use Custom Setting Mode? (bigheadtaco): www.bigheadtaco.com/2013/09/ricoh-gr-why-use-custom-setting-mode.html
- Ricoh forum in dpreview.com: forums.dpreview.com/forums/forum.asp?forum=1013
- GXR box settings (for Jim) (thread started by A Subset): www.dpreview.com/forums/post/55723823
- GR My and Box Mode settings (posting by Tom Caldwell): www.dpreview.com/forums/post/55743482
- GRD III version of the modes matrix (posting by Tom Caldwell): www.dpreview.com/forums/post/55742516
- Ricohforum (Pavel Kudrys): ricohforum.com
- Re: Need some help? (GR specimen set up matrix for boxes) (posting by Tom Caldwell): ricohforum.com/phpbb/viewtopic.php?f=72&t=10507#p59308
- GRD III specimen set up matrix for boxes (thread started by Tom Caldwell): ricohforum.com/phpbb/viewtopic.php?f=53&t=3313&start=0
- Re: GRD III specimen set up matrix for boxes (posting by Tom Caldwell, revised and most recent version of the matrix): ricohforum.com/phpbb/viewtopic.php?f=53&t=3313&start=30#p13983
Appendix: The Settings Screens
In addition to the settings that are a subset of the menus and that are listed on the settings screens, when you edit the custom settings, the following camera settings are also registered in the MYx settings (for details see p. 99 in the GR manual):
- Shooting mode: Auto, P, Av, Tv, TAv, M, SCENE, Video (for details see above)
- Aperture value and shutter speed when Av/Tv/TAv/M mode (Av: aperture, Tv: shutter speed, TAV/M: both) (for details see above)
- Self-timer
- Focus position for MF
- Macro
- Flash
Navigation: Note that you can move with the up/down buttons (directional pad) between settings and with the +/- button (rocker switch) between groups of items.
Note also that the settings screen depend on the shooting mode. Below are the custom settings screens for the Ricoh GR ("Auto" shooting mode, , therefore neither aperture nor shutter speed can be edited).
|
|
|
| Settings screen 1 (Auto shooting mode) | Move the cursor to the right to enter the settings name using a small alphanumeric keyboard. | |
|
 |
|
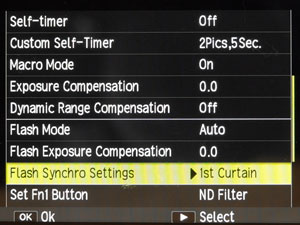
| Settings screen 1 after renaming the set | Settings screen 2 (scrolled to have no overlap) | |
 |
 |
|
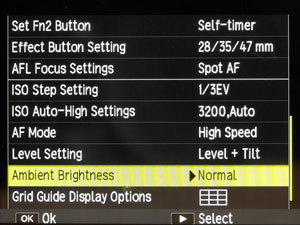
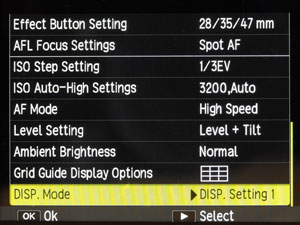
| Settings screen 3 (scrolled to have no overlap) | Settings screen 4 (one more item) |
|
made by |
| 03.04.2019 |