Astronomy | GXR · GR · RX100 M1 · RX100 M4 · RX10 M3/4 · TZ202 · X Vario · M240 · General | Photos | Conf. Places | Calendars | Art
Ricoh GR: Manual Focusing and Focusing Support
How is Manual Focusing Supported on the GR? - Overview | GR Manual Focus Methods | Support for "Pure" Manual Focusing | Conclusions | Links
Archive
On this page, I describe how manual focusing works with the Ricoh GR camera and how it is supported.
Note: For an overview of manual focusing methods, see page Manual Focusing Methods.
How is Manual Focusing Supported on the GR? - Overview
Depending on the needs of the photographer, the GR offers several methods of focusing manually:
- Snap focus (German: Fixfokus): Focus is set at a fixed distance (from a predefined selection of distances)
- Full Press Snap (German: Bild bei ganzem Durchdrücken): Autofocus is overruled if the user presses the shutter-release button quickly. Default snap focus distance is set to 2.5m, but can be changed in the menus by the users (the same values are available as for snap focus).
- Manual focus ("Pure" Manual Focus): The user sets the focus manually by pressing the macro/up button and turning the up-down dial.
- Focus Lock: Locking the focus at a certain distance for one or more shots (one might debate whether this is a manual focus method, but it fits in here...).
"Pure" manual focusing is furthermore supported in several ways (but note that these methods can also be used for autofocus):
- Depth of field display: For MF, infinity, and snap focus (Av, TAv, M exposure modes only), a distance scale with green depth of field indication is displayed in the LCD display.
- Magnification: A section of the picture can be enlarged 2x, 4x, or 8x. Either, a section of the display shows the enlarged portion (lower quality), or the enlarged section is shown full screen (better quality). The enlarged section can be moved in either mode.
- Focus assist (four methods): The GR offers four methods for supporting manual focusing: MODE 1 creates "sparkling" edges in a colored image, MODE 2 emphasizes edges in a B&W image (highpass filter), MODE3 reverses B&W in MODE 1, and MODE 4 reverses B&W in MODE 2.
GR Manual Focus Methods
The focus methods can be selected in the menu: Shooting > Focus. You can select from the following modes: Multi AF, Spot AF, Pinpoint AF, Sub. Tracking MF (manual focus), Snap (fix focus), and infinity. You can assign the "Focus" selection menu to one of the five "Adjust lever positions ", which I always do, or to a function button (Fn1, Fn2, Fn3).
Furthermore, you can activate/deactivate full press snap (item "Full Press Snap", default: "On") in the "Shooting" menu and set the snap focus distance (item "Snap Focus Distance") in the "Settings" menu - or use an Adjust lever position, a function button, or turn the front wheel while pressing the macro button.
Finally, you can assign the "AF/MF" selection to one of the function buttons (Fn1, Fn2, Fn3). This is kind of a focus lock...
Snap Focus
Snap focus allows you to preset the focus distance according to your needs. For example, street photographer may want to set the distance at 2.5 m, which is also the default snap focus distance. Infinity* is a "special" fixed distance, which can also be directly set from the "Focus" menu (like snap focus).
Snap focus distance can be set in menu "Settings > Snap Focus Distance".
Values: 1 m, 1.5 m, 2 m, 2.5 m, 5 m, infinity for the GR. You can select the snap focus distance in the menu: Shooting > Snap Focus Distance (default: 2.5 m). Setting the snap distance can also be delegated to an Adj. menu position, a function button, or to turning the front wheel while pressing the macro button.
When using snap focus, including infinity, a DOF scale appears in the viewfinder with a green depth of field indication as it does for the Ricoh GXR (see below), provided the camera is in the Av, TAv, or M exposure mode.
*) I use the infinity setting typically for sky photos, when Autofocus cannot find a target. Sometimes, I use it also for landscape and architectural shots, particularly with wide angle lenses. As I am not a "streetshooter" I neither use snap focus nor full press snap.
Full Press Snap
Full press snap allows users to press the shutter button in one motion when Multi AF or Spot AF is selected as focus mode and thus, to overrule AF. It switches the mode to snap focus at a preselected distance. This functionality is intended as a means not to miss a shot due to slow autofocus.The default distance of 2.5 m is useful for street photography and many indoor situations. However, it is less useful for landscape shots.
Here is the description of the full press function taken from the GXR manual (adapted):
- Take photographs without pausing to focus the camera when Multi AF or Spot AF is selected for focus.
- If the function is On the following happens: If the shutter-release
is pressed all the way down in one motion, the camera will take a picture
at the focus distance selected for Snap Focus Distance (which is 2.5 m by
default). Choose this function when quick shutter response is required.
Tip: Autofocus - The camera will focus normally if you press the shutter-release button halfway (page 69 in the English GXR manual, adapted; see also page 58 in the English GR manual).
Note that full press snap is enabled (ON) by default (indicated by an undocumented "FS" in the viewfinder/LCD screen). It can be disabled or enabled in the menu: Shooting > Full Press Snap (default: ON). Snap focus distance can be set in the menu: Settings > Snap Focus Distance (default: 2.5m).
Since snap focus is "on" by default, it can puzzle users who do not know of the existence of this feature. Therefore, I decided to disable it. I discuss this issue on pages Specialties and Pitfalls of Full Press Snap.
Manual Focus (MF)
To focus manually, first set focus mode to MF (menu "Shooting > Focus"; you can also assign focus mode selection to a function key or a position in the "ADJ." lever settings).
For the actual focusing, while pressing the "macro/up" button on the directional pad, adjust the focus with the up-down dial. This is what the manual states and what a screen message initially says. Actually, this procedure is cumbersome, or better, it is horrible for me. Most often, I loose contact with the macro button and leave the mode for setting the focus (success rate is 1 out of 5 to 10...). This is one of the reasons why I rarely used MF on the Ricoh GR. I preferred to estimate the distance and use snap focus (fix focus)...
But the good news is that I accidentally found relief (I did not find any mentioning of this in the manual)*: It suffices to briefly press the macro/up button**. A message appears on the screen stating that you can use the up-down dial for manual focus adjustment. This works until you press the macro button again (no message appears - there is no other indication that the dial now works the "usual way"). After the second button press, the up-down dial works according to the selected exposure mode. That is, the macro/up button works as a toggle now and needs no longer to be pressed all the time. This is, of course, much, much easier! In addition, a white triangle at the distance scale indicates the current distance. It is visible only when focus adjustment is active, and thus, acts also as a status indicator for the toggle button. My only problem is that the LCD screen is not my preferred focusing device, I prefer an EVF...
When turning the dial, you will find that the distance scale is divided into two parts: One ranges from infinity to 0.3 m, and another one from 0.3 m to 0.1 m, which corresponds to the macro mode. Thus, manual focusing includes the macro range. According to Tom Caldwell, there is also a "gear shift" - the adjustment speed is scaled in each section, that is, it is faster for larger distances than for smaller ones.
Manual focusing can be based on:
- The image displayed by LCD screen (sharpness of the image, focus aids offered by the focus assist function, magnification)
- The distance and depth-of-field scales displayed on the LCD screen
- Or a combination of both
You can also set the distance in advance (using one of the focus lock approaches described below) and correct it using the LCD screen. See also page Manual Focusing Methods.
My remaining problem with manual focusing is, however, that, being used to an EVF, I find it hard to recognize on the LCD screen when an object is in focus - even focus assist and magnification do not help me much.
*) In the manual, you will find that macro does not work for MF. Therefore, the button is available for the shortcut that I described above. For snap focus and infinity, the macro button initiates the macro function and is thus, not available. If you press it again you are back to snap focus/infinity.
**) A few days later, I found that Tom Caldwell mentioned this feature already nearly two years before I had "discovered" it in the post "Hooray a bit more" in the Ricohforum (in the "Need some help?" thead).
Focus Lock
Locking the focus at a certain distance for one or more shots is useful in a number of occasions, such as sports photos where AF is too slow, series of photos, etc. (one might debate whether this is a manual focus method, but it fits in here...). The Ricoh GR provides the following options for locking focus:
- Pressing down the shutter-release button down halfway. Note that this also locks exposure! Mostly, I use this technique for the latter reason, not because I want to lock the focus.
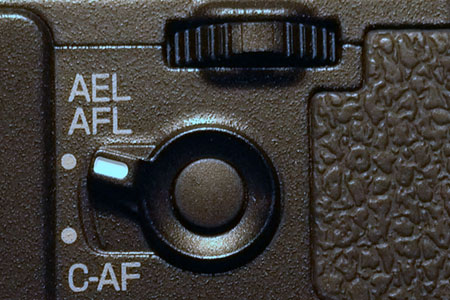
- Pressing the AF button in the AF function switching lever. If the
lever is set to its upper position (AEF/AFL), you can configure it to lock
either the focus (AFL), the exposure (AEL), or both (AEL/AFL).
- Switching from autofocus to manual focus ("AF/MF"). This may sound cumbersome, but can be easily done if "AF/MF" is assigned to a function key (otherwise you need to select it in the menu).
Shutter-Release Halfpress
While the technique of pressing the shutter-release button down halfway is easy to use (and I use it quite often), the coupling of exposure and focus lock can lead to problems. For example, when I take a picture of a landscape, and the image looks too dark, I point the camera lower to brighten the image up - but now the focus may be too close. The other way round, when I point the camera to the sky to darken the image, focus may not find a target.
AF/MF Function
The "AF/MF" function has the advantage that it sets the manual focus to the distance that AF has set. Thus, for pre-focusing you can first use the AF to set the appropriate distance and then switch to manual focus. Of course, this works only in cases where AF finds focus (for example, it may not work for sky or macro photos). As Tom Caldwell explained, you can use this technique to create "custom snap focus modes."
AF Button
Note that the AF button can be configured in the "Key Custom Settings" menu in several ways:
- AEL/AFL Setting: It can be configured to lock either exposure (AEL), focus (AFL), or both (AEL/AFL). In this case, it should be set to AFL.
- AFL Lock Keep Setting: It can work either as a button that has to be pressed all the time or as a toggle button. I prefer the toggle version.
- AFL Focus Settings: When using the AF button, focus mode can be set to Multi AF, Spot AF, or Pinpoint AF. I use Spot AF.
It may sound funny, but the AF button can be combined with MF to briefly use AF to set the distance and then lock it (mentioned in a post by aleksanderpolo). Just press the AF button to initiate AF and then lock the focus. Handling is a little bit different for the toggle than for the button that has to be pressed all the time:
- Toggle: Press the AF button briefly to initiate autofocusing. After there is a green focus confirmation and an "AFL" symbol, press the AF button again to return to MF, which takes over the distance.
- Button: Press the AF button until autofocusing has found its target (signalled by a green focus confirmation and an "AFL" symbol). Then release the AF button to return to MF, which takes over the distance.
Support for "Pure" Manual Focusing
Note that magnification and focus assist can be used for autofocus as well and may be sometimes useful together with it.
Depth-of-Field Display
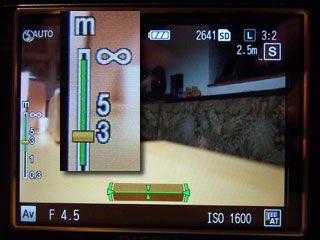
For manual focus (MF), infinity, and snap focus (Av, TAv, M odes only), a distance scale with depth of field indication is displayed on the LCD display. This allows you to apply the so-called "zone focusing" method or to set the "hyperfocal distance" (everything is sharp from a certain distance up to infinity). Although this is best used with true manual focus (MF), you can, at least, observe what is going on and, for example, change the aperture to extend the depth of field to a kind of hyperfocal distance...
 |
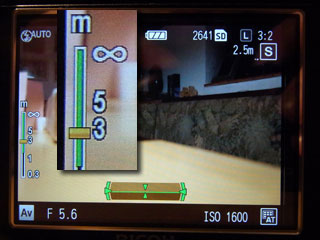 |
Figures: DOF indicator in Av mode. Snap focus set at 2.5 m. f/4.5 (left) is nearly hyperfocal, f/5.6 (right) is hyperfocal
Move Focus/Exposure Target, Magnification, Focus Assist
The Ricoh GR puts functions that are separated on the Ricoh GXR into one screen plus a detail screen for setting some options. This makes the functionality harder to find in the menu system (the name is somewhat cryptic...) and possibly more complex. But since I did not use these functions up to now, I do not know whether my impression is indeed correct... Ricoh recommends this functionality particularly when the GR is used on a tripod.
Note: Tom Caldwell prepared a diagram that can help in understanding the menu structure that is involved in using target move, magnification and focus assist functionality on the Rich GR. He mentions it in a posting in the Ricoh forum at dpreview: I show a diagram trying to get my head around the focus peaking system on the GR - the menu is not particularly easy or intuitive to follow: ricohforum.com/phpbb/viewtopic.php?f=72&t=10507#p59174
Basic Procedure
- Press the "MENU/OK" button
- In the "Shooting" menu, select item "FA/Move Target" and press the "right" (Flash) button.
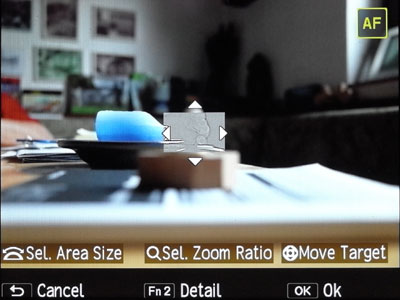
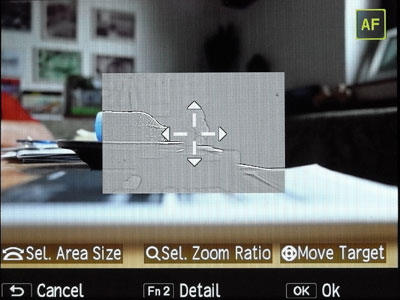
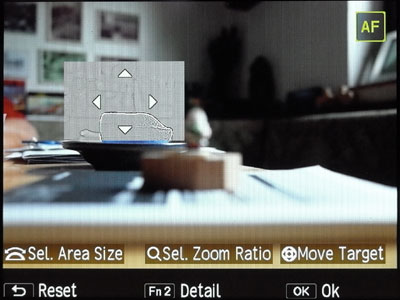
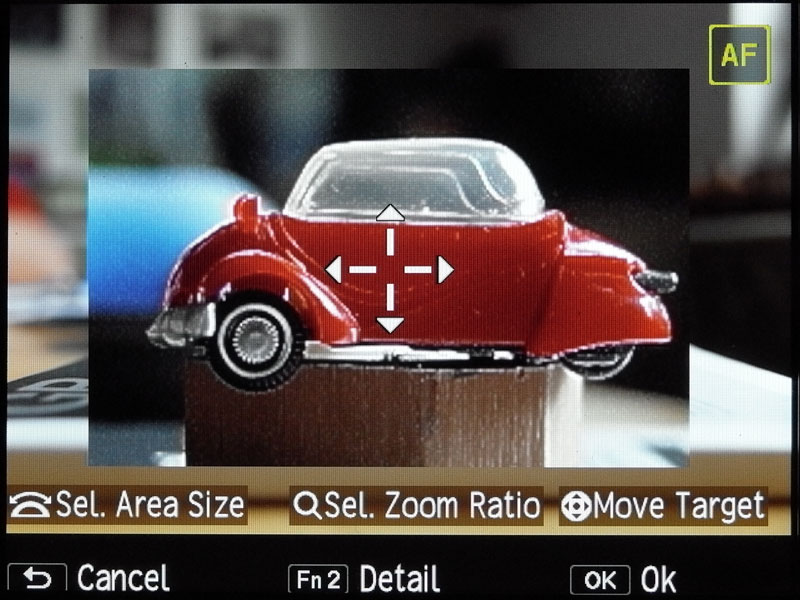
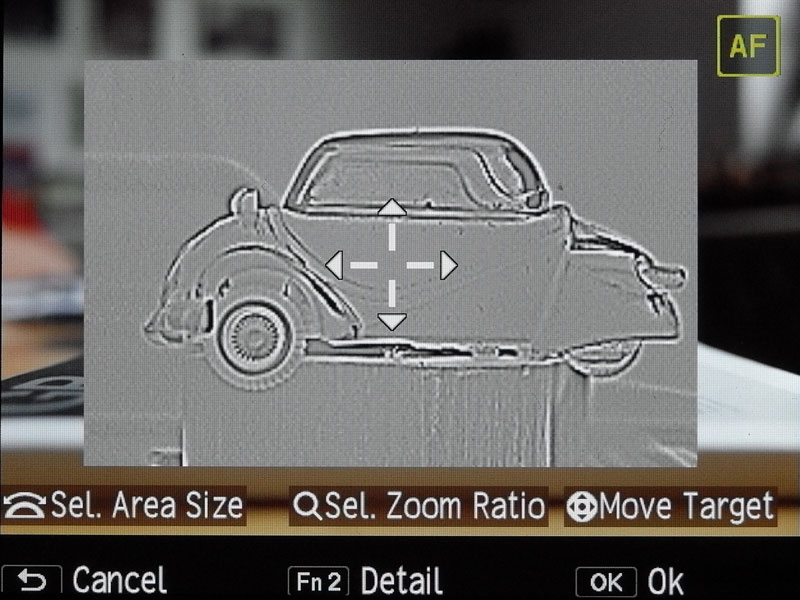
- You will see the following screen:

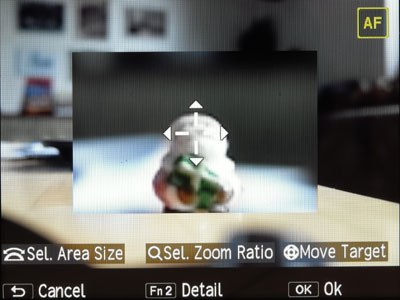
On this screen, you have quite a number of options for:- Selecting the size of the magnified area using the up-down dial (provided that a magnification is set as shown in the right figure)
- Selecting the zoom ratio (= magnification ratio: 2x, 4x, 8x) using the zoom lever
- Moving the target indicator and the magnified section (if there is one) jointly across the screen using the direction buttons on the directional pad.
- The following buttons can be used:
- DISP (Cancel) cancels the position or returns you to the menu screen
- OK returns you to the shooting screen (as does pressing the shutter release button)
- Fn2 leads you to a screen (called "Move Target/Focus Assist Setting") with detailed settings that will be described in the following.
Detail (Fn2)
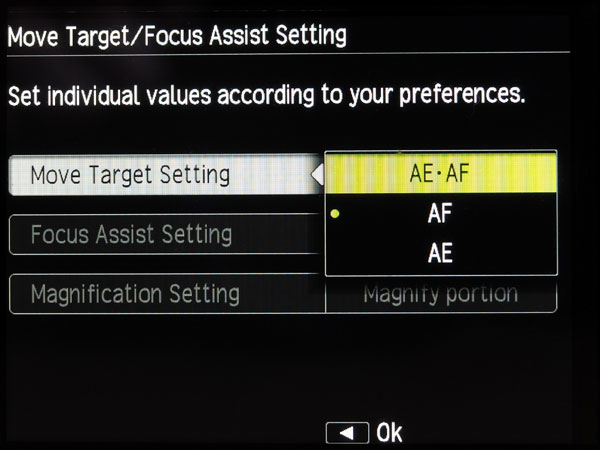
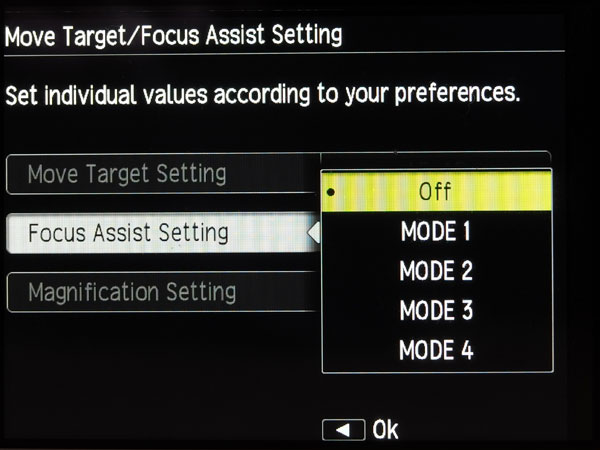
The Fn2 button leads you to the "Move Target/Focus Assist Setting" screen, which allows you to do the following:
- Determine whether focus, exposure or both will be set based on the target indicator's position (Move Target Setting): AF, AE or both (Figure left)
- Set the focus assist mode (Focus Assist Setting): Off, MODE 1, MODE 2, MODE 3, MODE 4 (Figure center)
- Set whether the magnified section is shown fullscreen or as a portion of the screen (Magnification Setting): Magnify portion, Magnify whole (Figure right)
 |
 |
 |
Figures: The "Move Target/Focus Assist Setting" screen
Set Target Size
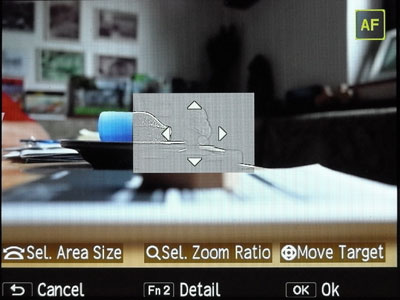
You can set the target size using the up-down dial. This allows you to constrain the measurement of focus, exposure or both to a smaller region, thus having a spot or pinpoint meter. You can set the size in five steps:
 |
 |
|
 |
 |
|
 |
 |
Figures: Different target size settings; the bottom right screen is the "normal" shooting screen after pressing "OK"
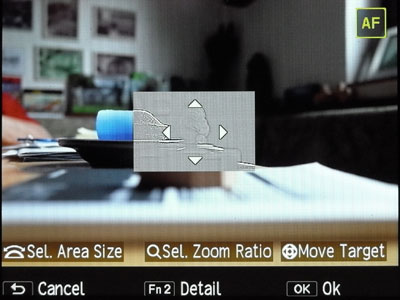
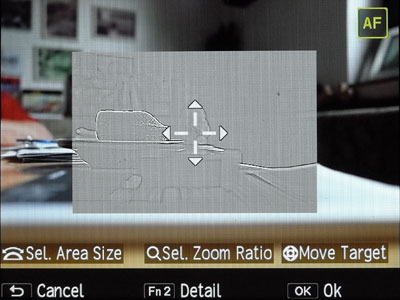
Move Target
You can move the target indicator and the magnified section (if there is one) jointly across the screen using the direction buttons on the directional pad. This function is particular useful when the GR is on a tripod, but it can be useful for hand-held shots as well.
 |
 |
Figures: Moving the target (right)
Magnification
You can influence two things when using magnification: the zoom (= magnification) ratio, and whether the enlarged section is shown as a portion on the screen or fullscreen.
Zoom Ratio
A section of the image can be magnified 2x, 4x, or 8x. The enlarged section is either shown as a portion of the screen (lower quality) or full screen (better quality). The enlarged section can be moved in either mode.
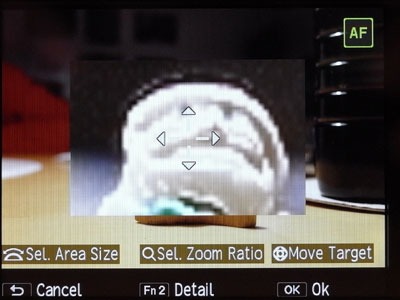
The following figures demonstrate the different zoom ratios and no zoom (upper left photo) for "Magnify portion":
|
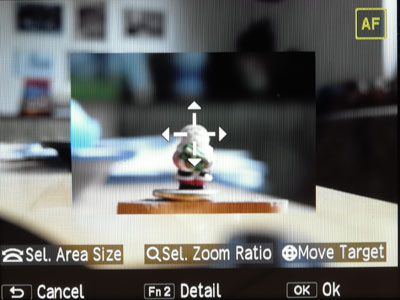 |
|
|
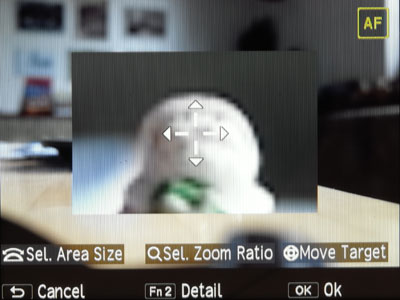 |
Figures: Different zoom settings (Magnify portion): no zoom (top left), 2x (top right), 4x (bottom left) and 8x (bottom right).
Note: The photos were taken with AF because that made it easier to focus on the object.
When you half-press the shutter-release button, magnification is not turned off (as is the case for the Ricoh GXR). Image quality is better for "Magnify whole" that is, when the magnified section is shown fullscreen (this is the same as for the GXR).
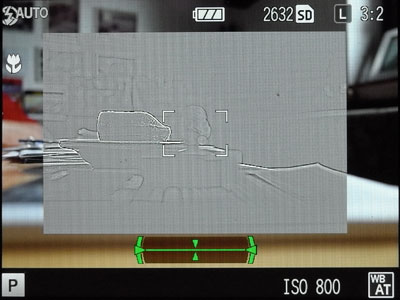
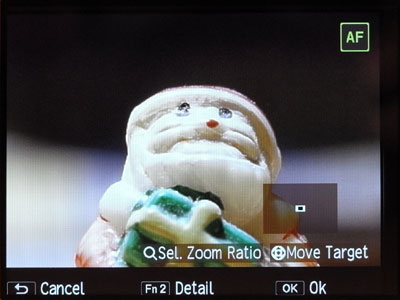
The following Figure shows that, after taking a photo or pressing "OK", the "Move Target" screen disappears and you are returned to the regular shooting screen, but still with the enlarged section (if you did not cancel enlargement), which is no longer moveable:

Figure: Shooting screen with enlarged section, which is no longer moveable
Magnify Portion or Full Screen
You can set whether the magnified section is shown fullscreen or as a portion of the screen (Magnification Setting): Magnify portion, Magnify whole. The following figures demonstrate the difference between the two options and the image quality that they deliver:
 |
 |
Figures: Magnified section shown as a portion of the screen (left) and fullscreen (right).
Note that when the enlarged section is shown as a portion of the display, the display is of poorer quality than when it is shown full screen.
Focus Assist
The Ricoh GR offers a "focus assist" functionality for supporting manual focusing. It expands on the GXR focus assist modes, and now there are four modes available:
- MODE 1 creates "sparkling" white edges in a colored image, or as the manual states: Shape outlines for subjects/objects in focus are enhanced. You cannot change the color of the sparkling edges as for some other digital cameras.
- MODE 2 emphasizes edges in a B&W image (highpass filter), or as the manual states: The picture display switches to black and white, and the area in focus glows in white.
- MODE 3 is a black and white reversal of MODE1.
- MODE 4 is a black and white reversal of MODE 2.
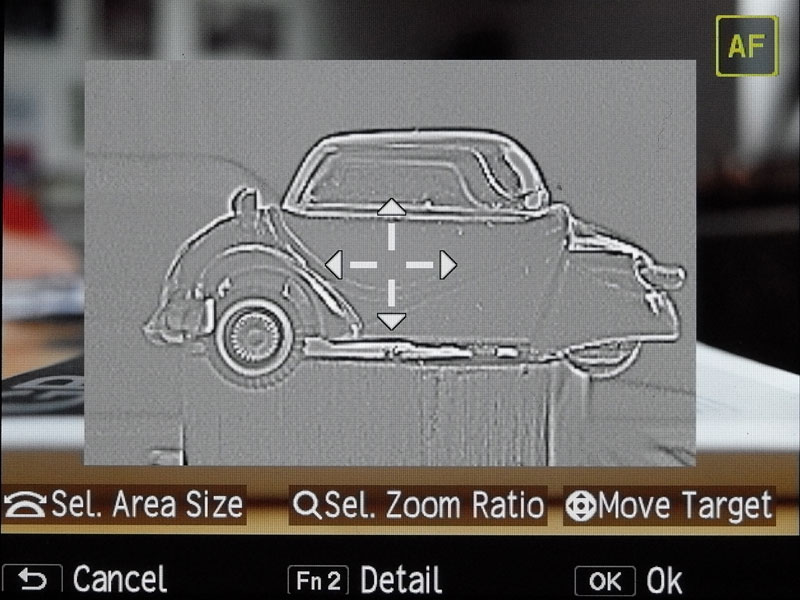
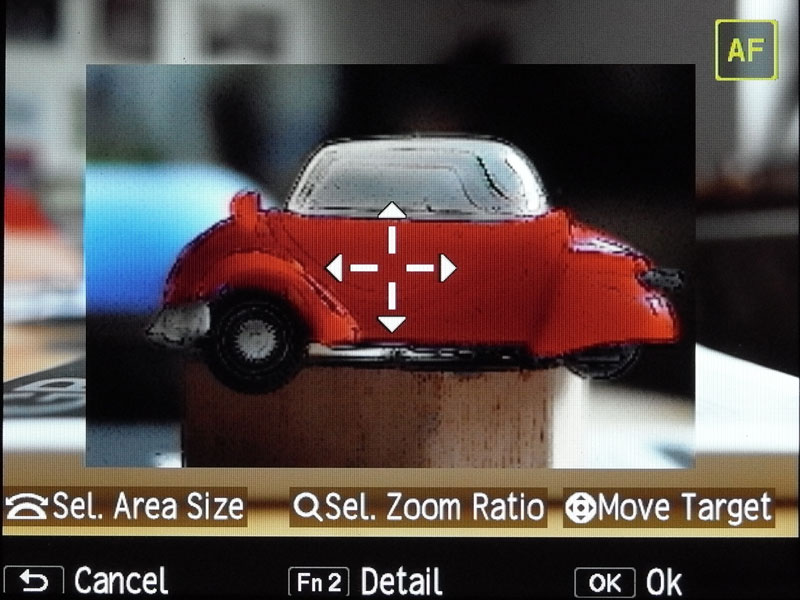
Here are sample photos of the focus assist modes:
 |
 |
|
 |
 |
Figures: Focus assist Mode 1 (top left), Mode 2 (top right), Mode 3 (bottom left; B&W reversal of Mode 1) and Mode 4 (bottom right; B&W reversal of Mode 2)
I have to admit, that Mode 3 and Mode 4 do not look very useful to me - but I did not use them in practice and may therefore be wrong.
Conclusions
For "normal" photos, I use manual focus on the Ricoh GR only on rare occasions. One such instance where I use it are photos of the sky. Here autofocus often cannot find a target, and therefore I set focus to infinity. Another instance are sports photos where autofocus is often far too slow. Here, I also use sometimes focus lock as an alternative. That is, I pre-focus, keep the shutter button half-pressed and wait for "the" moment. For the GR, the AF button would be a better choice, but I have to admit that I haven't used the GR for sports photos yet.
My main application for manual focus are macro photos, because here it often happens that autofocus does not lock or finds the wrong target. Even spot AF is not of much help, but I never tried the "pinpoint" spot AF - perhaps this might improve matters...
Note: For an overview of manual focusing methods, see page Manual Focusing Methods.
Links
- GR My and Box Mode settings (posting by Tom Caldwell, Ricoh forum on dpreview): www.dpreview.com/forums/post/55743482
- Need some help? (thread started by Tom Caldwell, Ricohforum): www.ricohforum.com/viewtopic.php?f=72&t=10507&start=0
- Need some help? (posting by Tom Caldwell, Ricohforum): www.ricohforum.com/phpbb/viewtopic.php?f=72&t=10507#p59174
- Hooray a bit more (posting by Tom Caldwell, Ricohforum): www.ricohforum.com/viewtopic.php?f=72&t=10507&start=0#p59264
- Re: Need some help (posting by aleksanderpolo, Ricohforum): www.ricohforum.com/viewtopic.php?f=72&t=10507&start=10#p59848
|
made by |
| 03.04.2019 |