Sony RX10 M3: Close-Up Experiences
No Dedicated Macro Mode | A Rule of Thumb... | My Macro/Close-Up Settings | A Few Suggestions for Macro/Close-Up Photos | Using Autofocus for Close-Ups | Using Manual Focus for Close-Ups | Finding the Closest Distance for Shots with Maximum Magnification | An Interplay of AF and MF | Working with "Ersatz" Targets | Close-Up Lenses | References
This page and its companion pages discuss the macro abilities of the Sony RX10 M3. Although the camera has a macro ability (allowing shots from a few cm - or 18 cm from the focal plane), I would not call these photos "macros" and therefore use the term "close-up."
This page presents some experiences as to using the Sony RX10 M3 for close-up shots with automatic and manual focus, plus some more.
Note: This page is also valid for the Sony RX10 M4, because both cameras have identical lenses.
Note: For close-up photos see pages Close-Up Samples, Close-Up Samples - Part 2 (with Close-up Lens), Telephoto Close-Up Samples
No Dedicated Macro Mode
Except for a Macro scene (SCN) mode, the Sony RX10 M3 does not have a specific macro mode. This means that you need not set the camera to "macro" as you have to for many other cameras. Just move the camera as close as possible in the direction of the object and half-press the shutter button to see whether the camera finds focus. If it does, it beeps (if enabled...) and shows a green focus confirmation frame. In addition, the green dot at the bottom left of the display stands steady. If it does not, there is no beep, the green dot blinks, and there is no green confirmation frame. Typically, you are too close to the target, particularly if you are using a focal length longer than 24 mm equivalent. The minimum distance increases quickly at a focal length of about 70 mm (equiv.), reaches its maximum of about 1.5 m at 300 mm and returns to about 90 cm at the end, that is between 500 and 600 mm (for details see page Close-Up Introduction and First Samples; all distances are measured from the focal plane as indicated by the camera).
A Rule of Thumb...
The minimum object size for the Sony RX10 M3 is about 7.2 x 4.8 cm (or simply 7 x 5 cm) at the short as well as at the long end (600 mm equiv.; see page Close-Up Introduction and First Samples). Are there any familiar objects that can help you get an idea of this size? Yes, finally, I found one: It is about the size of a credit card. This "rule of thumb" provides an idea of what the RX10 M3 can do for you with respect to close-up photos without using a close-up lens. See the sample photos for examples (pages Close-Up Samples, Close-Up Samples - Part 2 (with Close-up Lens), and Telephoto Close-Up Samples; note that not all of them were taken at the closest possible distance).
My Macro/Close-Up Settings
In order to optimize the results for close-up shots, I change my standard setting as follows:
- Switch from P mode to A mode,
- Set aperture to f/8 (or even smaller) for a wider depth of field**, and
- Set ISO to 400 or 800 to achieve still short enough shutter speeds**.
* But be aware that diffraction my cause fuzziness
for small apertures (look here for
details and here for RX10 M3 diffraction
samples); so staying at f/5.6 might be the optimum.
*) Depending on what effect you want to achieve, a larger aperture
with less depth of field may be desired (see page Close-Ups
with Aperture Variations for the effects on the RX100 M1).
**) If the light conditions permit, ISO
can be lowered to 200 or less for better image quality. In "urgent" cases
you might even want to increase ISO to 1600 to get a sharp picture.
Since all this means changing quite a lot of settings for a close-up shot now and then, I considered storing these settings in a custom setting for easy recall whenever I shoot close-ups. But I never actually put this into practice...
A Few Suggestions for Macro/Close-Up Photos
The following suggestions may help in taking macro/close-up photos successfully:
Optimize object sharpness
- Maximize depth of field (by using a small aperture and higher ISO see above)
- Try to make the object as "flat" as possible (see reference below for details)
- Place the focus point directly at the object (using spot focus) or more to the front (many macro photos have the focus too far in the background thanks to the AF...)
Avoid camera shake/motion blur
- Try to stabilize the camera even when not using a tripod (for example, press the camera against your forehead when looking through the viewfinder).
- Choose a higher ISO value in order to get shorter exposure times (a little bit of noise is more accaptable than a blurred photo...).
Other
- Check the photo directly after having taken it (using the viewfinder is best; use screen magnification on the LCD screen)
- Take a lot of photos so that you get at least one sharp photo...
See also 10 macro photography tips for beginners by Micael Widell.
Using Autofocus for Close-Ups
Using autofocus for close-ups can be a frustrating experience with the Sony RX10 M3, particularly afterwards when you look at your photos more closely and realize that the camera missed the target more than often. In the following, I present my approaches to getting more consistent and satisfying results for close-up photos using autofocus.
Selecting the Appropriate Autofocus Area
The only thing that you can influence with respect to the camera's autofocus is the autofocus area. Typically, you start with the Wide option (formerly called Multi...), which is the default. But very soon it seemed too unreliable to me regarding the identity of the recognized target (focus confirmation alone may not mean "much" - the actual focus target can lie far in the background...).
So I switched to the Center option to have more control over the autofocus target. But even with this option, I had focusing problems, probably, because the focus area was still too large and thus, unspecific.
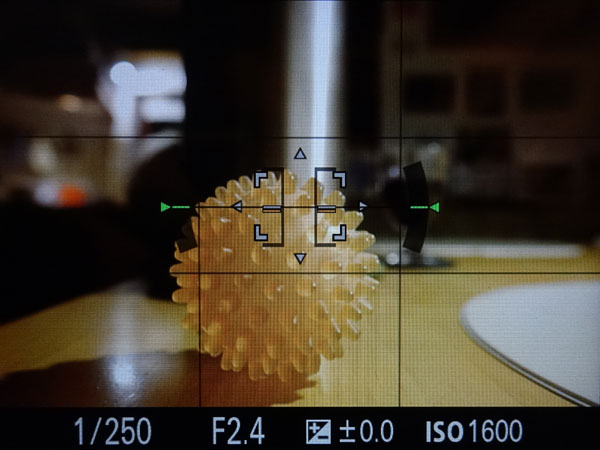
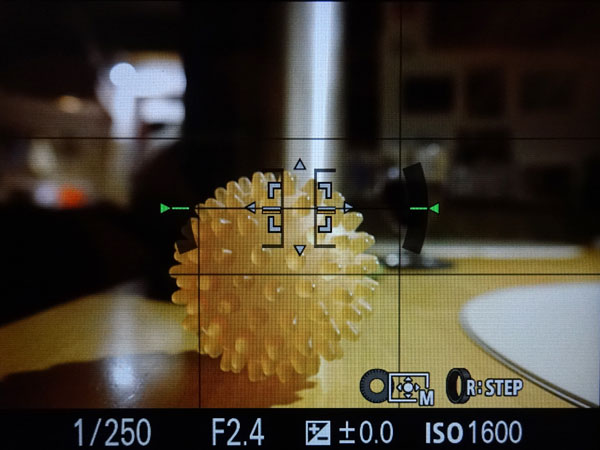
So, what could I do? As a last resort, I tried the Flexible Spot option, which allows you to change the size of the autofocus area in three steps (like on the RX100 M4): L(arge) is about the same size as the Center autofocus area, M(edium), and S(mall) offers a fairly small area (hopefully large enough for contrast AF to find some differences...). Using this feature, I finally got fairly consistent and satisfying results.
The Flexible Spot option also allows you to move the autofocus area, but I rarely use this feature - it is more useful when using a tripod. And on the RX10 M3 you can easily reset the position of the autofocus area by pressing the C3 button (the Custom button on the RX100 M4).
 |
 |
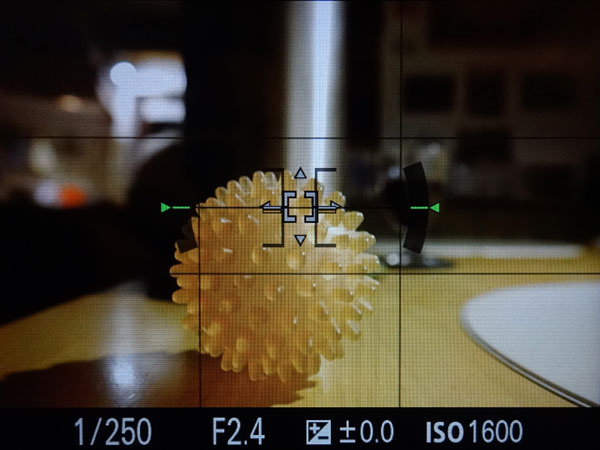 |
Photos: Size of the Flexible Spot focus area for the RX10 M3 - it can be changed in three steps (L, M, S - from left to right); L corresponds more or less to the standard size
A Complication - More or less Solved on the RX10 M3 (and RX100 M4)
With the Flexible Spot autofocus area, however, a new issue arises, when you do not set the center button to Standard, but assign a function to it (for the M1, this was the Focus Magnifier function). Whenever you want to change the location of the Flexible Spot autofocus area, you have to enter the Fn menu and set the autofocus area to Flexible Spot once again in order to be able to move the autofocus area. This is cumbersome to say the least...
Since I decided to set the center button to Focus Standard, I do not have this problem. Moreover, the Focus Magnifier functionality is also there in the guise of Manual Focus Assist, but this comes up only automatically, namely when you turn the focus ring at the lens. In addition, on the RX10 M3 you can assign the Focus Magnifier function to the C3 or any other customizable button, which I did (this is not possible on the M1).
All in all, the Flexible Spot autofocus area seems to deliver usable focusing results. And on the RX10 M3 you can easily reset the position of the autofocus area by pressing the C3 button.
Note: In my "normal" shooting mode, that is, in P mode with Center autofocus area, focus tracking will be activated whenever you press the center button because it is set to Focus Standard. This is annoying, to say the least... In the case that you assigned a function to the center button, you get an error message in AF mode. Not much better either, but easier to get rid of... All in all, in this situation, the camera proves less than perfect and displays some of the frustrations that I read about in RX100 and RX 10 reviews...
Note: On the RX100 M1, the level indicator interferes visually somewhat with the autofocus area indicator for the Flexible Spot autofocus area, but this has been improved on the M4 and on the RX10 M3 as well. See the photos below for illustration (gray and green autofocus area):
|
|
|
||
 |
 |
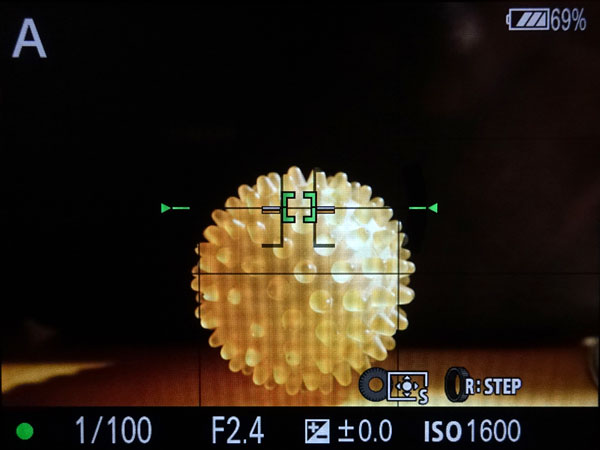 |
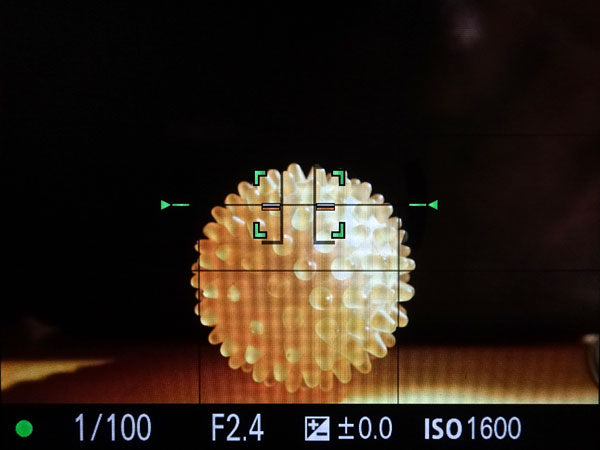
Photos: The Flexible Spot focus area indicator is shown in white on the RX10 M3 when the shutter button is not pressed; it no longer interferes visually with the level indicator (top row). The Flexible Spot autofocus area indicator is highlighted in green while the shutter button is being pressed down half-way and AF found a target. Highlighting in green interferes much less with the level indicator than the white color.
As a result, for the RX10 M3, I do no longer turn the level indicator off when using Flexible Spot autofocus area, as I did (and recommended) for the M1.
New Idea: Using Tracking Focus for Close-Up Shots
After I had read an article about focus tracking with new DSLR and system cameras in dpreview.com in spring 2017, I had the idea of using the focus tracking mode of the Sony RX 100 M1 for close-up shots and for shots where the subject is not at the center. Actually, this focus mode is meant for moving objects. So, this proposal is a kind of "misuse" of this feature. I prepared an extra page about this topic on which I also present some sample images. See there for details.
Up to now, I did not use this feature on the Sony RX10 M3.
Using Manual Focus for Close-Ups
Since there is no dedicated macro mode on the Sony RX10 M3, focusing manually is the same for all target distances. The camera offers two tools that are meant to make manual focusing easier:
- Focus Peaking: Contours that are in focus are highlighted in three different colors (red, yellow, white) and three intensities (high, medium, low).
- Magnification comes in two flavors:
- Manual Focus Assist: Magnifies an image section
full screen for a predefined (2 s, 5 s) or unlimited time as soon as
you turn the focus ring at the lens to focus manually, starting
at a magnification of 5.3 x. If you press the center button, magnification
increases to 10.7 x, pressing it again returns magnification to 5.3 x,
and so on.
You can cancel magnification by half-pressing the shutter button. Pressing the C3 button resets the position of the magnified section.
Moreover, the four direction buttons of the control wheel (and turning it) allow you to change the position of the enlarged section within the image. - Focus Magnifier: Magnifies the center section of the
image full screen after you press a dedicated control button (which one,
can be set in the menu), starting at a magnification of 1 x or 5.3 x.
If you press the center button starting from 1 x, magnification increases
to 5.3 x, pressing again increases it to 10.7 x, pressing it once more
leaves the magnification mode (as on the RX100 M4, but with different
magnifications).
You can cancel magnification by half-pressing the shutter button. Pressing the C3 button resets the position of the magnified section.
Moreover, the four direction buttons of the Control wheel (and turning it) allow you to change the position of the enlarged section within the image.
- Manual Focus Assist: Magnifies an image section
full screen for a predefined (2 s, 5 s) or unlimited time as soon as
you turn the focus ring at the lens to focus manually, starting
at a magnification of 5.3 x. If you press the center button, magnification
increases to 10.7 x, pressing it again returns magnification to 5.3 x,
and so on.
Focusing manually is done using the focus ring at the lens (you can choose, which of the two lens rings you want to use for focusing). Some people say that this is intuitive and provides a focusing experience similar to an camera with manual focus. Others, however, say that the experience is rather "indirect", since focusing is "by wire," and turning the ring is rather tedious because there are no stops at the end (which a manual lens provides). All in all, I have to agree with the latter.
I more or less hate focusing manually with the RX100 M1, but there are some improvements on the RX100 M4 and on the RX10 M3 even more. For example, I never know on the M1 and M4, which direction to turn the control ring for focusing. The RX10 M3, however, allows me to select the direction for turning the focus ring, so that I can choose the direction that I feel "natural."
Setting the distance manually to infinity is useful in quite a few applications where the autofocus might be fooled or does not find a target (sky, a fence in the foreground, etc.). But note that for longer focal lengths the "real" infinity point is not at the end of the distance scale. The end point of the distance scale may already be beyond infinity. Therefore, finding the correct "infinity" setting can be quite tricky.
When using a close-up lens, setting distance to infinity delivers a lower magnification than when setting distance to the lowest (or a lower) value.
Finding the Closest Distance for Shots with Maximum Magnification
When using AF, it is little bit tedious to find the closest possible distance. If you are too close, focus will not be confirmed, and you have to increase the distance and reframe the photo. If you are too far away, the target objects will be smaller than possible - and you may not even notice that you are too far away and how much. Using manual focus and setting the minimum distance (using the lens ring, which is also a little bit tedious...) allows you to shoot at the closest distance for the respective focal length. And since the RX10 M3 provides a coarse distance scale (like the RX100 M4), this is much easier than on the RX100 M1. I mentioned this already above...
However, I find it hard to recognize on the LCD screen or in the viewfinder, whether the target object is optimally in focus. Here, the two focus tools can help, particularly magnification (called Manual Focus Assist and Focus Magnifier). But often I cannot hold the camera steady enough so that I already have lost focus again, when I half-press the shutter button to reframe the photo after using magnification. And then I have to start over...
An Interplay of AF and MF
Like the Sony RX100 M1 and M4, the RX10 M3 offers a function that already my Minolta Dimage cameras provided, but which I rarely used, although it looks useful on paper: Direct Manual Focus (DMF). In short, it means that after you focused automatically by half-pressing the shutter button, you can adjust the focus manually by turning the control ring at the lens while still half-pressing the shutter button. This also activates Focus Peaking (set to one of three intensities) and magnification (Manual Focus Assist, Focus Magnifier) if these are enabled.
You can use DMF also the other way round: Focus manually first using the control ring and then use the AF for the final focusing. You must briefly release the shutter button so that you can use AF. This may be a solution to the problem that I describe in "Working with Ersatz Targets." You can focus manually using the focus ring alone - in this case there is no focus assists - or half-press the shutter button to also activate focus assist, provided it is enabled.
I have some issues with the DMF functionality. First, I find it hard to turn the focus ring on the lens while half-pressing the shutter button. Often, I slightly release the shutter button in this process and have to start over, which in the end is frustrating. Second, since I usually turn focus peaking on, this in on all the time when I use DMF, not only when I half press the shutter button to adjust the focus manually. This disturbs the impression of the image for me (particularly if focus peaking is a bit strong).
It looks, as if I will not use this feature with the Sony RX10 M3 very often (as was the case for the Minolta Dimage and the RX100 M1 and M4 as well)... So I looked for an alternative to DMF and found one: the AF/MF Control Toggle function. This function has the feature that it sets the manual focus to the same distance as AF set it before (similarly to DMF). Thus, for pre-focusing you can first use the AF to set the appropriate distance and then switch to manual focus using the AF/MF Control Toggle function. Of course, this works only in cases where AF finds focus (for example, it may not work for sky or macro photos). You can use this technique as an alternative to the DMF functionality without the hassles of having to press buttons all the time and to be disturbed by focus peaking all the time. The only thing that you have to observe is that, after having taken the shot, you have to toggle back to AF.
This may sound cumbersome, but can be easily done if you assign the AF/MF Control Toggle to a button such as the Focus Hold Button (default: Focus Hold), a button on the control wheel (default: Not set), or any other custom button.
Working with "Ersatz" Targets
Sometimes, the Sony RX10 M3's autofocus struggles with close targets and focuses on targets in the background. For example, instead of focusing on a flower, the camera focuses on the ground despite the fact that I use Center or even (flexible) spot AF (and the focus field is covered by the flower). Generally, with close-ups contrast is often not strong enough for the AF to find focus (which is true for most cameras).
Sometimes, it helps when you focus on something close to the target object and then focus again on the actual target. If the camera erroneously focuses on something farther away and not on the target, it often seems to be "trapped" by that wrong focus object - refocusing again and again does not help. Instead, the camera needs help to find correct focus again, and this can be provided by focusing on a different target that is not too far away from the actual target. Having focused on this "ersatz" target, the camera is now able to focus on the actual target.
Another solution to this problem might be to use Direct Manual Focus (DMF) for focusing and start with manual focusing to come close to the desired target object and then leave the final focusing to the autofocus system. The same effect would be achieved by starting with MF and then using the AF/MF Ctrl Toggle function.
By the way, I found a similar behavior for the Leica X Vario and the Ricoh GR, and of course, the RX100 M1 and M4.
Close-Up Lenses
The Sony RX10 M3 lens does have a filter thread and therefore can directly use close-up lenses (and filters). However, the filter thread has the huge diameter of 72 mm, and I did not have filters and lenses for this diameter - also also no adapters.
So I bought a Marumi +3 achromat for this camera. See page Close-Up Experiences - +3 Achromat Tests for more information and page Close-Up Samples - Part 2 (with Close-up Lens) for samples.
Here is my summary table for the Sony RX10 M3 and the Marumi +3 achromat:
|
Focal Length |
Close-up Lens
Setup |
|||
| None | Marumi +3 Achromat |
|||
| (equiv.) | Minimum Object Width > |
MF closest | MF closest | MF infinity |
| 50 | 62 mm | n.a. | n.a. | |
| 85 | 92 mm | 67 mm | 149 mm | |
| 100 | 114 mm | 70 mm | 121 mm | |
| 135 | 189 mm | 70 mm | 89 mm | |
| 200 | 266 mm | 55 mm | 58 mm | |
| 300 | 189 mm | 38 mm | 40 mm | |
| 400 | 108 mm | 28 mm | 32 mm | |
| 500 | 86 mm | 24 mm | 26 mm | |
| 600 | 69 mm | 20 mm | 22 mm | |
References
- Alexander S. White (2016). Photographer’s Guide to the Sony DSC-RX10 III. White Knight Press, Henrico, Virginia (ISBN: 978-1-937986-54-4 (paperback), 978-1-937986-55-1 (ebook))
- Henning Fuchs (2016). Sony RX10 III - Die fehlende Anleitung. Amazon CreateSpace Independent Publishing (ISBN: 978-1537703459 (paperback)).
- Subject tracking: Why it matters to us and why it should matter to you (Carey Rose, dpreview.com): www.dpreview.com/techniques/5004008634/subject-tracking-why-it-matters
- 10 macro photography tips for beginners (Micael Widell, dpreview.com): www.dpreview.com/learn/1063005124/10-macro-photography-tips-for-beginners
- Michael Nagel (2018). Sony RX10 IV. Franzis Verlag: Haar bei München (ISBN: 978-3-645-60603-5)
|
made by |
| 19.11.2021 |