Astronomy | GXR · GR · RX100 M1 · RX100 M4 · RX10 M3/4 · TZ202 · X Vario · M240 · General | Photos | Conf. Places | Calendars | Art
Sony RX100 M1: Close-Up Experiences
No Dedicated Macro Mode | A Rule of Thumb... | My Macro/Close-Up Settings | A Few Suggestions for Macro/Close-Up Photos | Using Autofocus for Close-Ups | Using Manual Focus for Close-Ups | Finding the Closest Distance for Shots with Maximum Magnification | An Interplay of AF and MF | Working with "Ersatz" Targets | Close-Up Lenses | References
This page and its companion pages discuss the macro abilities of the Sony RX100 M1. Although the camera has a macro ability (allowing shots from 5 cm), I would not call these photos "macros" and therefore use the term "close-up."
This page presents some experiences as to using the Sony RX100 M1 for close-up shots with automatic and manual focus, plus some more.
Note: The following post on RX100 Macros (09-11-2012 05:42 PM) community.sony.com/t5/Cybershot-Cameras/RX-100-Macro/td-p/28896 offers a lot of useful information about using the Sony RX100 M1 for macros. For more close-up photos see pages Close-Up Introduction and First Samples, Close-Up Samples and Close-Up Samples - Part 2.
No Dedicated Macro Mode
Except for a Macro scene (SCN) mode, the Sony RX100 M1 does not have a specific macro mode. This means that you need not set the camera to "macro" as you have to for many other cameras. Just move the camera as close as possible in the direction of the object and half-press the shutter button to see whether the camera finds focus. If it does, it beeps (if enabled...) and shows a green focus confirmation frame. In addition, the green dot at the bottom left of the display stands steady. If it does not, there is no beep, the green dot blinks, and there is no green confirmation frame. Typically, you are too close to the target, particularly if you are using a focal length longer than 28 mm equivalent. The minimum distance increases quickly and dramatically to 55 cm (!) at the telephoto end.
A Rule of Thumb...
The minimum object size for the Sony RX100 M1 is about 8 x 5.7 cm (or simply 8 x 6 cm) (see page Close-Up Introduction and First Samples). Are there any familiar objects that can help you get an idea of this size? Yes, finally, I found one: It is about the size of a credit card (8.5 x 5.3 cm) - a little bit less wide and a little bit taller than a credit card.
This "rule of thumb" provides an idea of what the RX100 M4 can do for you with respect to close-up photos without using a close-up lens. For example, it allows you to take a "full-frame" photo of a rose flower or a small signposts with text, but not of small daisy blossoms or stamps. See the sample photos for examples (pages Close-Up Introduction and First Samples, Close-Up Samples and Close-Up Samples - Part 2; note that not all of them were taken at the closest possible distance).
Macro/Close-Up Settings
In order to optimize the results for close-up shots, I change my standard settings as follows:
- Switch from P mode to A mode,
- Set aperture to f/8 for a wider depth of field***, and
- Set ISO to 400 or 800 to achieve still short enough shutter speeds**.
* But be aware that diffraction my cause fuzziness
for small apertures (look here for details).
*) Depending on what effect you want to achieve, a larger aperture opening
with less depth of field may be desired (see page Close-Ups
with Aperture Variations for the effects).
* A small aperture also helps minimize flaws
introduced by close-up lenses if these are used.
**) If the light conditions permit, ISO can be lowered 200 or less for better
image quality. In "urgent" cases you might even want to increase
ISO to 1600 to get a sharp picture.
Since all this means changing quite a lot of settings for a close-up now and then, particularly for my wife, I decided to store these settings in a custom setting for easy recall whenever we shoot close-ups. But we never actually put this into practice...
A Few Suggestions for Macro/Close-Up Photos
The following suggestions may help in taking macro/close-up photos successfully:
Optimize object sharpness
- Maximize depth of field (by using a small aperture and higher ISO see above)
- Try to make the object as "flat" as possible (see reference below for details)
- Place the focus point directly at the object (using spot focus) or more to the front (many macro photos have the focus too far in the backgound thanks to the AF...)
Avoid camera shake/motion blur
- Try to stabilize the camera even when not using a tripod (for example, press the camera against your forehead when looking through the viewfinder).
- Choose a higher ISO value in order to get shorter exposure times (a little bit of noise is more accaptable than a blurred photo...).
Other
- Check the photo directly after having taken it (use screen magnification on the LCD screen)
- Take a lot of photos so that you get at least one sharp photo...
See also 10 macro photography tips for beginners by Micael Widell.
Using Autofocus for Close-Ups
Using autofocus for close-ups can be a frustrating experience with the Sony RX100 M1, particularly afterwards when you look at your photos more closely and realize that the camera missed the target more than often. In the following, I present my approaches to getting more consistent and satisfying results for close-up photos using autofocus.
Selecting the Appropriate Autofocus Area
The only thing that you can influence with respect to the camera's autofocus is the autofocus area. Typically, you start with the Multi option, which is the default. But very soon it seemed too unreliable to my wife and me as to the identity of the recognized target (focus confirmation alone does not mean "much" - the focus target can lie far in the background...).
So we switched to the Center option to have more control over the autofocus target. But even with this option, my wife had focusing problems (whereas I switched to manual focusing for close-ups), probably because the focus area was still too large and thus, unspecific.
So, how could I help her? As a last resort, I tried the Flexible Spot option and finally got fairly consistent and satisfying results, probably, because the focus area is smaller than for the Center option. It also allows you to move the autofocus area, but I rarely use this feature - it is more useful when using a tripod. In addition, I cannot find an easy way to reset the focus area position as is possible on the M4.
I have to confess that my wife does not use this focus mode because she has to go into the menus for activating it... So she stays with the Center option...
A Complication - Solved Only Partially...
When using the Flexible Spot autofocus area, however, a new issue came up, because I initially had assigned the Focus Magnifier function to the center button (the same would apply to any other function). Whenever I wanted to change the location of the Flexible Spot autofocus area, I was no longer able to use the center button but had to enter the Fn menu and set the autofocus area to Flexible Spot once again in order to be able to move the autofocus area. This was cumbersome to say the least... Also note that the location of the autofocus area cannot be reset with a single button press, as is possible with later models.
Since my wife does not use manual focus, and thus, does not need the Focus Magnifier functionality, I decided to set the center button to Standard again. The Focus Magnifier functionality is still there (in the form of Manual Focus Assist), but now it comes up only automatically, namely when I turn the control ring, which is used for manual focusing when the center button is set to Standard. It is, however, not possible to assign the Focus Magnifier function to another function button on the M1, as is possible on the M4 (the available function buttons are used for other needed functions).
Note: When my wife uses the camera in her "normal" shooting mode, that is, in P mode with Center autofocus area, Focus Tracking will be activated whenever she presses the Center button, because we set the center button to Standard. This is annoying, to say the least... In the case that you assigned Focus Magnification to the center button, as we had done before, you get an error message in AF mode whenever you press the center button. Not much better either, but easier to get rid of... All in all, in this situation, the camera proves less than perfect and exhibits some of the frustrations that I read about in RX100 reviews...
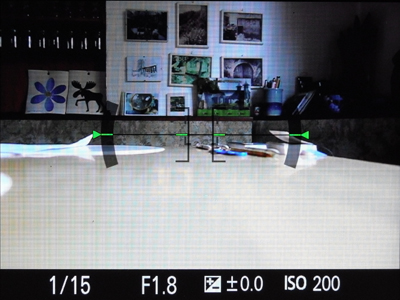
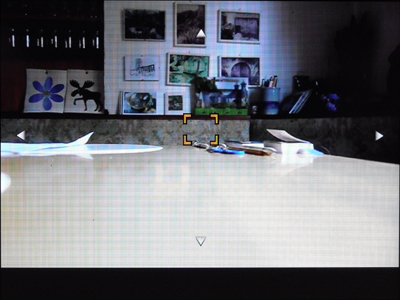
Note: The level indicator interferes visually somewhat with the autofocus area indicator for the Flexible Spot autofocus area, at least, for me. It is particularly hard to see as long as it is gray (it turns green when you press the shutter button down half-way and AF finds a target). See the photos below for illustration (gray and green autofocus area):
 |
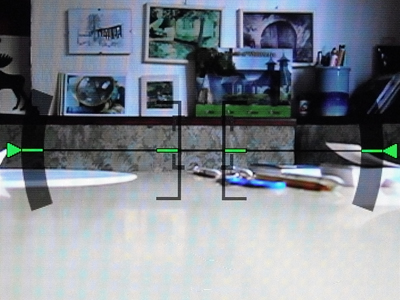 |
Photos: The Flexible Spot focus area indicator is shown in gray when the shutter button is not pressed (right: enlarged). It interferes visually strongly with the level indicator.
 |
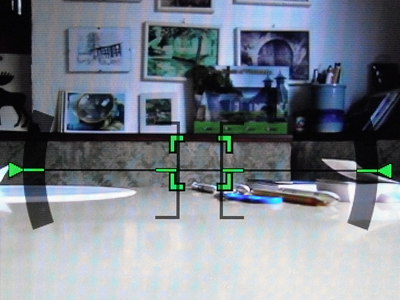 |
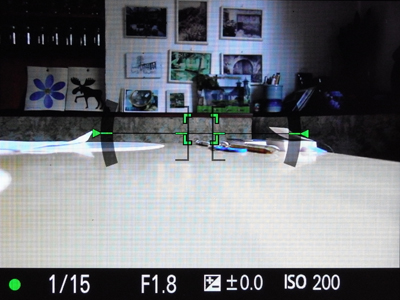
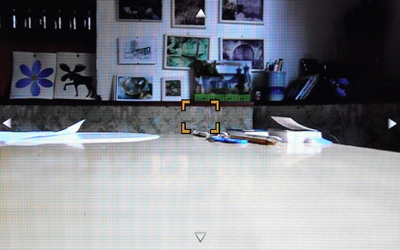
Photos: The Flexible Spot autofocus area indicator is highlighted in green while the shutter button is being pressed down half-way and AF found a target (right: enlarged). Highlighting in green interferes much less with the level indicator than the gray color.
Therefore, it is a good idea to turn the level indicator off when shooting close-ups - usually it is not needed for this type of photography (of course, there are exceptions from this...). To do so, press the DISP button twice (and then once to redisplay the level indicator).
Note: This has been improved on the RX100 M4. Did Sony read my pages???
Another "trick" for having less visual interference between the level and autofocus area indicators would be as follows: Press the center button briefly to switch to Move mode for the focus area. Now the autofocus area appears in orange (plus the four direction arrows, which indicate that you can move the focus field). When you press the shutter button down half-way, you are returned to the normal shooting screen, and the level indicator reappears (if activated) - and the focus field turns green if the autofocus finds a target. This procedure may seem even easier for one or the other than pressing the DISP button...
 |
 |
Photos: When the Flexible Spot autofocus area is set to Move mode by pressing the center button briefly, its is highlighted in orange, and direction buttons are shown, which indicate that the autofocus area can be moved (right: enlarged). In this state, there is no level indicator shown, and the autofocus area indicator is clearly visible.
New Idea: Using Tracking Focus for Close-Up Shots
After I had read an article about focus tracking with new DSLR and system cameras in dpreview.com in spring 2017, I had the idea of using the focus tracking mode of the Sony RX 100 M1 for close-up shots and for shots where the subject is not at the center. Actually, this focus mode is meant for moving objects. So, this proposal is a kind of "misuse" of this feature. The idea behind this "misuse" is as follows:
- When taking close-up shots it is important that you put the focus exactly
where you want/need it. This requires that you set the focus mode to Center or
Flexible Spot (because otherwise the camera will select it on its own),
point the camera to the target area, half-press the shutter to lock
the focus,
recompose the image, and then press the shutter button to take the
photo.
The flexible spot can also be moved around so that you need neither lock the focus nor recompose the image. Typically you do this when using a tripod, but here my focus is on hand-held shots. - Half-pressing and then recomposing can be awkward at times, particularly when there is wind and the target moves somewhat to and fro - or you move the camera yourself, because you cannot hold it steadily. Here, the tracking focus mode comes into play, because it can, at least to a certain degree, compensate for such movements. In short: you tell the camera, on which area you want to focus, and the camera tries to maintain focus on this area by moving the focus point when the image changes due to subject or camera movements.
- For using tracking focus, you press the center button at the rear. A gray square appears on the screen to indicate the focus area, and within it is a smaller white square, suggesting that this small area is used to set the focus point, but I am not sure whether this is indeed the case To set the focus area you point the square to the desired target (by moving the camera) and then press the center button once again. After a short delay, the camera surrounds the selected focus area with a white double framed square of the same size as the gray frame. This frame indicates on which area the camera will focus. It tries to follow (or track) the selected area, so that you can see where the focus will be set (it may not always stay on exactly the same area, though). You need not half-press the shutter button all the time, but when you half-press it, the white focus frame will turn green to indicate that focus has been found. Now you can press the shutter button to take the photo. Do not wait too long, though, because the target may have moved in the meantime!
- Sometimes, the camera loses track of the target, and the focus square disappears, or it moves astray to different objects. In both cases, you will have to restart the process by pressing the center button again, and so on.
So far, so good. First tests indicated that I got a lot of "hits" using this method. Time will tell whether this approach is really useful, particularly for my wife. I myself can still resort to the Flexible Spot focus area or other approaches like manual focusing. I find it in practice also useful to increase ISO somewhat and to switch to A mode, whereas my wife only uses P mode (see Macro/Close-Up Settings for details). I prepared an extra page about this topic on which I also present some sample images. See there for details.
Using Manual Focus for Close-Ups
Since there is no dedicated macro mode on the Sony RX100 M1, focusing manually is the same for all target distances. The camera offers two tools that are meant to make manual focusing easier:
- Focus Peaking: Contours that are in focus are highlighted in three different colors (red, yellow, white) and three intensities (high, medium, low).
- Magnification comes in two flavors:
- Manual Focus Assist: Magnifies an image section
full screen for a predefined (2 s, 5 s) or unlimited time as soon as
you turn the control ring at the lens to focus manually, starting
at a magnification of 8.6 x. If you press the center button, magnification
increases to 17.1 x, pressing it again returns magnification to 8.6 x,
and so on.
You can cancel magnification by half-pressing the shutter button.
Moreover, the four direction buttons of the control wheel (and turning it) allow you to change the position of the enlarged section within the image. - Focus Magnifier: Magnifies the center section of the
image full screen after you press a dedicated control button (which one,
can be set in the menu), starting at a magnification of 1 x. If you
press the center button, magnification increases to 8.6 x, pressing
again increases it to 17.1 x, pressing it once more returns to 8.6 x,
and so on.
You can cancel magnification by half-pressing the shutter button.
Moreover, the four direction buttons of the control wheel (and turning it) allow you to change the position of the enlarged section within the image.
- Manual Focus Assist: Magnifies an image section
full screen for a predefined (2 s, 5 s) or unlimited time as soon as
you turn the control ring at the lens to focus manually, starting
at a magnification of 8.6 x. If you press the center button, magnification
increases to 17.1 x, pressing it again returns magnification to 8.6 x,
and so on.
Focusing manually is done using the control ring at the lens. Some people say that this is intuitive and provides a focusing experience similar to an camera with manual focus. Others, however, say that the experience is rather "indirect", since focusing is "by wire," and turning the wheel is rather tedious because there are no stops at the end (which a manual lens provides). All in all, I have to agree with the latter.
I more or less hate focusing manually with the RX100 M1. For example, I never know, which direction to turn the control ring and where I am on the distance scale (which is not displayed in the M1 version). And except for the sharpness of the screen, the camera does not provide any information on the set distance. This is really a shame for such an otherwise well-made camera. Sony should have taken a look at the Leica X Vario, which does manual focusing so well that is "feels" manual, even though it is "by wire." And while it may not be possible to have a distance scale on the lens, as the X Vario has, there should at least be a scale on the screen. All our Ricoh cameras provide such a scale (including depth of field indicators). In particular, I want to know, when I reach infinity and when I reach the minimum distance when turning the ring. Since there is no feedback, I turn and turn the ring, until I think that the limit has been reached. That's really unbelievable! I also wonder, why Sony does not offer a quick "infinity" setting as the Ricoh cameras do. There are so many occasions (for example, shooting though a fence, shooting the sky), in which I would need this...
Finding the Closest Distance for Shots with Maximum Magnification
When using AF, it is little bit tedious to find the closest possible distance. If you are too close, focus will not be confirmed, and you have to increase the distance and reframe the photo. If you are too far away, the target objects will be smaller than possible - and you may not even notice that you are too far away and how much.
Using manual focus and setting the minimum distance of 5 cm (using the control ring, which is also a little bit tedious, because there is no distance scale; typically I do not know in which direction to turn the ring...) allows you to shoot at the closest distance, but I find it hard to recognize on the LCD screen whether the target object is optimally in focus. Here, the two focus tools can help, particularly magnification (called Manual Focus Assist and Focus Magnifier). But often I cannot hold the camera steady enough so that I already have lost focus again, when I half-press the shutter button to reframe the photo after using magnification. And then I have to start over...
An Interplay of AF and MF
The Sony RX100 M1 offers a function that already my Minolta Dimage cameras provided, but which I rarely used, although it looks useful on paper: Direct Manual Focus (DMF). In short, it means that after you focused automatically by half-pressing the shutter button, you can adjust the focus manually by turning the control ring at the lens while still half-pressing the shutter button. This also activates Focus Peaking (set to one of three intensities) and magnification (Manual Focus Assist, Focus Magnifier) if these are enabled.
You can use DMF also the other way round: Focus manually first using the control ring and then use the AF for the final focusing. You must briefly release the shutter button so that you can use AF. This may be a solution to the problem that I describe in "Working with Ersatz Targets." You can focus manually using the control ring alone - in this case there is no focus assists - or half-press the shutter button to also activate focus assist, provided it is enabled.
Personally, I find it hard to turn the control ring while half-pressing the shutter button. Often, I slightly release the shutter button in this process and have to start over, which in the end is frustrating. It looks, as if I will not use this feature with the Sony RX100 M1 very often (as was the case for the Minolta Dimage as well)...
Note that the control ring is exclusively dedicated to focusing when DMF is used.
Working with "Ersatz" Targets
Sometimes, the Sony RX100 M1's autofocus struggles with close targets and focuses on targets in the background. For example, instead of focusing on a flower, the camera focuses on the ground despite the fact that I use center or even (flexible) spot AF (and the focus field is covered by the flower). Generally, with close-ups contrast is often not strong enough for the AF to find focus (which is true for most cameras).
Sometimes, it helps when you focus on something close to the target object and then focus again on the actual target. If the camera erroneously focuses on something farther away and not on the target, it often seems to be "trapped" by that wrong focus object - refocusing again and again does not help. Instead, the camera needs help to find correct focus again, and this can be provided by focusing on a different target that is not too far away from the actual target. Having focused on this "ersatz" target, the camera is now able to focus on the actual target.
Another solution to this problem might be to use Direct Manual Focus (DMF) for focusing and start with manual focusing to come close to the desired target object and then leave the final focusing to the autofocus system.
By the way, I found a similar behavior for the Leica X Vario and the Ricoh GR.
Close-Up Lenses
The Sony RX100 M1 lens does not have a filter thread and therefore cannot use close-up lenses (and filters). Of course, you can try to hold a close-up lens with your hand (Close-Up Experiences - Hand-held Close-up Lenses). There are also some "special" solutions to this issue, including one from Sony, that you can find on the Web (Lensmate, MagFilter, ...).
In November 2017, we bought a MagFilter filter adapter. See pages Close-Up Experiences - MagFilter Adapter Installation and Close-Up Experiences - MagFilter Adapter Tests for more information and page Close-Up Samples - Part 3 (with Lenses) for samples.
Here is my summary table for the Sony RX100 M1 and different diopter values for close-up lenses or achromats:
|
Focal Length |
Minimum Object... |
Close-up Lenses
Setup |
|||
| None | +5 | +10 | +15 | ||
| 28 | Size > | 80 mm | 67 mm | 55 mm | n.a. |
| 100 | 200-205 mm | 60-62 mm | 36-37 mm | 26-27 mm | |
| 28 | Distance > | 5 cm | 2.5 cm** | 1.7 cm** | n.a. |
| 100 | 45/55* cm | 13.5 cm | 8.5 cm** | 5.6 cm** | |
*) Given by Sony; **) crude estimates, all other values estimates
References
- Martin Vieten (2014). Das Sony RX100 & RX100 II Handbuch. dpunkt.verlag GmbH (ISBN-10: 3864902134, ISBN-13: 978-3864902130) (German)
- Alexander S. White (2012). Photographer’s Guide to the Sony DSC-RX100. White Knight Press, Henrico, Virginia (ISBN: 978-1-937986-08-7, paperback)
- Post on RX100 Macros: 09-11-2012 05:42 PM - community.sony.com/t5/Cybershot-Cameras/RX-100-Macro/td-p/28896
- Subject tracking: Why it matters to us and why it should matter to you (Carey Rose, dpreview.com): www.dpreview.com/techniques/5004008634/subject-tracking-why-it-matters
- 10 macro photography tips for beginners (Micael Widell, dpreview.com): www.dpreview.com/learn/1063005124/10-macro-photography-tips-for-beginners
|
made by |
| 19.11.2021 |