Astronomy | GXR · GR · RX100 M1 · RX100 M4 · RX10 M3/4 · TZ202 · X Vario · M240 · General | Photos | Conf. Places | Calendars | Art
Sony RX100 M1: Manual Focusing and Focusing Support
How Is Manual Focusing Supported on the Sony RX100 M1? - Overview | Sony RX100 M1 Manual Focus Methods | Locking Focus | Setting Fixed Distances | Support for Manual Focusing | Conclusions | References
On this page, I describe how manual focusing works with the Sony RX100 M1 camera and how it is supported.
Note: For an overview of manual focusing methods, see page Manual Focusing Methods.
How Is Manual Focusing Supported on the Sony RX100 M1? - Overview
Depending on the needs of the photographer, the Sony RX100 M1 offers several methods of focusing manually:
- Manual Focus (MF): The user sets the focus manually by turning the ring.
- Direct Manual Focus (DMF): The user manually overrides the distance set by autofocus (or vice versa)
The Sony RX100 M1 allows you to lock focus, albeit there is no direct function for this, and also, with some "trickery," to store fixed distances for later use:
- Focus Lock: Locking the focus at a certain distance for one or more shots by switching from AF to MF using the Focus Mode or the AF/MF Control Toggle functions
- Storing Fixed Distances: Fixed distances can be stored for later use (as a kind of "snap focus distance" or for use as "hyperfocal distance") using memory locations
Manual focusing is furthermore supported in several ways (but note that these methods can also be used for autofocus):
- Focus Peaking: Contours that are in focus are highlighted in various ways
- Magnification comes in two flavors: Manual Focus Assist and Focus Magnifier
Sony RX100 M1 Manual Focus Methods
Manual Focus (MF)
To focus manually, first set Focus Mode to MF (set in menu Shooting p. 2 > Focus Mode). Focus mode selection can also be assigned to one of the seven positions in the Fn button menu (set in menu Custom p. 2 > Function Button).
Focusing manually is done using the control ring at the lens. Some people say that this is intuitive and provides a focusing experience similar to an camera with manual focus. Others, however, say that the experience is rather "indirect", since focusing is "by wire," and turning the wheel is rather tedious because there are no stops at the end (which a manual lens provides). All in all, I have to agree with the latter. I more or less hate focusing manually with the RX100.
For example, I never know, in which direction to turn the control ring and where I am on the distance scale. And except for the sharpness of the screen, the camera does not provide any information on the set distance. This is really a shame for such an otherwise well-made camera. Sony should have taken a look at the Leica X Vario, which does manual focusing so well that is "feels" manual, even though it is "by wire." And while it may not be possible to have a distance scale on the lens, as the X Vario has, there should at least be a scale on the screen. All our Ricoh cameras provide such a scale (including depth of field indicators). In particular, I want to know, when I reach infinity and when I reach the minimum distance when turning the ring. Since there is no feedback, I turn and turn the ring, until I think that the limit has been reached. That's really unbelievable! I also wonder, why Sony does not offer a quick "infinity" setting as the Ricoh cameras do. There are so many occasions (for example, shooting though a fence, shooting the sky), in which I would need this...
My remaining problem with manual focusing is, however, that, being used to an EVF, I find it hard to recognize on the LCD screen when an object is in focus - even focus peaking and magnification do not help me much, particularly in bright light.
Direct Manual Focus (DMF)
Direct Manual Focus (DMF) allows you to override autofocus manually (and vice versa). To use direct manual focus, first set Focus Mode to DMF (set in menu Shooting p. 2 > Focus Mode). Focus mode selection can also be assigned to one of the seven positions in the Fn menu (set in menu Custom p. 2 > Function Button).
Note that DMF works in two directions: You can (1) either focus automatically and then override the focus manually by turning the control ring at the lens, or you can (2) focus manually first and then fine-tune focusing using autofocus. Also note that when using DMF, manual focus support is available (for details see below), provided that you activated it in the menu. Here are the detailed procedures for using the two approaches:
- To use DMF the first way, you have to half-press the shutter
button to focus automatically. Then turn the control ring to adjust
the focus manually while
still pressing the shutter
button half-way.
If you activated Manual Focus Assist, the screen will be magnified for 2 s, 5 s, or as long as you half-press the shutter button.
You can also change magnification if you assigned the Focus Magnifier function to a function button and press it briefly. This function will be active all the time, not only while half-pressing the shutter button.
If you activated Focus Peaking, it will also be active all the time, not only while half-pressing the shutter button. - To use DMF the second way, first turn the control
ring to adjust the focus manually, then half-press the shutter button to
focus automatically.
Note that in this case, Manual Focus Assist does not work, but you can still use the Focus Magnifier function provided that you activated it.
If you activated Focus Peaking, it will also be active all the time, not only while half-pressing the shutter button.
I have some issues with the DMF functionality. First, I find it hard to turn the control ring while half-pressing the shutter button. Often I release the shutter button or press it inadvertently, which is annoying. Second, since I usually turn focus peaking on, this in on all the time when I use DMF, not only when I half press the shutter button to adjust the focus manually. This disturbs the impression of the image for me (particularly if focus peaking is a bit strong).
So I looked for an alternative and found one. See below!
Locking Focus
Focus Lock
Locking the focus at a certain distance for one or more shots is useful in a number of occasions, such as sports photos where AF is too slow, series of photos, etc. (one might debate whether this is a manual focus method, but it fits in here...). The Sony RX100 M1 provides the following options for locking focus:
- Pressing the shutter-release button down halfway. Note that this also locks exposure! Mostly, we use this technique for the latter reason, not because we want to lock the focus.
- Switching from autofocus to manual focus (AF/MF Control Toggle). This may sound cumbersome, but can be easily done if AF/MF Control Toggle is assigned to a button such as the left button on the control wheel (default: Self-timer/Drive Mode button).
While the technique of pressing the shutter-release button down halfway is easy to use, the coupling of exposure and focus lock can lead to problems. For example, when I take a picture of a landscape, and the image looks too dark, we point the camera lower to brighten the image up - but now the focus may be too close. The other way round, when we point the camera to the sky to darken the image, focus may not find a target.
The AF/MF Control Toggle function* activates a "manual focus mode," which has the advantage or feature that the manual focus is set to the same distance as AF set it before (similarly to DMF). Thus, for pre-focusing you can first use the AF to set the appropriate distance and then switch to manual focus. Of course, this works only in cases where AF finds focus (for example, it may not work for sky or macro photos). You can use this technique either to quickly focus at nearby objects such as playing children or sports people, or to focus at distant objects such as the sky. In the latter case, this can replace the missing "infinity" setting (or is a workaround for it...)- at least for shorter focal lengths.
*) Alternatively, you can also use the Focus Mode function for this purpose. See below for the difference between these functions.
Locking the focus as described here is not appropriate for setting the focus at a known distance (infinity is an exception; you may, of course, focus objects for which you know the distance) and particularly, for storing it for later use. This topic is discussed below.
Note: Since locking exposure and/or focus is interwined, I dedicated an extra page to the topic of "locking": Locking Focus and Exposure. Please read this page for details!
Addendum: The Interplay of the AF/MF Control Toggle and the Focus Mode Functions
The Focus Mode function allows you to select between several manual and automatic focus modes (MF, DMF, AFS-S, AF-C). It is the "primary" method to select the focus mode, can be accessed from the menu (Shooting menu, page 2), the Fn button menu if assigned to it, and also from the left/right buttons of the control wheel if assigned to them.
The AF/MF Control Toggle function switches between AF and MF, that is, in both directions, and might be regarded as a simplified version of the Focus Mode function. It can be assigned to the left/right buttons of the control wheel. In fact, it allows fast and easy switching between manual and automatic focus, but it is only meant for temporary use and sets the camera into a "specific mode." This is revealed by several indicators:
- The state of the AF/MF Control Toggle function cannot be stored in a memory location, only the state of the Focus Mode function can.
- If you set the Focus Mode function to AF and switch to MF using
the AF/MF Control Toggle function, the Focus Mode function
is disabled (grayed out) in the menu and in the Fn button menu (if
assigned to it). However, it displays the current focus mode (that is, MF).
It is enabled again, if you switch back to the original mode that you set
with the Focus Mode function.
The same is true for the other way round (starting with MF, switching to AF, ...)
Setting Fixed Distances
Setting A Fixed Distance
Regrettably, the Sony RX100 M1 does not display a distance scale when in manual focus mode (as some newer models do). Therefore, the question arises how you can set a fixed distance of, for example, 2 m on this camera. The only way to achieve this, is to select a target at a known distance (you may have measured the distance to the target using a measuring tape or using other aids) and then
- (1) Measure the distance using AF, and the switch from AF to MF either
using the
- AF/MF Control Toggle function*, or the
- Focus Mode function*, or
- (2) Measure the distance using MF, potentially assisted by the Focus Peaking and/or Focus Magnifier/Manual Focus Assist functions
*) Both functions set the camera to the same (fixed) distance as AF did. You may ask yourself whether using the Focus Mode or the AF/MF Control Toggle functions makes any difference...
Support for Manual Focusing
The Sony RX100 M1 offers two tools that are meant to make manual focusing easier:
- Focus Peaking: Contours that are in focus are highlighted
- in three intensities (high, medium, low) and
- in three different colors (red, yellow, white).
- Magnification comes in two flavors:
- Manual Focus Assist: Magnifies an image section full screen for a predefined or unlimited time
- Focus Magnifier: Magnifies the center section of the image full screen after you press a dedicated control button
In the following, I explain these methods in more detail.
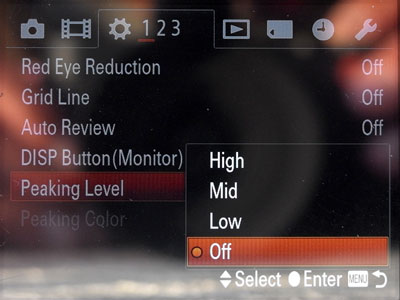
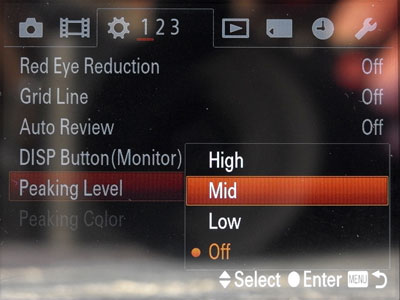
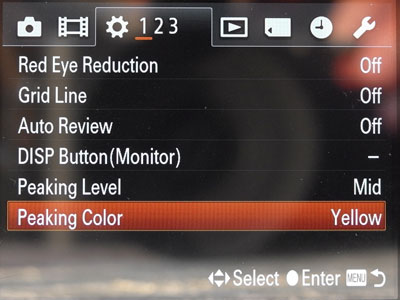
Focus Peaking
Focus Peaking is an approach to highlight contours that are in focus. On the Sony RX100 M1, contours are highlighted
- in three different intensities (Peaking Level: High, Mid, Low); "Off" cancels Focus Peaking
- in three different colors (Peaking Color: Red, Yellow, White); inactive when Peaking Level is set to "Off"
 |
 |
|
 |
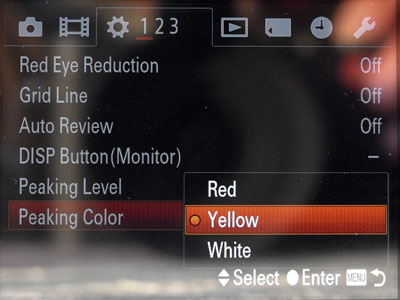 |
Figures: Setting Peaking Level (top row) and Peaking Color (bottom row) in the Custom menu (page 1)
 |
 |
 |
Figures: Peaking Colors red, yellow and white (from left to right; Peaking Level: Mid)
Magnification
Magnification comes in two flavors: Manual Focus Assist and Focus Magnifier. Both show an enlarged portion of the image fullscreen.
Manual Focus Assist
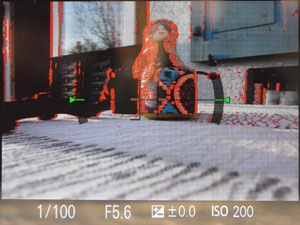
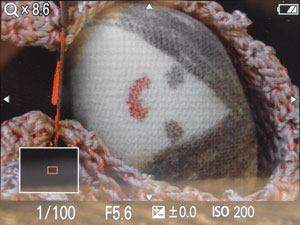
Manual Focus Assist (or MF Assist) magnifies an image section full screen for a predefined (2 s, 5 s) or unlimited time as soon as you turn the control ring at the lens to focus manually, starting at a magnification of 8.6 x. If you press the center button, magnification increases to 17.1 x, pressing it again returns magnification to 8.6 x, and so on (see the Figures below). Half-pressing the shutter button (or if you take a photo...), cancels magnification, and you have use the to control ring again to re-activate magnification.
 |
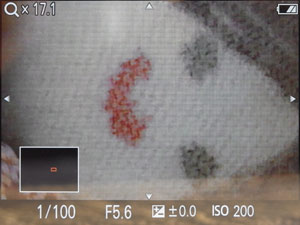 |
Figures: Manual Focus Assist combined with Focus Peaking (Peaking Color red) (from left to right: after first button press = 8.6 x, after second button press = 17.1 x)
Moreover, the four direction buttons of the control wheel (and turning the wheel) allow you to change the position of the enlarged section within the image.
MF Assist is activated in the menu: Custom 3. p > MF Assist (On, Off). Focus Magnif. Time is set in the same menu (2 Sec, 5 Sec, No Limit). See page Configuration for details. I set the focus magnification time to No Limit.
Focus Magnifier
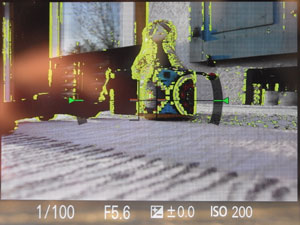
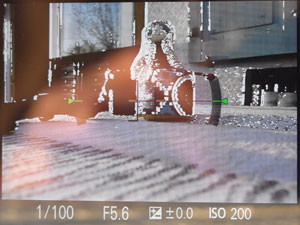
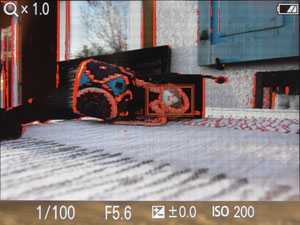
The Focus Magnifier function magnifies the center section of the image full screen after you press a dedicated control button (which one, can be set in the menu see page Configuration for details), starting at a magnification of 1 x. If you press the center button, magnification increases to 8.6 x, pressing again increases it to 17.1 x, pressing it once more returns to 1 x, and so on (see Figures below). You can cancel magnification by half-pressing the shutter button (or if you take a photo...).
 |
|
|
Figures: Focus Magnifier combined with focus peaking (Peaking Color red) (from left to right: after first button press = 1.0 x, after second button press = 8.6 x, after third button press = 17.1 x)
Moreover, the four direction buttons of the control wheel (and turning the wheel) allow you to change the position of the enlarged section within the image. I do not know how to reset the section to the original position...
The Focus Magnifier function can be assigned to a control wheel button such as the Center, Left, or Right button. See page Configuration for details.
Manual Focus Assist and Focus Magnifier
You can activate both, Manual Focus Assist and Focus Magnifier, at the same time. So you can choose whether you want to have magnification activated by both methods or only by one or even none of them.
Conclusions
For "normal" photos, we use manual focus on the Sony RX100 M1 only on rare occasions. My personal problem with manual focusing is that, being used to an EVF, I find it hard to recognize on the LCD screen when an object is in focus - even focus peaking and magnification do not help me much, particularly if it is too bright.
One instance for using manual focus are photos of the sky. Here autofocus often cannot find a target, and therefore we set the focus to (about) infinity by locking it on a distance AF target (turn the control ring until you believe infinity has been reached may not work, as I found out for other camera, because you may already be beyond infinity...). I also use the "infinity" trick for situations when objects in the foreground might fool the autofocus (a fence, flowers, ...).
Another instance are sports photos where autofocus is often far too slow. Here, focus lock can be an alternative to AF as well: Either you pre-focus, keep the shutter button half-pressed, and wait for "the" moment. Or you set the distance using AF and a suitable target at the expected distance, lock focus by switching from AF to MF, and then wait for "the" moment.
Our main application for manual focus are close-up photos, because here it often happens that autofocus does not lock or finds the wrong target. Even spot AF is not of much help here, but I never really tried the Flexible Spot autofocus area, which provides a kind of "small spot" AF - perhaps this would improve matters (see page Focusing with the Flexible Spot for details).
See page Close-Up Introduction and First Samples for details on taking close-up photos with the Sony RX100 M1. I used the Flexible Spot on the RX100 M4, though, where can also change its size.
Note: For a more general overview of manual focusing methods, see page Manual Focusing Methods.
References
- Alexander S. White (2012). Photographer’s Guide to the Sony DSC-RX100. White Knight Press, Henrico, Virginia (ISBN: 978-1-937986-08-7, paperback)
- Post on RX100 Macros: 09-11-2012 05:42 PM - community.sony.com/t5/Cybershot-Cameras/RX-100-Macro/td-p/28896
|
made by |
| 08.05.2022 |