Leica M (Typ 240): Characteristics
Introduction | Exchangeable M-Mount Lenses | Manual Focus and Aperture | Optical Rangefinder AND Electronic Viewfinder with Live View Mode | Exposure Preview | Exposure Modes | Manual Exposure Bracketing | Final Word
Archive
On this page, I would like to discuss some specific characteristics of the Leica M (Typ 240). Some of them are quite evident, and you might think that they do not even warrant being mentioned. But some visitors of this page will not be Leica experts and know what a Leica constitutes. For example, they may use or have used compact cameras, which are fully automatic, have an inbuilt lens with a wide zoom range, and expect that such an expensive camera as a Leica will, of course, "have it all." Other characteristics may not be that "evident" and can only be discovered when actually using the camera.
BTW: I will not repeat the rangefinder versus electronic viewfinder discussion here. You will find enough about this in the Leica camera forums.
Notes:
- In addition to the characteristics, I present a few optional accessories for the Leica M (Typ 240) that I have bought or that the Leica M "inherited" from my Leica X Vario (or has to share with it).
- For a functional consistency comparison with the Leica X Vario, see page Leica M (Typ 240) and Leica X Vario: Functional Consistency Comparison.
Introduction
For the Leica X Vario, page Characteristics lists more or less the reasons why I bought this camera. For the M (Typ 240) the reason for buying one was evident: It was my collection of M-mount lenses and the insight that there are at the moment no alternatives to what I wanted (e.g. I did not want a pure rangefinder camera; I did not want a camera where many of my lenses would deliver soft corners). Therefore, for the M (Typ 240) the "characteristics" page collects characteristics that are different from other cameras, are great, or just made me wonder. The exact "bias" of this page has still to be defined...
Exchangeable M-Mount Lenses
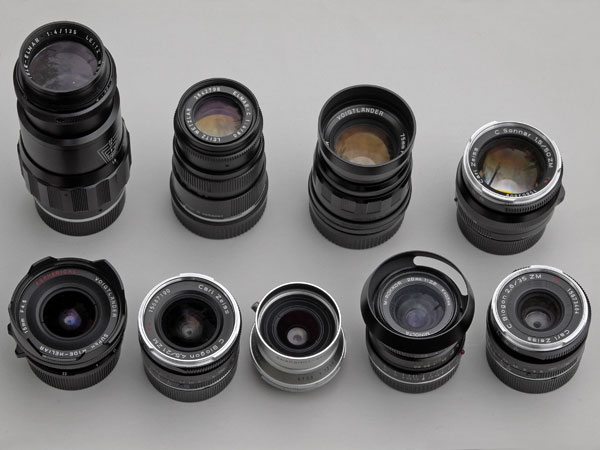
The Leica M (Typ 240) camera is actually a camera body, just like a DSLR body. It is to be used with Leica M-mount (or M-bayonet) lenses. The M-bayonet was introduced in the 1950s. Older Leicas have an M39 thread for taking lenses, and you can still mount M39 lenses using an M39-to-M-bayonet adapter. Two of my lenses are M39 lenses, and each of it has its own adapter, so that I need not exchange adapters between the lenses.
In 2006, with the introduction of the Leica M8, Leica introduced 6-bit-lens codes that allow lenses to be recognized by the camera automatically. This information is used to correct lens deficits and to write lens information to the Exif data. Older lenses and lenses from other manufacturers (Zeiss, Voigtländer, ...) do not have such codes. Many older Leitz/Leica lenses can be coded by Leica. There are also some experts who code code lenses. You can also code lenses on your own using felt pens (which does not last long) or by exchanging mount-adapters with ones that have 6 drilled pits for the coding information. None of my lenses (see below) is coded, by the way.

Photo: My nine M-mount lenses (including two M39 lenses with M-mount adapters)
For details, see page Using Lenses without Lens Codes - Part 1: Theory and the follow-up pages.
Manual Focus and Manual Aperture
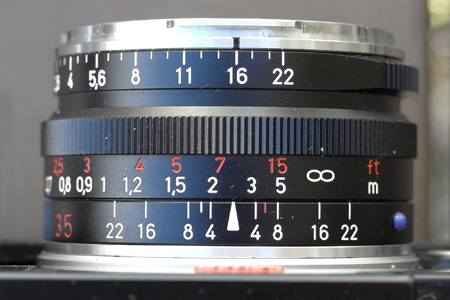
M-mount lenses are manual lenses. That means, distance and aperture have to be set manually.

Photo: M-mount lens (Zeiss Biogon 35mm f/2.8) with manual aperture and distance rings
Setting aperture manually is probably the smaller issue. Main considerations here are the wanted depth of field, the light that is available, the maximum shutter speed that you need to avoid camera shake (you can play around also with ISO to increase the shutter speed, but there are limits to this), and potential softness introduced by diffraction when you use too large f-numbers (a rule of thumb states that f/22 should be avoided for full-frame format cameras).
Setting distance manually is, however, more difficult and can, depending on the lens, the situation at hand, the motif, and so on, become a challenge at times. "Real" Leica users use the rangefinder and its focusing aids for focusing, whereas live view mode users have to base their distance setting on overall image sharpness and on focusing aids such as screen magnification and focus peaking. You can also use the distance scale instead of the viewfinders and estimate the distance, or resort to manual focusing methods such as using zone focusing or the hyperfocal distance (everything "acceptably" sharp from half the hyperfocal distance to infinity).
See pages Manual Focusing (EVF) and Manual Focusing Methods (general information about manual focusing) for more information about manual focusing. There are also pages on this site that offer more information about depth of field and the hyperfocal distance.
Optical Rangefinder AND Electronic Viewfinder with Live View Mode
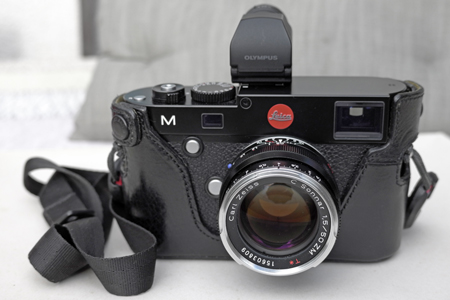
Photo: Leica M (Typ 240) with optical rangefinder and attached electronic viewfinder (Olympus VF-2); the small window next to the M symbol is the range finder viewing window and needed for distance setting using the rangefinder.
The Leica M (Typ 240) is probably the only camera in the world that offers both an optical rangefinder AND and an electronic viewfinder (EVF) with live view mode. The latter was the reason that I bought this camera and not a more affordable Leica M9. Of course, you can also use the rear LCD screen in live view mode, thus, the ELV is not mandatory for this mode. But note that there are a number of Leica M models (M8, M9, M-E, M262, ...) with a rear LCD screen that do NOT offer live view mode, just a review image. I nearly fell for this when I was interested in the Leica M9, because its lower price tag compared with a used M (Typ 240)...
Since I rarely use the rangefinder (only when the battery power is low...), I do not want to comment on it here. More information about the electronic viewfinder can be found on page Electronic Viewfinder. Information about focusing with the electronic viewfinder using live view mode can be found on page Manual Focusing (EVF).
Exposure Preview
In live view mode, the Leica M (Typ 240) can indicate a preview of the exposure. This is a very important feature for me, because I am used to checking the exposure in the viewfinder. I was somewhat unhappy when I owned DSLRs, since the optical viewfinder did not give any indication of the exposure, and I usually forgot to check the photos on the LCD screen afterwards (this is also time consuming and a little awkward...).
I also found that different cameras handle exposure preview somewhat differently - the Leica M (Typ 240) is no exception to this rule. Since firmware update 2.0.1.5, you can set exposure preview to either "Permanent" or "Release button half-pressed" using the new menu item "Exposure Simulation":
- Exposure simulation -> Permanent: Live view mode accurately shows image brightness according to the shutter speed and aperture set in manual exposure (as long as the chosen exposure time is shorter than 1/30s).
- Exposure simulation -> Release button half-pressed: Image brightness in live view mode is adjusted for best visibility, regardless of the actual exposure. Half pressing the shutter button simulates the actual exposure.
In the latter case, the camera tries to maintain a bright viewfinder view as long as this is feasible. When you half-press the shutter release button, the view changes to a preview of the exposure. When "Exposure Simulation" is set to "Permanent", the camera displays an exposure preview all the time.
Is the exposure preview reliable? I never checked this. If you are in doubt as to the correct exposure you better take several shots with different exposures or use exposure bracketing.
Exposure Modes
Many compact cameras offer quite a few exposure modes, automatic modes, and scene modes. Today, they usually even offer automatic modes that "automatically" (or "intelligently") select the suitable automatic or scene mode for you. For my wife's RX100 M1, Sony calls these modes Auto advanced (Superior automatic) and Auto (Intelligent automatic, iA). Leica M users have to do without all this, and are limited to two, or three modes, depending on how you count these:
- Aperture priority: You set the aperture at the lens, and the camera selects the shutter speed automatically
- Manual: You set both the aperture and the shutter speed manually (the camera indicates how much exposure deviates from a correct exposure)
- Auto ISO in manual mode (ako TAv mode, as Ricoh and Pentax call
it): Like in manual mode, you set both the aperture and the shutter speed
manually, and the camera adjusts the ISO value (within certain limits) to
achieve a correct exposure.
(Since firmware update 2.0.1.5: "Auto ISO in M mode" is now offered as an option. This varies ISO sensitivity for correct exposure when shutter speed and aperture are set manually.)
That's all the Leica M offers - and it's enough for me. Most of the time, I use A mode and adapt exposure to my liking (according to the look in the viewfinder) either using exposure compensation or locking exposure by half-pressing the shutter release button.
Manual Exposure Bracketing
"Bracketing" means that you can shoot several photos with a variation of values on one photographic dimension such as exposure, white balance, or ISO. Many cameras offer such a feature and differ with respect to the bracketing dimensions (exposure, white balance, ISO, color, effects, etc.) and the degree of the variations (e.g. number of shots, size of the variation steps, etc.). Like the X Vario, the Leica M offers exposure bracketing, but with more options. Just for the record, the Ricoh GXR and particularly, the GR offer more bracketing options (but only three steps) and also a more flexible user interface that allows for "asymmetric" bracketing. All of these cameras offer "automatic bracketing", meaning that you press the shutter release button once, and then the camera fires several shots in quick succession, each with a different setting (e.g. an exposure variation of -1, 0, +1 EV).
The Leica M (Typ 240) offers, however, one specialty that I did not find on any other camera: manual exposure bracketing. In this case, you have to press the shutter release button for each single exposure variation. I was not able to find any indication in the viewfinder of which shot in the bracketing sequence the camera is going to take, but perhaps I overlooked this. At the moment, though, I still have to figure out why (or for which applications) "manual" exposure bracketing is useful.
A Warning...
There is one more reason, why I mention this feature here: It puzzled me completely when I activated it inadvertently, that is, without knowing. I believed that my camera had become defective, because of getting under- and overexposed photos without any obvious reason for me. Actually, manual bracketing was at work, hence the under- and overexposures, but I did not know this (I did not understand the icon that was showing in the viewfinder, and mostly I was in another display mode that does not even show it).
Luckily, I was not the only person who was puzzled by this phenomenon. I started a thread in the l-camera-forum, and eventually, two posters replied to it and explained that they had once been puzzled by the camera's behavior as well. Since both of them had activated the "manual" exposure bracketing feature deliberately, they eventually found the key to their issues and thus, also were able to help me out. Read also about this phenomenon in my FAQ.
Final Word
I will add to this page as soon as I hit on further specialties of the Leica M (Typ 240).
| 04.07.2024 |
