Astronomy | GXR · GR · RX100 M1 · RX100 M4 · RX10 M3/4 · TZ202 · X Vario · M240 · General | Photos | Conf. Places | Calendars | Art
Ricoh GXR: Recording the Lens in Exif
Motivation: Why I Finally Decided to Dig into this Matter... | Introduction: How the Custom Settings Are Organized | Creating, Refining, and Using the Settings Sets | How to Use the Custom Settings | Conclusions | Links | Appendix: The Settings Screens | Appendix: Setting Lens Data | Appendix: Correcting Lens Characteristics
Archive
On this page, I describe how you can record information about the M-mount lens that is used on the Ricoh GXR with M-mount expansion unit in the Exif data so that you know later, which lens was used. This data is registered in a set of custom settings (or a settings set, for short), which can stored in the camera or on a memory card and assigned to one of the three "MYx" positions on the mode dial for easy access.
In addition, you can record correction data for a lens to minimize corner hue shift and distortion. Last, but not least, you can include a large number of parameter values in a set of custom settings, which is the main purpose of the custom settings and available for all Ricoh GXR camera units.
Notes: Here the focus is on recording lens information in the Exif data. Elsewhere you will find a general introduction to custom settings. Moreover, page M-Mount Lens Settings provides an overview of what you can do for M-mount lenses without going to much into detail on how custom settings are to be used.
Motivation: Why I Finally Decided to Dig into this Matter...
I used the Ricoh GXR for years without bothering much with custom settings. I was simply too lazy to take a closer look at them, because I believed that I did not need them - and the description in the manual looked daunting to me. And even if I create some custom settings, after a while I have forgotten what they are good for (it's the same with my wife and her compact Ricohs...).
Recently, however, with a growing collection of M-mount lenses, the wish and need came up to store in a photo's Exif data, which lens was used. Particularly, when I performed tests with several lenses, I was usually unable afterwards to uncover, which lens was used for which photo, making the whole test useless. Since the M-mount expansion unit is completely agnostic of the used lens and settings (aperture, distance), you have to tell the camera what lens and settings you are using to record it for you, for example, in the Exif data. Otherwise you need to write that down with paper and pencil, which is unthinkable for me...
So I finally decided to dig into the dry and complex matter of custom settings and find out what they can do for me. However, I was only interested in the bare minimum, that is the lens name, and maybe its focal length and actual or maximum aperture (although the latter two are not really needed in my case...).
In the following, I will describe how the custom settings are organized on the Ricoh GXR and how you can create sets of them, store them, and recall them for use - all in consideration of the described purpose.
Introduction: How the Custom Settings Are Organized
The Ricoh GXR has three primary sets of custom settings MY1, MY2, and MY3 (I will call them collectively "MYx"), which can be easily accessed from the mode dial. They can also be given names that indicate their purpose (provided you choose a proper name...). So, at least on the GXR, there is no excuse for not remembering what a set of settings is good for. However, you have to activate that names are displayed in the menu - otherwise, you will only see the generic "MYx" names.
In addition to the three "MYx" sets of custom settings, the Ricoh GXR offers six more stores for sets of custom settings in the "My Settings Box" (also called "box modes"). Since the introduction of the M-mount expansion unit (as far as I know...), it offers six more stores for sets of custom setting on the camera's memory card (called "Card"), resulting all in all in twelve storage locations for sets of settings.
The twelve additional storage locations are, however, not directly accessible - only the three "MYx" setting sets on the mode dial are. Being only able to access three sets of settings directly, makes things a little complicated: If you need to use another set, you have to copy it to one of the three "MYx" locations and thus, overwrite a set (which should be stored safely in one of the twelve storage locations).
Creating, Refining, and Using the Settings Sets
Although I am only interested in few data to be stored in the settings (the lens name would do...), a set of settings comprises a huge number of options, which can all be set in a dedicated menu. I would like to refer you to the GXR manual and to the manuals of the individual camera units (because these may differ in the possible options) for details. See also Appendix: The Settings Screens for the settings screens for the M-mount expansion unit as an example and Appendix: Setting Lens Data for editing lens data ( M-mount expansion unit only).
In the following, I describe how you can create sets of settings, assign them to one of the 15 possible storage locations, edit them, and copy them to the three "MYx" storage locations for direct access from the mode dial.
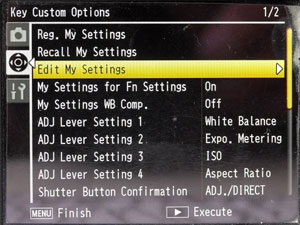
All "settings work" is done in the "Key Custom Options" tab in the menu, where you have three options (starting from the top of the menu page) to deal with sets of settings:
- Reg. My Settings (Register My Settings): Allows you to store the current settings in a storage location (either MY1 to MY3 (three locations), the "My Settings Box" (six locations), or on the "Card" (memory card, six locations).
- Recall My Settings: Allows you to select a set of settings from one of the twelve storage locations (six from the "My Setting Box", six from "Card") and assign it to one of the three "MYx" locations (MY1, MY2, or MY3). Actually, it's the other way round: first you select the target location, then the set of settings.
- Edit My Settings: Allows you to edit a set of settings in any of the 15 locations, either in MY1 to MY3 (three locations), the "My Settings Box" (six locations), or in "Card" (six locations). If you select a set in "Card" and there is none, you are returned to the menu. Thus, you have to save a set on the memory card before you can edit it.
In the following, I describe the three functions in more detail.
Register My Settings
Start from a state of camera settings that are useful for a certain purpose and then register these in a set of custom settings using the menu.
- In my specific case, I want all settings options to be identical, except for the lens-specific data (you can also correct corner color shift and distortion - which I never did up to now). Therefore, I started from a "default state/set" and saved it to nine storage locations (box modes and card), which is the number of lenses that I own. Thereafter, I edited the nine sets to adapt them to the specific lenses - see below.
To register a set of custom settings, press the "MENU/OK" button and select the "Key Custom Options" tab (the second tab).
 |
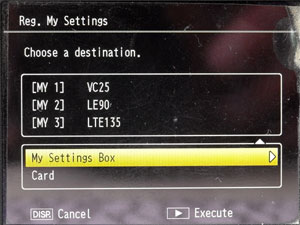
In the "Key Custom Options", select "Reg. My Settings" and move the cursor to the right. You can store the current settings in any storage location, either MY1 to MY3 (three locations), the "My Settings Box" (six locations), or on the "Card" (memory card, six locations). |
|
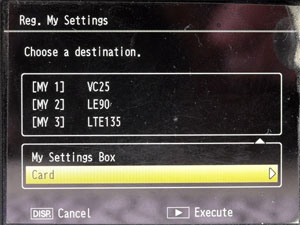
I only show the two two latter cases: |
||
| My Settings Box: | Card: | |
 |
 |
|
| Select "My Settings Box" and move the cursor to the right. | Select "Card" and move the cursor to the right. | |
 |
 |
|
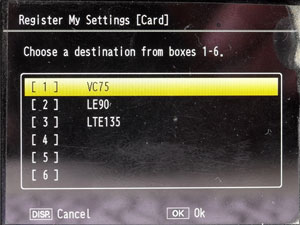
Select one of the six locations and press "OK" (you can replace or update an existing setting). |
Select one of the six locations and press "OK" (you can replace or update an existing setting). | |
Overwriting Existing Settings, Confirmation, Naming
 |
 |
|
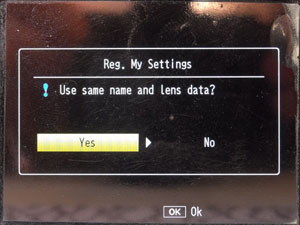
| If there is already data in a storage location, a dialog appears that asks you whether you want to keep the current name of the settings and the current lens data (lens data only for M-mount expansion unit). | Finally, you get a confirmation message that the settings are registered in the selected location. In this case, it is an "MYx" location, namely MY2. |
The settings will automatically be given a name that reflects the date of the registering. Here you can see these "automatic names" for the three "MYx" location:

You may change the name later by editing the set (see below).
Edit My Settings
This functionality allows you to edit and thus, refine, a set of settings after you saved it in one of the 15 storage locations. Usually, you will find that some changes to the initial settings are required, and this is the way to go if you want/need to refine your settings. To do so, press the "MENU/OK" button and select the "Key Custom Options" tab (the second tab).
 |
 |
|
| In the "Key Custom Options", select "Edit My Settings" and move the cursor to the right. | You can edit the settings in any storage location, either MY1 to MY3 (three locations), the "My Settings Box" (six locations), or on the "Card" (memory card, six locations). | |
I show only the case than an "MYx" location is selected. Select "MYx" and move the cursor to the right to arrive at the first of several screens for setting options: |
||
 |
 |
|
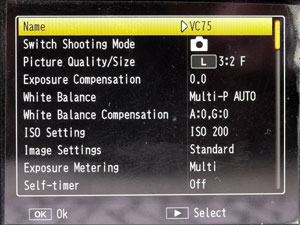
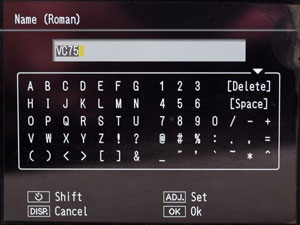
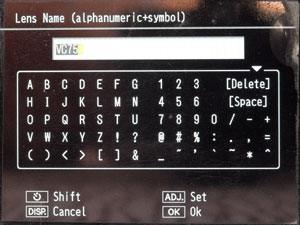
| You start with the first of five settings screens. The first item on this screen allows you to give a set of settings a descriptive name (here it is a short name for a lens) | Move the cursor to the right to enter the settings name using a small alphanumeric keyboard. | |
A set of settings comprises a huge number of options, which can all be set in the settings screens. I would like to refer you to the GXR manual and to the manuals of the individual camera units (because these may differ in the options they offer) for details. See Appendix: The Settings Screens for the M-mount expansion unit's five settings screens.
For my purposes, the following options are relevant:
- Name: Descriptive label for the setting. Here; I also use the short name of the lens, because that is all I need to know. Do not forget to turn "Show My Settings Name" on in the "Setup" menu - otherwise this name will not be shown on the display.
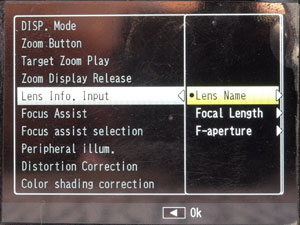
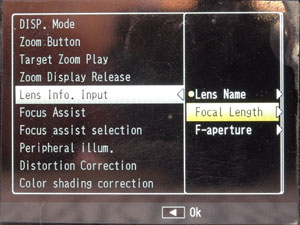
- Lens Info. Input: Information that is recorded in the Exif data
- Lens Name: The name that allows you to identify a lens (I use a short name).
- Focal Length: The lens's focal length (typically, I include it ion the short name). Leave this field empty if you do not need it.
- F-aperture: Here you might store the actual aperture that you use for a shot; that's too much work for me; so I include the may aperture, although that would not be necessary. Leave this field empty if you do not need it.
For details regarding the lens data, see the respective settings screens below.
As already mentioned, you can also correct corner color shift (color shade correction) and distortion (distortion correction) for each lens (= set of settings).
Display of Custom Settings Name
In the "Setup" menu, you can activate that the name of the customs settings sets are displayed:
 |
 |
|
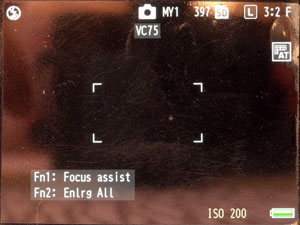
| Option "Show My Setting Name" in the "Setup" menu activate the display of the settings names (see photo to the right) | Settings name, here "VC75", displayed (only for a few seconds, though...) |
Note that the settings name is displayed only for a few seconds after you turn the camera on or turn the mode dial to the respective "MYx" setting.
Recall My Settings
If you stored more than three sets of settings, that is, more than can be directly accessed from the mode dial, you will from time to time need to recall a set and assign it to one of the three "MYx" storage locations. In my specific case, I own nine lenses, and when I mount one of these, I may need to recall the respective set of settings, assign it to an "MYx" location, and then turn the mode dial to this "MYx" option to activate the settings.
To assign a set of settings to an "MYx" location, first press the "MENU/OK" button and select the "Key Custom Options" tab (the second tab).
 |
In the "Key Custom Options", select "Recall My Settings" and move the cursor to the right.
|
|
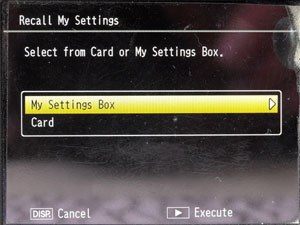
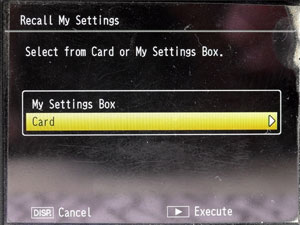
| You can recall the settings from the "My Settings Box" (six locations) or the "Card" (memory card, six locations) and store them in one of the three "MYx" locations. | ||
| My Settings Box: | Card: | |
 |
 |
|
| First, select "My Settings Box" and move the cursor to the right. | First, select "Card" and move the cursor to the right. | |
 |
 |
|
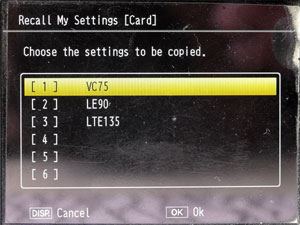
| Next, select the desired "MYx" setting (in this case, it is MY1) and move the cursor to the right again. | Next, select the desired "MYx" setting (in this case, it is MY1) and move the cursor to the right again. | |
 |
 |
|
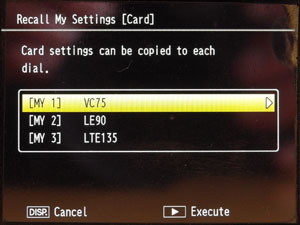
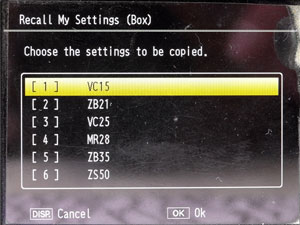
| Then, select one of the six box locations and press "OK". | Then, select one of the available card locations and press "OK". | |
 |
 |
|
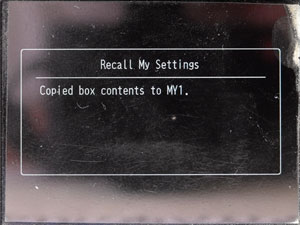
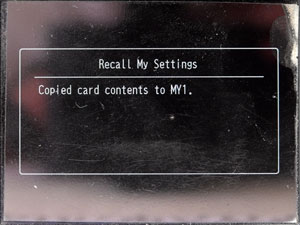
| Finally, you will get a confirmation message that the settings will be recalled from the selected location and copied to the selected "MYx" location (in this case, it is MY1). | ||
There may be many strategies for assigning sets of settings to the 15 locations. In my case, it's all about lenses. I have assigned my six wide to normal lenses to the box modes and the three tele lenses to locations on the memory card. When I go on a shooting tour with less than three lenses, I can assign the respective sets to the MYx locations in beforehand. Otherwise, I will have to recall the sets on the fly. This is a little disturbing, but can be done fairly quickly...
To activate the settings in a "MYx" storage location, turn the mode dial to the respective "MYx" position. Note that applying a set of settings is a completely manual process - if you make an error or forget to set the correct settings the camera will not help you...
Card Settings - Caveats
Usually, I format a card after it is full. This prevents, among others, that directory errors will accumulate and is also much faster than deleting individual images. If, however, sets of settings are stored on a memory card, these are lost after formatting the card. I therefore store the "Card" settings sets (located in folder MYSET on the card) on my computer and copy them back to the card after it was formatted.
Please note that different camera units may use different sets of settings. However, the settings that are stored on a memory card are used by all the units - which may not make much sense. Perhaps it is therefore advisable to use card settings only with the M-mount expansion unit and reserve a memory card of its own for it - I do not think that the other camera units need more than six sets of settings.
What the Exif Data Shows
Since, in order to identify the lens, I am only interested in the lens name, if suffices to inspect the field showing model name of the camera: the lens (short) name is added to the already existing camera name (for example, GXR MOUNT A12_LE90). Moreover, if you add the the focal length and the f-stop to the lens data, these appear also in the respective Exif fields. This allows you to enter the actually used f-stop (and if you want, the manually set distance instead of the focal length). Entering this information for each shot is, however, tedious. Nevertheless, there may be instances in which this feature is useful (for example, when I am testing equipment).
How to Use the Custom Settings (M-Mount Expansion Unit)
When using the M-mount expansion unit, I use the custom settings for recording which lens I used together with the unit. I therefore created nine sets of custom settings, which primarily consist of the lens name (which is also reflected in the names of the settings sets). You can also add the focal lengths of the lenses and the used aperture (or whatever f-stop value you want to record - or just leave this empty).
You can also store settings for distortion correction and color shading correction (four corners) - but I do not use this information up to now. Moreover, instead of doing experiments on one's own, it might be useful to find sources on the Web that already provide such information (Ricohforum, Ricoh forum on dpreview). As soon as I will find such information, I will add it to the Links section below.
Tom Caldwell's Comments on Custom Settings in 2015
In 2015, a new discussion about GXR custom settings arose in the Ricoh forum at dpreview.com. See the respective thread "GXR box settings (for Jim)" for details. In this thread, Tom Caldwell made two longer replies to my postings and explained how he uses the GXR custom settings. He allowed me to cite and adapt his postings here for your information. Here is his comment on using custom settings for storing lens data:
Although I appreciate the benefit of the EXIF for lens type storage, I don't use it for several reasons:
A Proposal...Unfortunately the GXR series was abandoned before the lens database was taken to its logical conclusion which would be to make it a separate lens only database which would be called up at will and changed/edited. I envisaged it popping up to offer the last lens used default or select from a sorted list based on frequency of use. Also an unknown lens feature where a lens is swapped in a hurry and its data can be entered afterwards to images on the card - either as "all" or selectively. But this is a "pipe dream" unless Ricoh resurrects the GXR in mount module format. (Original posting: www.dpreview.com/forums/post/55728814) |
Conclusions
I am just at the beginning of using the custom settings for recording the lens name in the Exif data. Experience will show, whether I will really use this feature. It took me indeed a while to scan the manuals and search the Internet before I understood how it works. Once understood, it is, however, fairly simple.
Up to now, I also did not find it necessary to correct my M-mount lenses for distortion and color shift in the corners.
Note that page M-Mount Lens Settings provides an overview of what you can do for M-mount lenses without going to much into detail on how custom settings are to be used. It may be helpful as a quick guide for you.
Links
- Ricoh: Mounting Check Results for Each Lens
- Lens compatibility list on the Ricohforum
- Ricoh forum in dpreview.com: forums.dpreview.com/forums/forum.asp?forum=1013
- GXR box settings (for Jim): www.dpreview.com/forums/post/55723823
- Ricohforum (Pavel Kudrys): ricohforum.com
For more links related to the Ricoh GXR M-mount expansion unit, see page M-Mount Links.
Appendix: The Settings Screens
Below are the cutsom settings screens for the M-mount expansion unit. Other camera units may have slightly different settings screen depending on their technical characteristics.
|
|
|
| Settings screen 1: Here I set the name for the settings set (short name of the lens) (first item); ISO is set to 200 | Move the cursor to the right to enter the settings name using a small alphanumeric keyboard. | |
 |
 |
|
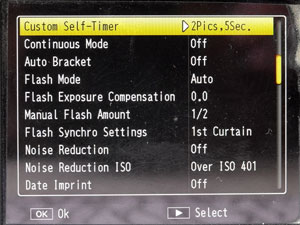
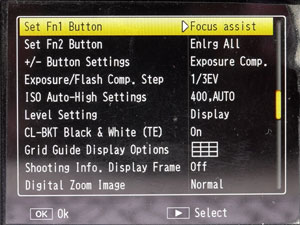
| Settings screen 2: Nothing special here... | Settings screen 3: The first two items assign focus aids to the function buttons Fn1 and Fn2 |
|
 |
 |
|
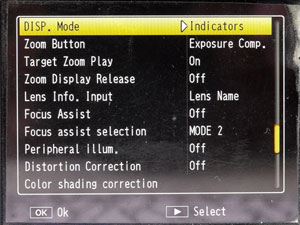
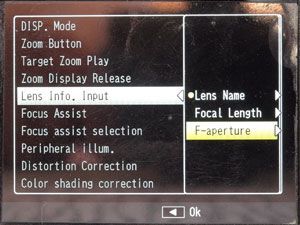
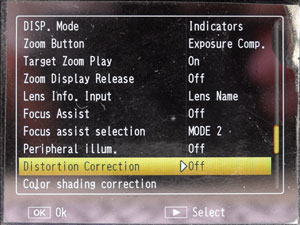
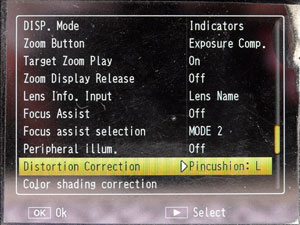
Settings screen 4: Item "Lens Info. Input" allows you to set three lens characteristics, lens name, focal length, and aperture (select this item, move cursor to the right to select and enter the settings). For details on the lens information see below. In addition, I set focus assist to MODE 2 (high pass filter). Also note that I do not use the options to correct distortion and color shading. At the bottom of this screen are the two options for correcting lens characteristics (distortion, color shading). For details on correcting lens characteristics see below. |
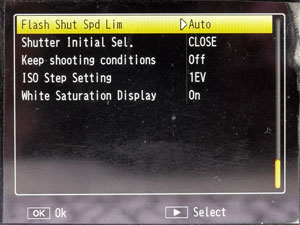
Settings screen 5: Nothing special here... |
Appendix: Setting Lens Data
Below are the options for registering lens data (lens name, focal length, f-stop) for the M-mount expansion unit (Edit My Settings):
 |
||
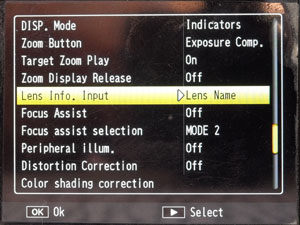
| Settings screen 4: Item "Lens Info. Input" allows you to set three lens characteristics, lens name, focal length, and aperture (select this item, move cursor to the right to select and enter the settings). | ||
|
 |
|
| Lens Name: Move the cursor to the right to enter the lens name | Small alphanumeric keyboard for entering the lens name (the same keyboard is used for entering the settings name). | |
|
 |
|
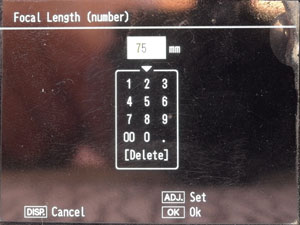
| Focal Length: Move the cursor to the right to enter the focal length of the lens | Small numeric keyboard for entering the focal length of the lens name (the same keyboard is used for entering the F-aperture). | |
 |
 |
|
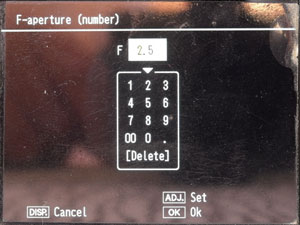
| F-Aperture: Move the cursor to the right to enter the F-aperture | Small numeric keyboard for entering the F-aperture length of the lens name (the same keyboard is used for entering the focal length). | |
Appendix: Correcting Lens Characteristics
The two lens correction functions are available in "Edit My Settings," where they are located on the fourth screen, as well as in the "Shooting" menu (screen three).
Both functions are available in "Edit My Settings": |
||
| Distortion Correction: | Color Shading Correction: | |
 |
 |
|
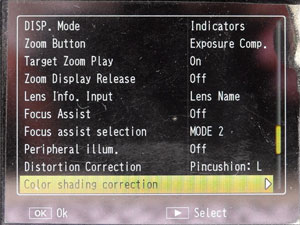
Settings screen 4: Item "Distortion Correction" allows you to minimize distortion, item "Color Shading Correction" to minimize hue shift in all four corners. |
||
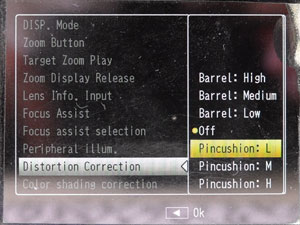 |
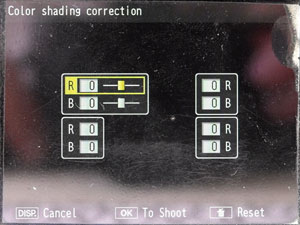 |
|
| Low pincushion correction selected... | For each of the four corners, the R(ed) and B(lue) values can be adapted between -4 and +4 (whatever that means...). | |
 |
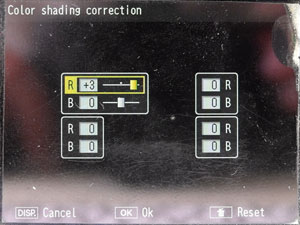 |
|
| ...and shown on the settings screen. | Example: Top left correction for R(ed) | |
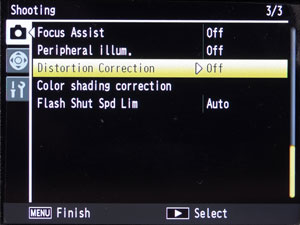
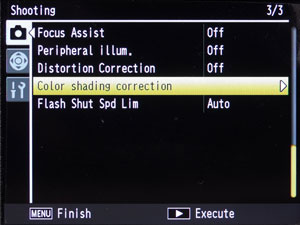
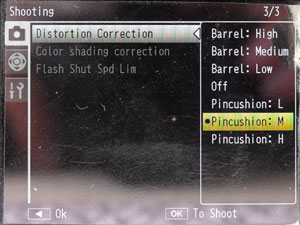
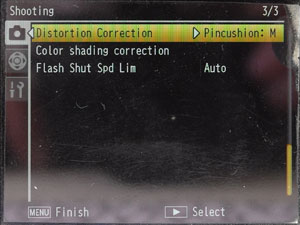
Both functions are also available in the "Shooting" menu: |
||
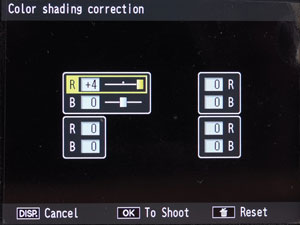
| Distortion Correction: | Color Shading Correction: | |
 |
 |
|
| Move the cursor to the right to enter the lens name to change the correction | Move the cursor to the right to enter the correction screen | |
 |
 |
|
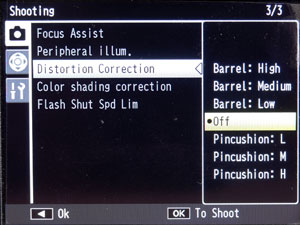
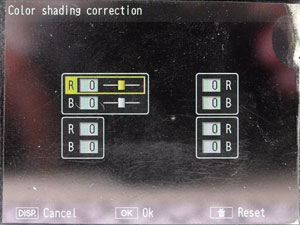
| Distortion correction can be "off" or one of three degrees of barrel or pincushion distortion correction. | For each of the four corners, the R(ed) and B(lue) values can be adapted between -4 and +4 (whatever that means...). | |
 |
 |
|
| Medium pincushion correction selected... | Example: Top left correction for R(ed) | |
 |
||
| ...and shown on the settings screen. | ||
Note: The reason for the variation in the location of the functions on the "Shooting" menu screen is unknown to me...
|
made by |
| 19.11.2020 |