Ricoh GR: Hidden Functions
This page lists some "prominent" hidden functions of the Ricoh GR, as well as some functions that are not so evidently implemented as I would have expected. Note that many functions are only briefly introduced, because they are described elsewhere in more detail.
Note: For an introduction to the topic, please read page Hidden Functions in Digital Cameras.
Hidden GR Functions
This is my personal list of "hidden" GXR functions:
- Target Move, Magnification (Enlargement), and Focus Assist
- Magnifying the Review Image
- Manual Focusing
- Quickly Changing the Snap Focus Distance
- ISO Setting on Adjust Lever
- Full Press Snap
Many of the hidden GR functions are also described elsewhere. In these cases, I provide links to places where the function is presented in more detail. Nevertheless, there may be some overlap between the pages...
Target Move, Magnification (Enlargement), and Focus Assist
On the GR, Ricoh puts these functions, which are separated on the GXR, on one settings screen - plus a detail screen for setting some options. This aggregation makes the functionality harder to find in the menu system - the name "FA/Move Target" appears somewhat cryptic to me and possibly more complex. Personally, I find the way how these features are accessed is by no means intuitive (despite the highly praised "intuitive" Ricoh user interface...), and Tom Caldwell seems to have the same opinion (see the note below).
Note: Tom Caldwell prepared a diagram that can help in understanding the menu structure that is involved in using target move, magnification, and focus assist functionality on the Rich GR. He mentions it in a posting in the Ricoh forum at dpreview: I show a diagram trying to get my head around the focus peaking system on the GR - the menu is not particularly easy or intuitive to follow: ricohforum.com/phpbb/viewtopic.php?f=72&t=10507#p59174
These features are most useful for manual focusing, but may also be helpful when taking macro shots with autofocus (for confirming that the focus is on the correct spot). Ricoh recommends this functionality particularly when the GR is used on a tripod.
Basic Procedure
- Press the "MENU/OK" button
- In the "Shooting" menu, select item "FA/Move Target" and press the "right" (Flash) button.
- You will see the following screen:
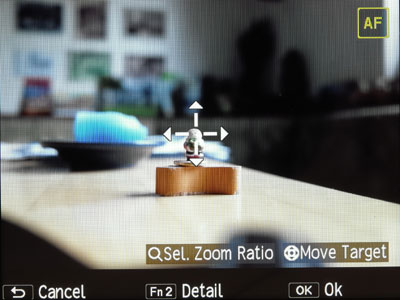
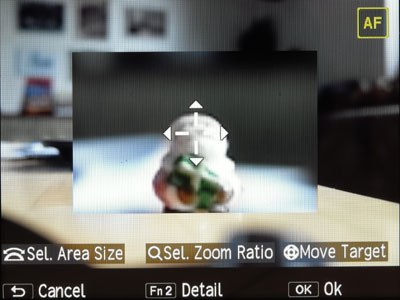
On this screen, you have quite a number of options for:- Selecting the size of the magnified area using the up-down dial (provided that a magnification is set as shown in the right figure)
- Selecting the zoom ratio (= magnification ratio: 2x, 4x, 8x) using the zoom lever
- Moving the target indicator and the magnified section (if there is one) jointly across the screen using the direction buttons on the directional pad.
- The following buttons can be used:
- DISP (Cancel) cancels the position or returns you to the menu screen
- OK returns you to the shooting screen (as does pressing the shutter release button)
- Fn2 leads you to a screen (called "Move Target/Focus Assist Setting") with detailed settings.
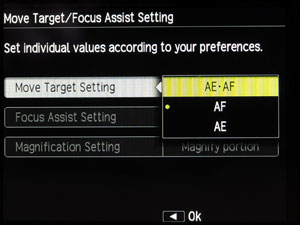
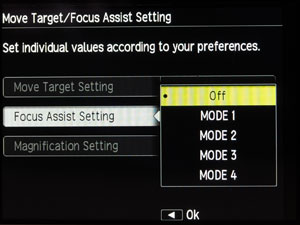
Button Fn2 leads you to the "Detail" screen, also called "Move Target/Focus Assist Setting" screen:
 |
 |
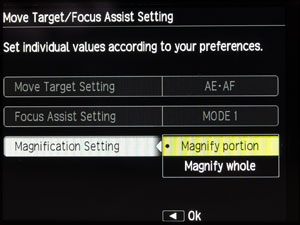 |
Figures: The "Detail" or "Move Target/Focus Assist Setting" screen
Here you can do the following:
- Determine whether focus, exposure or both will be set based on the target indicator's position (Move Target Setting): AF, AE or both (Figure left)
- Set the focus assist mode (Focus Assist Setting): Off, MODE 1, MODE 2, MODE 3, MODE 4 (Figure center)
- Set whether the magnified section is shown fullscreen or as a portion of the screen (Magnification Setting): Magnify portion, Magnify whole (Figure right)
See page Manual Focusing and Focusing Support for details on this functionality.
Magnifying the Review Image
In review mode, the image can be magnified up to 16 times using the zoom in button (alternatively, you can rotate the up-down dial next to the shutter-release button). The buttons of the directional pad can be used to pan the image not only in four, but in eight directions. Pressing the MENU/OK button (or the Adjust lever button) resets the view to the complete image; the zoom out button allows you to decrease image size.
These are the things that I knew all the time. However, I did not know for a long time that pressing the adjust lever instantly magnifies the view to a certain size (4x, 8x, 16x), which can be defined in the menu: Setup -> One Press Zoom Ratio. It is also possible to use the MENU/OK button for this as long the image has already been magnified, otherwise this button resets size as mentioned above.
There are so many other options for the review of images, that I have to refer you to the manual. The basic issue with all these options is, however, that they are hard to remember.
Manual Focusing
Like the Ricoh GR P10, S10, and A16 camera units, the Ricoh GR have to be focused manually in a cumbersome way and a way that I tend to forget because it is not obvious:
- While pressing the macro button on the directional pad (that is, the up button), rotate the up-down dial to focus (manual p. 65).
Of course, manual focus (MF) has to be selected first.
This procedure drives me crazy because most often, the button looses contact and the distance does not change.
Quickly Changing the Snap Focus Distance
There are several approaches to changing the snap focus distance: You can select the snap focus distance in the menu: Shooting > Snap Focus Distance (default: 2.5 m). You can also delegate setting the snap distance to an Adj. menu position or a function button. Then there is also a "fast track" to selecting the snap focus distance that is not obvious (like manual focusing).
- While pressing the macro button on the directional pad (that is, the up button), rotate the up-down dial to focus (manual p. 65).
Of course, snap focus has to be selected first. Note that a white triangle has to appear in front of the snap focus distance and that macro mode has to be off.
This procedure drives me crazy because most often, the button looses contact and the triangle goes away so that I cannot change the distance.
ISO Setting on Adjust Lever
On the GR, just like later on the GXR, the adjust lever can be used to change the ISO setting. This function can be enabled or disabled in the menu: Key Custom Options > ADJ. Direct ISO Control. If this function is set to ON, in situations where shooting is possible, moving the ADJ. lever right/left changes the ISO sensitivity.
As a result, I removed the ISO setting from the "Adjust lever" menu and added another setting to it, instead.
Full Press Snap
Full press snap allows users to press the shutter button in one motion when Multi AF or Spot AF is selected as focus mode and thus, to overrule AF. It switches the mode to snap focus at a preselected distance. This functionality is intended as a means not to miss a shot due to slow autofocus.The default distance of 2.5 m is useful for street photography and many indoor situations. However, it is less useful for landscape shots.
Note that full press snap is enabled (ON) by default (indicated by an undocumented "FS" in the viewfinder/LCD screen). It can be disabled or enabled in the menu: Shooting > Full Press Snap (default: ON). Snap focus distance can be set in the menu: Settings > Snap Focus Distance (default: 2.5m).
Since snap focus is "on" by default, it can puzzle users who do not know of the existence of this feature and get fuzzy images because they pressed the shutter-release button too fast - as was the case for me. I therefore decided to disable it. I discuss this issue on pages Specialties and Pitfalls of Full Press Snap.
Not-So-Evident GR Functions
In preparation...
| 03.04.2019 |