Astronomy | GXR · GR · RX100 M1 · RX100 M4 · RX10 M3/4 · TZ202 · X Vario · M240 · General | Photos | Conf. Places | Calendars | Art
Leica X Vario and Leica M (Typ 240): Functional Consistency Comparison
Introduction | Overall Appearance | "Menu" Buttons | Direction Pad, Setting Dial (Thumb Wheel) | Example: The ISO Button | Example: The SET Buttons... | ... | Pressing a Button while Pressing Another One, Turning a Wheel, etc. | Manual Focus, Screen Magnification, and Focus Assist | Bracketing | Summary and Conclusions: Handling
Archive
On this page, I would like to investigate how consistent the handling is across the Leica cameras M (Typ 240) and X Vario. I first owned the X Vario. Two years later, I purchased a used M (Typ 240) and admittedly struggled in a number of situations with the M because I had been exposed to the X Vario before. Other Leica users may have made similar experiences, buying one or the other first, and then adding the second to it or replacing the first with it.
As a usability professional at SAP for more than 20 years, I have learned that consistency is one of the basic and "holy" usability principles. It helps users/photographers to transfer knowledge that they acquired for one device to another one, in my case from the X Vario to the M (Typ 240) (and maybe vice versa...). Since I struggled sometimes, I decided to look more systematically at how consistent the handling and control layout is across both cameras, and into what problems a user might run who uses both cameras.
Both cameras are not only manufactured by the same company, that is, Leica, they were also released in close succession (the X Vario appeared a little bit later and was announced by Leica as a "Mini M"). But they are, of course, very different cameras that address different types of photographers. Thus, when doing this comparison, I am well aware of the fact that both cameras differ in many respects and that, of course, there must therefore be some inconsistencies between them. Thus, I am looking primarily at inconsistencies that I find unnecessary and can make life harder for users/photographers. Moreover, assembling this page will help me to become more familiar the cameras (and their manuals).
Note: I will not take other M and X Models (which I do not know...) into account here, just my situation: Coming from a Leica X Vario to an M (Typ 240), or vice versa.
A comparison of the technical data of both cameras can be found here. Comparisons of further characteristics can be found here.
Introduction
Let me start this page with some general experiences. During my life as a usability professional I often made the experience that other people know better, because they are the users, have made their experiences with various devices, and so on. Usually, I then stop talking or writing (in forums) and let the others go ahead.
For example, I had a lively discussion with a professional photographer about enabling the famous Ricoh "snap function" (MF with a pre-selection of fixed distances, such as 1 m, 2.5 m, 5 m, and infinity). This is a nice function, particularly for street shooters. My problem was, however, that there is also an AF override function, which sets the camera to the pre-selected snap distance (typically 2.5 m) if you press the shutter release button down quickly. I did not know of this function (because "I did not know my camera," as the photographer blamed me...) and therefore took quite a few fuzzy photos that were sharp only in the foreground. I was puzzled by these results and did not have the slightest idea what had happened. When consulting the forum, I learned about the AF override function and I also learned that it was enabled by default. Thus, people like me, who do not know of the AF override function may run into such an issue. From what I knew from my usability practice, I maintained that the AF override function should be disabled by default so that dummies do not run into trouble. The photographer, however, insisted on the current solution, namely that the function is enabled by default - he had even recommended Ricoh to implement the functionality this way. All in all, for usability professionals the principle of "safe defaults" is to be obeyed, for others the opposite is true so that they can shoot faster. Actually, the latter is not really true. People who know of this function just need one step to enable it, thereafter they are "done" forever.
This example is not the only case when I had a hard time as a usability person, but it is one that I will probably never forget... Probably, some people will agree with the photographer and also contradict to some or all of my findings below, or may argue that an inconsistency that I found is there, because it was that way on the X1, X2 or some M models. The latter may be true, but I would argue that in such a case, the damage has already happened earlier...
Overall Appearance
The following comparisons photos are meant to provide an overview of the camera controls so that they can be discussed and compared. That is, they set the stage (you might consult the manuals as well...) for the investigation and discussion that follows further down: I will compare how these controls work and have to be handled and, based on the results, discuss the consistency between both cameras.
Please note that the same controls often have different names on both cameras. I therefore take the liberty, to sometimes use even a third name (as I am used from my past experience with cameras).
Front View
 |
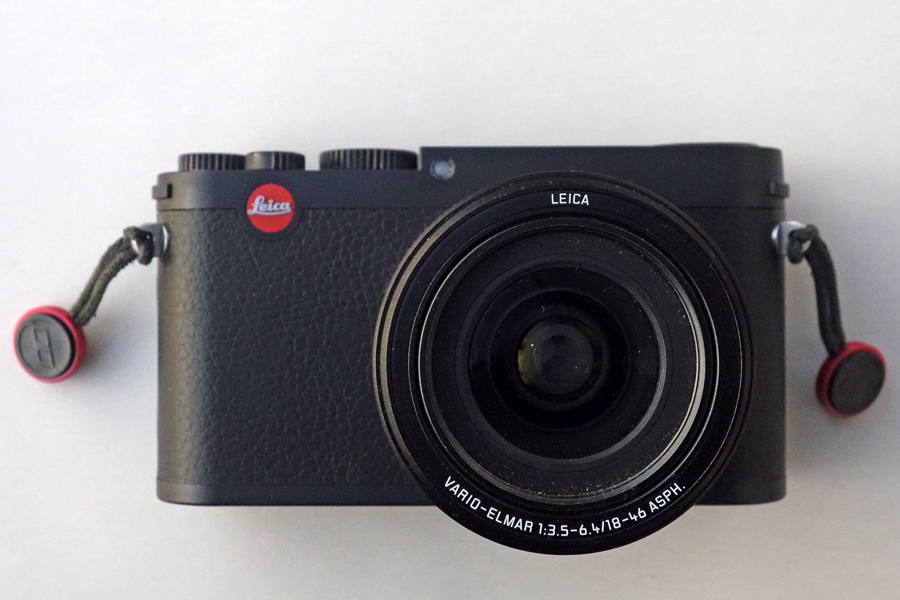 |
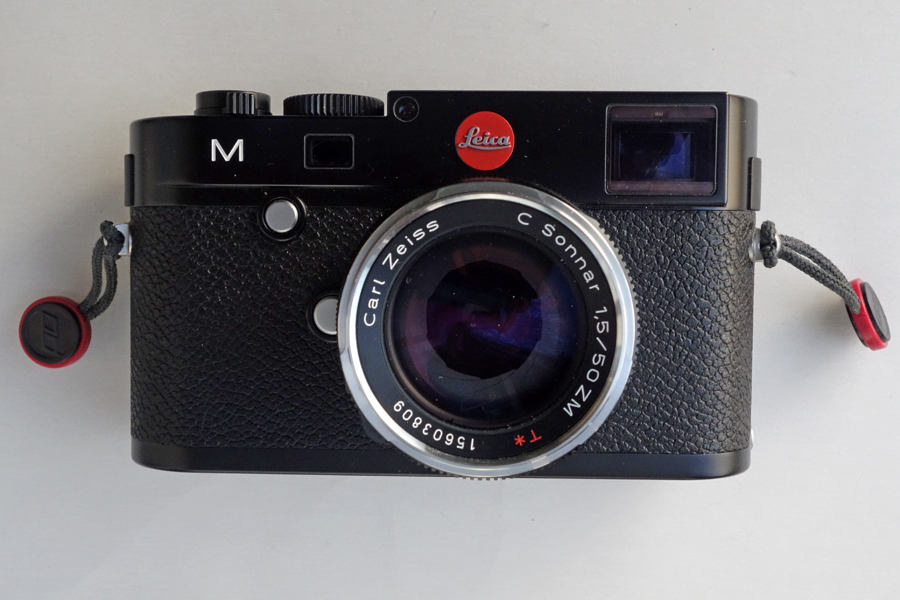
Photos: Front view of Leica M (Typ 240) body with Zeiss 50mm f/1.5 lens (left) versus Leica X Vario (right)
The M (Typ 240) has two buttons on the front side, one close to the lens for exchanging lenses (which is, of course, missing on the X Vario because it has a fixed lens) and another one, called focusing button (I will often say just focus button), for initiating manual focus aid (screen magnification); it can also be used for exposure correction (this was mandatory before firmware update 2.1.0.5). The X Vario's focus button is on the back of the camera (see Rear View).
Rear View
 |
 |
Photos: Rear view of Leica M (Typ 240) body (left) versus Leica X Vario (right)
Both camera offer a number of function buttons next to the left edge of the LCD display, a thumb wheel (called setting dial) with a thumb's rest at the upper right of the camera, and a direction pad on the right side of the camera, albeit in different positions. The Leica M (Typ 240) also has a rangefinder window at the top left, where the X Vario offers a button for releasing the flash (called Flash release slider; the M does not have a flash). Both cameras have a socket for the electronic viewfinder (EVF) below the flash hot shoe. The M also offers a brightness sensor for the monitor.
There a fine, but perhaps important difference in the engraved Leica label: On the it reads "LEICA CAMERA - MADE IN GERMANY," on the X Vario just "LEICA CAMERA - GERMANY."
I discuss the functionality associated with the controls further below.
Top View
 |
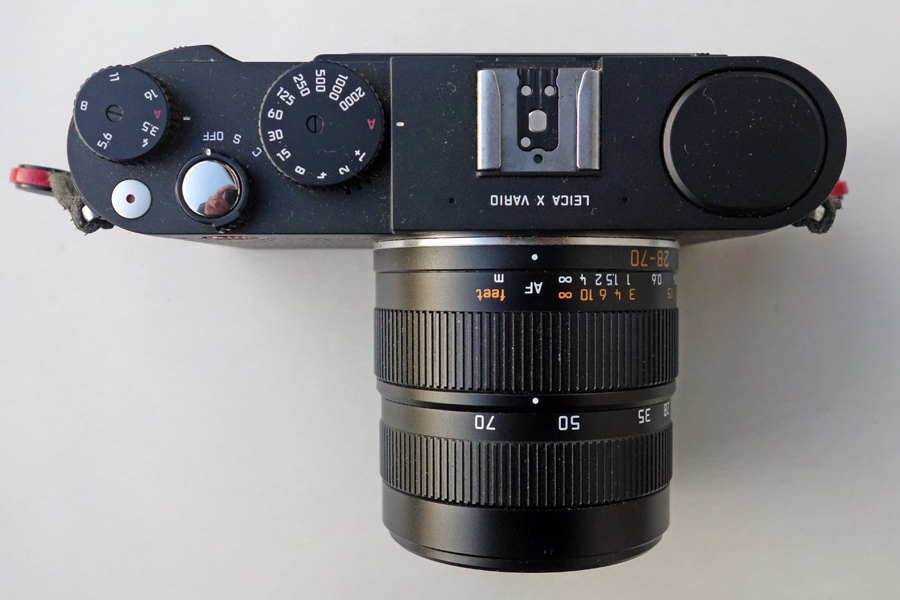 |
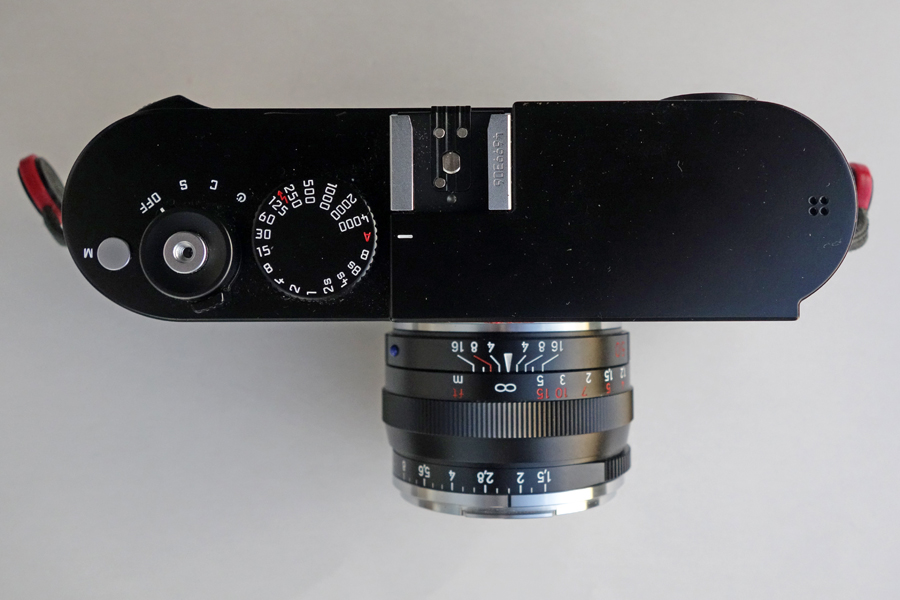
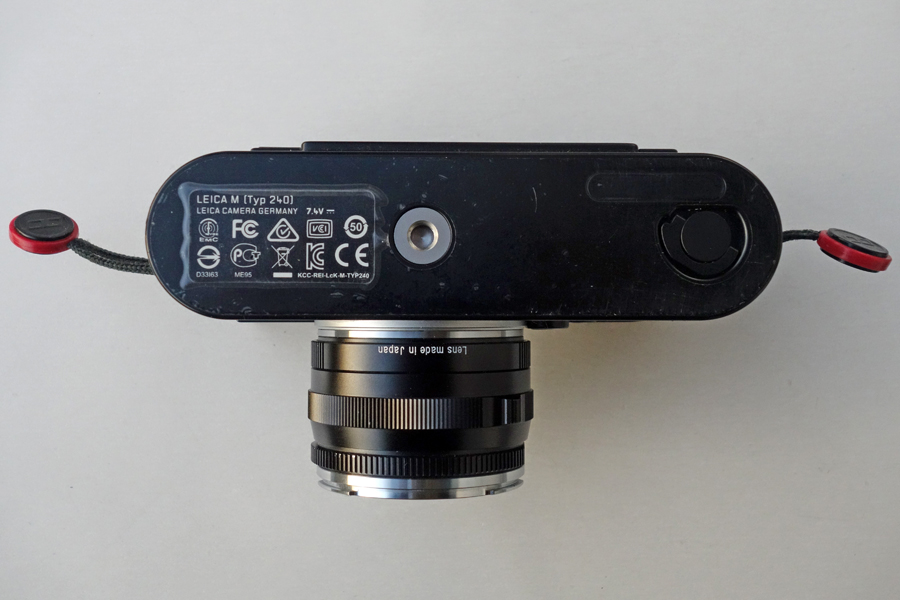
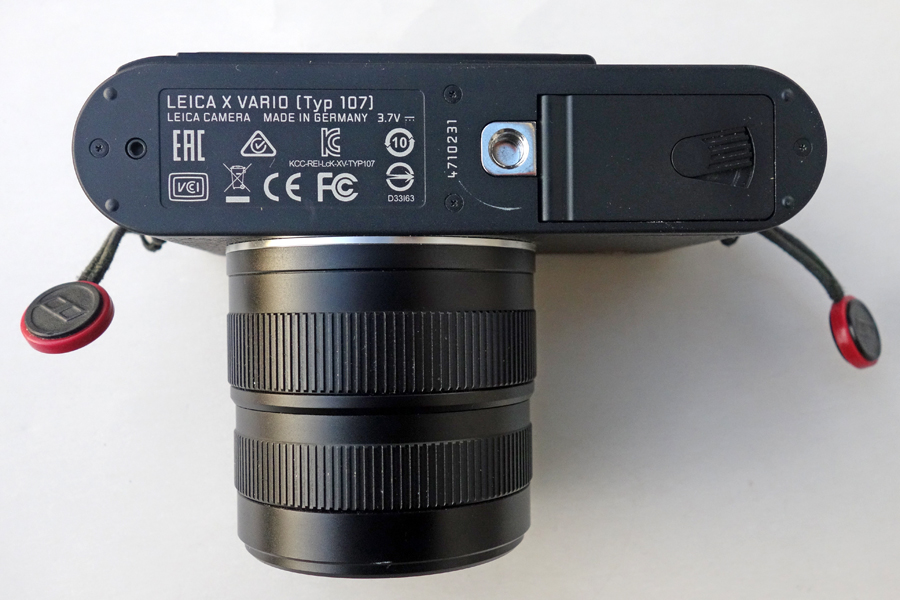
Photos: Top view of Leica M (Typ 240) body with Zeiss 50mm f/1.5 lens (left) versus Leica X Vario (right)
Both cameras offer a shutter speed dial, a main switch (in which the M includes the self-timer - on the X Vario, it is found on the direction pad), a movie button (called video shutter button or release), and a flash hot shoe (the M's hot show is not exactly located above the lens). The X Vario also has a built in flash in a place, where the rangefinder resides on the M (Typ 240).
I discuss the functionality associated with the controls further below.
Bottom View
 |
 |
|
 |
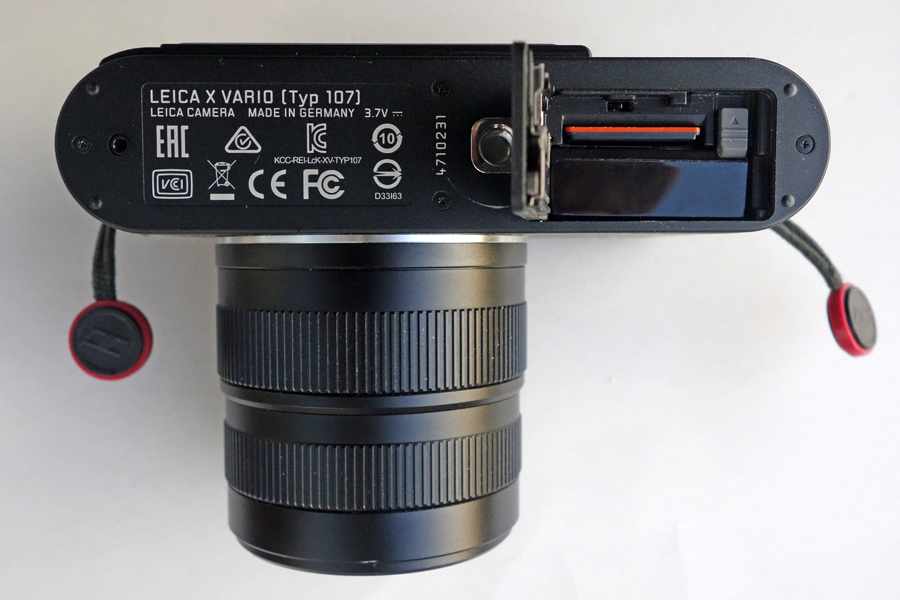 |
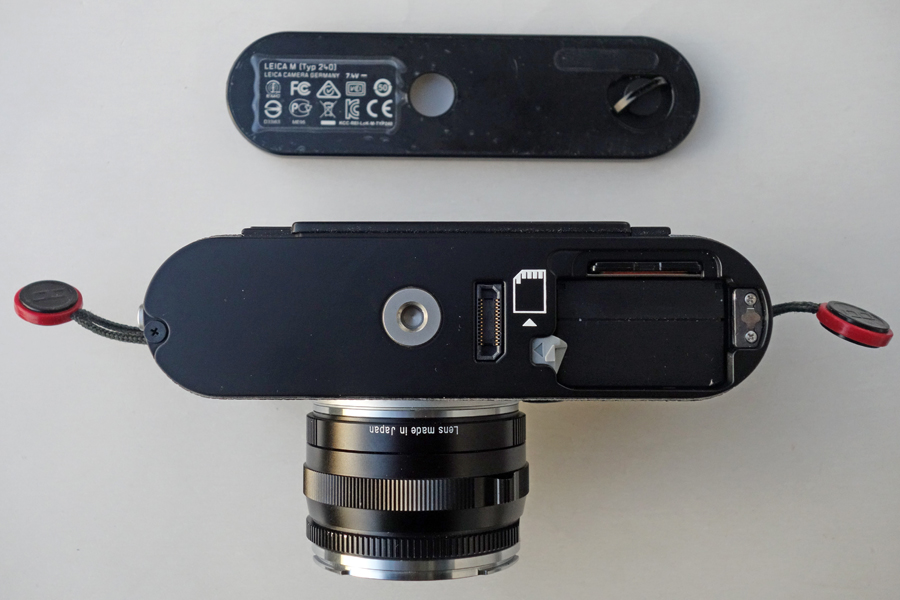
Photos: Bottom view of Leica M (Typ 240) body with Zeiss 50mm f/1.5 lens (left) versus Leica X Vario (right)
Both camera offer a tripod mount on the bottom, but the X Vario's is off-axis. The X Vario has a compartment for battery and SD-Card, whereas on the M you have to remove a metal bottom plate (called bottom cover) to get access to both. This is due to the optional multifunction handgrip that can be mounted at the bottom.
What is not quite easily to see on the photos (bottom row): The SD-cards are mounted in different orientations in both cameras.
I discuss the functionality associated with the controls further below.
"Menu" Buttons
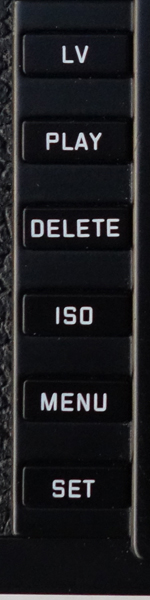
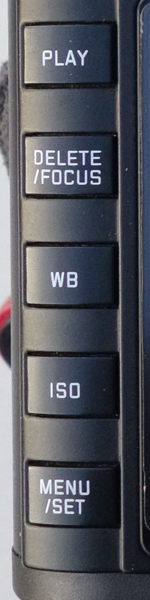
Here is an overview of the "menu" buttons at the left edge on the LCD on the back of the camera (see Rear View for photos).
| Button | Functions on Leica M (Typ 240) |
Comment | Functions on Leica X Vario |
Comment | |||
| M (Typ 240)
X Vario
|
LV | Turns on/off live view mode | On LCD screen or optional electronic viewfinder | n.a. | The X Vario is always in live view mode | ||
| PLAY | Opens and exits the (continuous) review screen | Pressing PLAY again or half-pressing the shutter release button cancels the review | Opens the (continuous) review screen | Half-pressing the shutter release button cancels the review | |||
| DELETE
DELETE/ |
Deletes images (Play mode) | The M's focus button sits on the front of the camera (main use: initiate manual focus aid = screen magnification) | Deletes images (Play mode)
Focus button (Record mode) |
Focus button:
|
|||
| WB | n.a. | White balance can be set using the SET button (as one of eight options), see below | Sets the white balance | Has to be pressed only briefly; also sets the value | |||
| ISO | Sets ISO sensitivity | Has to be pressed permanently; the ISO screen disappears 2 s after the button was released (the value is set immediately, however) | Sets ISO sensitivity | Has to be pressed only briefly; also sets the ISO value | |||
| MENU
MENU/ |
Calls and closes the menu screen (incl. submenus) | Calls and closes the menu screen (incl.
submenus)
Applies the selected menu option |
Calls and closes the menu screen
Applies the selected menu option and returns to the main menu (INFO on the direction pad does the same*) |
||||
| SET | SET button:
|
*Picture parameters menu
**You can also use the INFO button or the right arrow button on the direction pad ***INFO on the direction pad does the same | n.a. | There is no picture parameters menu on the X Vario
The SET functionality is taken over by the MENU/SET and INFO* buttons |
*) Since firmware update 1.1.
Leica M (Typ 240) and Leica X Vario: Menu options can be cancelled by half-pressing the shutter release button
Direction Pad, Setting Dial (Thumb Wheel)
Here is an overview of the direction pad buttons and the setting dial/thumb wheel on the back of the camera (see Rear View for photos).
M (Typ 240) |
X Vario |
|
 |
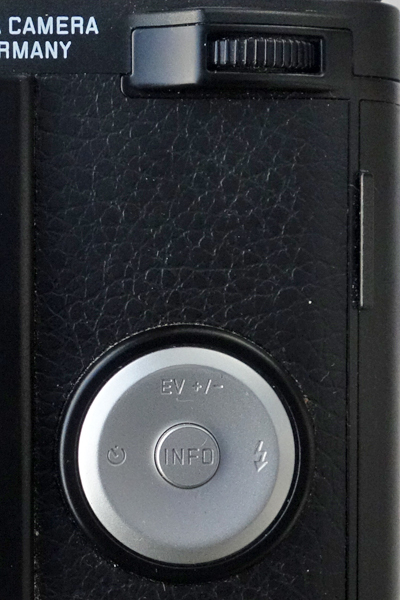 |
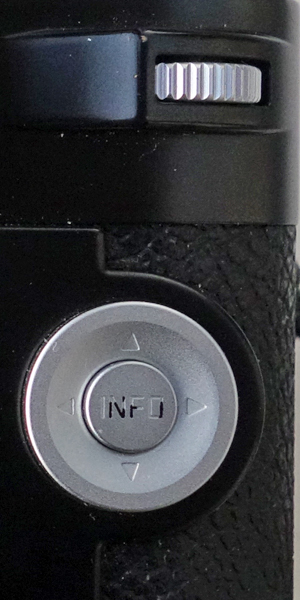
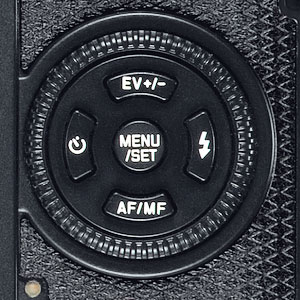
Photos: Direction pad and setting dials (thumb wheel) at the rear of the Leica M (Typ 240) (left) and the Leica X Vario (right)
| Button/Control | Functions on Leica M (Typ 240) |
Comment | Symbols X Vario |
Functions on Leica X Vario |
Comment |
| Direction Pad | The direction pad is used for
|
*The X Vario manual calls this: Scrolling through menus and submenus
See the button descriptions below for details |
Direction Pad | The direction pad is used for
|
See the button descriptions below for details |
| INFO* | The INFO button is used for
|
*INFO: Toggles
between different screen modes in picture and play mode
**This function duplicates the SET button |
INFO* | The INFO button is used for
|
*INFO: Toggles between different screen modes in picture and play mode |
| Up* (with direction triangle) |
The up button is used for
|
*Select the relevant function option /
value, either using the setting dial or by pressing the corresponding
direction on the direction pad, i.e.
|
EV +/- * | Exposure compensation
The up button is also used for
|
Menu use: You can also use the thumb wheel (setting dial) |
| Down* (with direction triangle) |
The down button is used for
|
*Select the relevant function option /
value, either using the setting dial or by pressing the corresponding
direction on the direction pad, i.e.
|
none | The down button is used for
|
You can also use the thumb wheel (setting dial) |
| Left* (with direction triangle) |
Menu use (press left/right
for settings within a line or on a scale)*
The left button is also used for
|
*Select the relevant function option /
value, either using the setting dial or by pressing the corresponding
direction on the direction pad, i.e.
|
Selftimer* | Opening / making settings in the self timer
menu / exiting menus and submenus without saving the menu settings
(Selftimer)
The left/Selftimer button is also used for
|
On the M (Typ 240), the selftimer button is on the main switch |
| Right* (with direction triangle) |
Menu use (press left/right for
settings within a line or on a scale)* The right button is also used for
|
*Select the relevant function option /
value, either using the setting dial or by pressing the corresponding
direction on the direction pad, i.e.
**You can select the relevant submenus with the SET button, the INFO button, or by pressing right on the direction pad. |
Flash* | Flash: Opening / making settings in the flash
mode menu / opening submenus (Flash) The right/Flash button is also used for
|
There is no flash on the M (Typ 240) |
| Setting Dial | The setting dial is used for:
|
*The X Vario
manual calls this: Scrolling through menus and submenus
**Select the relevant function option / value, either using the setting dial or by pressing the corresponding direction on the direction pad. ***Direct exposure compensation activated*** or while pressing the focus button |
Thumb Wheel (Setting Dial) |
The thumb wheel is used for
|
*1 second and longer
**Added by me (somewhat redundant with the "scrolling" item) ***Exposure compensation: In P mode, up (EV +/-) has to be pressed briefly, before the value can be selected in P mode (in A and T mode not needed; not available in M mode); further presses lead to bracketing and flash exposure compensation ???In the manual there is also the item "Manual distance setting." It seems to be a leftover from the X1/X2 manuals; at least, I cannot confirm this. |
*) On the direction pad
**) Since firmware update 1.1.
***) Since firmware update 2.1.0.5.
Comments
I went nearly crazy when preparing this table and I do no longer feel any obligation for having everything correct. Both manual differ with respect to some terms for the same thing, information is cluttered over the manuals, sometimes misleading, and my own checks may be incomplete, because I forgot something to consider. It would have been a good idea, if Leica would have prepared such a table for all of their cameras to ensure more consistency, particularly regarding the terms/language that they use in the manuals.
Overall, both cameras may be more consistent in their handling than I had originally expected, but it took me a lot of work to find this out. In addition, the firmware upgrades to both cameras also improved a lot with respect to handling and consistency. Nevertheless, I will cover some puzzling aspects in the following (in due course...).
Example: The ISO Button
When I used my Leica M (Typ 240) on the very first day, I had not even read the manual, because we were in a hurry. The ISO value is one of the things that I change fairly often. So I tried it and just did the same as I was used from my X Vario: I briefly pressed the ISO button and pressed the up/down arrows on the direction pad to change the ISO value. But I was out of luck: It seemed that just when I press an arrow key, the ISO screen disappeared and nothing was changed. What was going wrong here?
See Rear View for photos.
First, I learned from the manual (p. 176) that I have to press the ISO button all the time, when I want to change the ISO value. If I release the button, the ISO screen goes away after 2 seconds. This was probably about the time, when I started to press the arrow keys, so that I wrongly assumed that pressing the arrow keys would make the ISO screen disappear. Secondly, I learned that I have to press the setting dial to select the ISO value. This is the same as on the X Vario, but I usually use the arrow keys there. And finally, I had to learn that while you have to press the up and down arrow keys on the X Vario, it is the left and right arrow keys on my M (Typ 240). Note that this in contrast to what the manual states, namely up and down. Oh my God, what has happened to my camera? Hopefully, I will find out one day...
All in all, consistency mixed with inconsistency is probably the most effective way to puzzle your users...
Example: The SET and INFO Buttons...
The SET and INFO buttons are another example of where Leica strayed between consistency and inconsistency, and I do not know why. I assume this happened to be consistens with the older X models and the new Leica M (240), which is not achievable, because the differences are too large. In the end, after firmware update 1.1 for the Leica X Vario, a state has been reached that I can live with...
Firstly, Leica exchanged the positions of the MENU/SET button and the INFO button with respect to older Leica X models (see right figure below), probably to make the button layout look more "M-like" (the X Vario was announced as a "Mini M"...):
M (Typ 240) |
X Vario |
M (Typ 240) | X Vario | |||||
|
|
|
 |
|
Figures: Direction pad with INFO button (left) and further buttons, including the SET or MENU/SET button (center) at the rear of the Leica M (Typ 240) and the Leica X Vario; Leica X2 direction pad in black with white labels - and with a function in the "down" position (right)
As a result, while most cameras on the market use the center button of the direction pad for confirming menu selections, this was no longer the case on the X Vario: Now you had to press the MENU/SET button for this (which confused me a lot...). Luckily, with firmware update 1.1, Leica extended the functionality of the INFO button on the Leica X Vario so that it can also be used for confirming menu settings, as is the case on the Leica M (Typ 240). The latter seems that have offered this "extension" to the INFO button from the very beginning (and it is the older model!).
Secondly, the X Vario lacks the Leica M's SET menu, called Picture parameters menu by Leica, which can be regarded as a kind of "quick menu" for important photographic functions. So they "united" the MENU and SET buttons in one button, the MENU/SET button. Obviously, this has a tradition on X models. But I wouldn't mind to find such a menu on the Leica X Vario as well, and if it were user configurable, this would be even better, not to say GREAT! A user configurable SET menu would, of course, also be great on the Leica M...
In the end, all this remains somwhat confusing... Therefore, and for your convenience, I have put together the functionality of the INFO, MENU, SET and MENU/SET buttons in one table (essentially it is the same information as above):
*) Since firmware update 1.1.
Pressing a Button while Pressing Another One, Turning a Wheel or Ring, etc.
I often find that I myself or other camera users inadvertently press buttons, turn wheels, or do other things to their camera - and typically only realize this, when it is too late: one or more shots are already ruined. This mishap can happen anytime, anywhere: when the camera is in the bag, when you put it into the bag or get it out of it, when you hold the camera, grab it, and so on...
It looks as if there were no easy cure for this problem. Nevertheless, there are some attempts to make changing camera settings more difficult: by making dials harder to turn, adding a lock to a dial (on my Ricoh GR the lock can be pressed so easily that it does not help...), or requiring an accompanying, second button press, either temporarily or permanently. The result of this can be that a function is indeed hard to invoke inadvertently now, but also when you want to invoke it.
It looks, that the M originally was conceived to have more functions that require two buttons or a button and a wheel or ring to be invoked. I found at least one such function really hard to use, namely direct exposure compensation - and obviously many other users as well. Fortunately, Leica extended the handling of the function in a firmware update (2.1.0.5). Now, it can be invoked by just turning the setting dial (the old variant where you have to press the focus button is still available). When I read a review of the Leica M (Type 240), however, I learned that this function is only for people coming from other camera brands so that they are used to it. A "real" Leica M user does not need this function...
The ISO button is another example in this vein: To change the ISO value, you have to press the ISO button all the time, while you turn the setting dial to select the ISO value. As I showed above, the X Vario, and most other cameras, do this differently (after briefly pressing the ISO button, a screen appears on which you can select the ISO value using direction buttons or the setting dial). I would concede that there is no "better" solution per se, only that the M's variant is "unusual."
Manual Focus, Screen Magnification and Focus Assist
Since manual focusing is a topic, where you can write a lot, I devoted a page of its own to it: Leica M (Typ 240) and Leica X Vario: Manual Focus Comparisons. Here, I just present my conclusions on this topic.
Conclusions
Focusing manually with the Leica M (Typ 240) is much easier and more joy than with the Leica X Vario. The magnified section can be displayed permanently, so that it does not go away too soon, and the image quality of the magnified section (shown full-screen) is much better on the Leica M (Typ 240). Moreover, the M also adds focus peaking as a bonus... The only thing that annoys me at the moment, is the focus button, which often needs several presses before it reacts... I am unsure whether this is the fault of my sample or of the camera in general. But it seems that I have become better at this, in the meantime...
On the Leica X Vario, the short period of time that the magnified section is displayed is completely insufficient and annoying. The quality of the magnified section is also insufficient. Therefore, I prefer to focus manually without screen magnification on the X Vario. The X Vario also lacks focus peaking.
Bracketing
Both cameras offer an exposure bracketing functionality, but the M (Typ 240) offers more setting options than the X Vario. I have not used this functionality on either camera, and therefore cannot comment on it.
Summary and Conclusions: Handling
There are probably a minority of Leica users who own both the Leica X Vario (which was my first Leica) and the Leica M (Type 240) (which came next). Therefore, the inconsistencies that I described above may only annoy a few Leica users. Nevertheless, many of the confusions could have been avoided with a little more care for usability from the side of the Leica engineers...
All in all, I find the Leica M (Typ 240) the camera that is easier to handle, because it is simpler than the X Vario in some respects (or more old-fashioned). But both cameras are, in my opinion, much simpler to handle than some high-tec cameras from the competition...
|
made by |
| 03.04.2019 |